
樣式
樣式 Dart 後端框架

- 星標
- 7
- 分支
- 1
- 最近推送(UTC)
- 2023年10月15日
- 專案狀態
- 未封存
原始 README
以下為英文專案原文快照,最新內容請造訪 GitHub。
style_dart
Style dart is a backend framework written in Flutter coding style.


You can see our main motivation, purpose and what it looks like in general with this article. Documentation and website will be developed soon.
Get Started
1 ) Create a dart simple-command-line application
2 ) Add dependency
style_dart: latest
3 ) Create a server
Similar to Flutter, "everything is a component" structure used in Style.
The runService(MyComponent()) method runs a style application.
Define a Component
There is a component to create a simple server : Server
It is the equivalent of "MaterialApp" or "CupertinoApp" in Flutter.
Server is a ServiceOwner. ServiceOwner holds states, cron jobs and component tree.
Not Implemented yet but components such as MicroService and ServiceServer(It will be used to share services such as
Logger between Servers/Microservices.) are ServiceOwner.
Server receive and hold main gateway(children) , default services(like httpService) , root
endpoint (rootEndpoint) , exception endpoints and etc.
Now let's create a simple http server:
class MyServer extends StatelessComponent {
  const MyServer({Key? key}) : super(key: key);

  @override
  Component build(BuildContext context) {
    return Server(

      /// default localhost:80
        httpService: DefaultHttpServiceHandler(
            host: "localhost",
            port: 8080
        ),
        children: [
          // main gateway
        ]);
  }
}
Run Server
void main() {
  runService(MyServer());
}
Now, server is ready from localhost but we have to define endpoints.
4 ) Create a Endpoint
Endpoints create functions where client requests are fulfilled.
"Endpoint" is a component. It can be put in Component parameters. But all ends in the component tree must end with Endpoint and Endpoints do not have child/children.
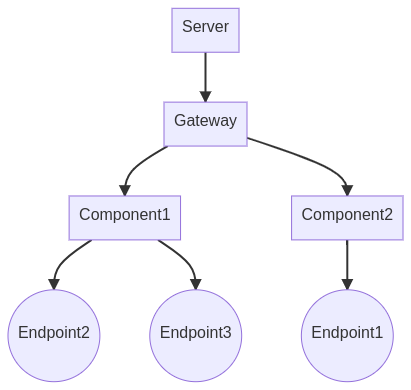
Boxes are Component, circles are Endpoint.
Now let's create an Endpoint that response with "Hello World!".
class HelloEndpoint extends Endpoint {

  @override
  FutureOr<Object> onCall(Request request) {
    return "Hello World!";
  }
}
4 ) Put endpoints on routes
The main Gateway that handles requests is the Server's children value.
There must be a Route between all Endpoint in the component tree and the Gateway above them.
Otherwise, you will get an error while the server is being built.
Now let's place the Endpoint to respond to the "http://localhost/hello" request.
class MyServer extends StatelessComponent {
  const MyServer({Key? key}) : super(key: key);

  @override
  Component build(BuildContext context) {
    return Server(
        httpService: DefaultHttpServiceHandler(
            host: "localhost",
            port: 8080
        ),
        children: [
          Route("hello", root: HelloEndpoint())
        ]);
  }
}
Route takes a root and a child.
root handles requests ending with the entered path segment.
In this example HelloEndpoint handles request "http://localhost/hello"
If we want to process "hello/*" and its sub-routes, the child parameter must be defined.
Also, if we want to handle "hello/*" and its sub-routes with HelloEndpoint, handleUnknownAsRoot must be true.
Request
Now start server with dart run or your IDE's run command.
And call "http://localhost/hello" .
5 ) Add Middleware(Gate)
I named the Component, which creates functions to be used as middleware, Gate.
Gate's onRequest function works with a request and waits for a request or response.
If the return value is Request, the request continues. It can be used to manipulate the content of requests.
If the return value is a Response, the response is sent to the client.
Also, if you want to send an error message, the exceptions thrown in this function are handled by the
context's ExceptionWrapper.
Gate in the example only works for "host/api/users/*"
The second gate in the example, AuthFilterGate, which is a Gate implementation, optionally only accepts auth users.
Since Style has a modular structure, it will have many ready-made Components that the developers will contribute.
The following example also has Gateway and argument path segment ("name") usage example.
class MyServer extends StatelessComponent {
  const MyServer({Key? key}) : super(key: key);

  @override
  Component build(BuildContext context) {
    return Server(
        children: [

          // host/api/
          Route(
              "api",
              child: Gateway(
                  children: [

                    /// GATE IS HERE :)
                    Gate(
                      onRequest: (request) {
                        // DO SOMETHING
                        return request; // return Request or Response
                      },
                      // host/api/users/
                      child: Route("users",

                          // host/api/users/{name}
                          child: Route("{name}",
                              root: SimpleEndpoint((req, c) {
                                // [Create] request handled with
                                // this context's DataAccess
                                return Create(
                                    collection: "greeters",
                                    data: {"greeter": req.arguments["name"]});
                              }))),
                    ),
                    // host/api/posts
                    Route("posts",
                        root: AuthFilterGate(
                            child: SimpleEndpoint.static("Hi")
                        ))
                  ]
              ))
        ]);
  }
}
The first Gate in the example handles both the root segment and all subsegments of "/api/users".
In the second example, it only handles the root segment of "api/posts".
6 ) Add your exception messages
You can customize the endpoints that handle the exceptions.
It is possible to customize with exact types(e.g. in example bellow) or with super types(e.g. ClientError or Exception). Applies to all sub-components unless re-wrapped.
When determining the endpoint to handle exceptions, they are checked in the following order. exact -> (if is implementation) super (e.g. ClientError) -> Exception
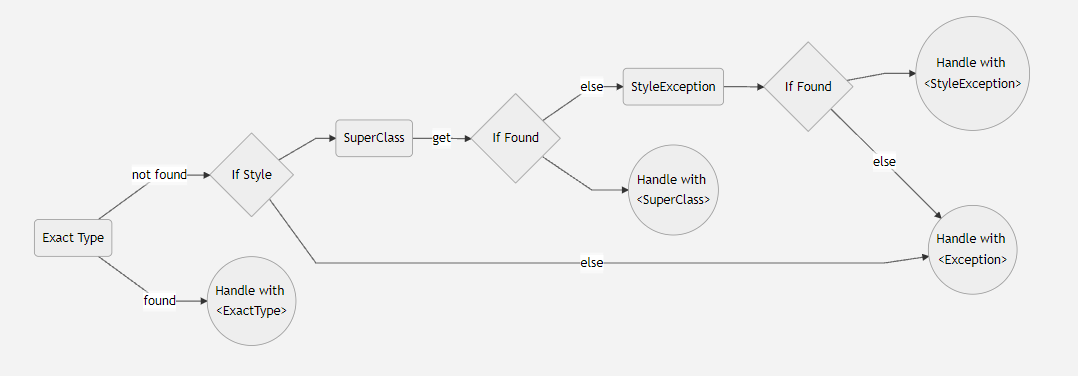
class MyStyleExEndpoint extends ExceptionEndpoint<BadRequest> {
  MyStyleExEndpoint() : super();

  @override
  FutureOr<Object> onError(Message message, BadRequest exception, StackTrace stackTrace) {
    return "Will always be bad !!!";
  }
}


//TODO: Add the component your Component tree.
Component getExceptionWrapper() {
  return ExceptionWrapper<BadRequest>(
      child: Route("always_throw", root: Throw(BadRequest())),
      exceptionEndpoint: MyExceptionEndpoint());
}
Throw is an endpoint that always sends an exception
7 ) Add your DataAccess
Accessing data is required for a backend application.
In Style, there are structures that I call base service.
DataAccess , HttpService , Logger , Authorization , Crypto and WebSocketService are currently available
services.
Each service has its own functions.
Defining the Services
All the services can be assigned as the default service of the Server.
class MyServer extends StatelessComponent {
  const MyServer({Key? key}) : super(key: key);

  @override
  Component build(BuildContext context) {
    return Server(
        httpService: DefaultHttpServiceHandler(),
        webSocketService: StyleTicketBaseWebSocketService(),
        logger: MyLogger(),
        dataAccess: DataAccess(MongoDbDataAccessImplementation()),
        children: [
          Route("hello", root: HelloEndpoint())
        ]);
  }
}
MongoDb implementation available with style_mongo package
Service Wrapper
You can use a different service for part of your Component tree. Wraps are valid as long as they are not re-wrapped.
class MyServer extends StatelessComponent {
  const MyServer({Key? key}) : super(key: key);

  @override
  Component build(BuildContext context) {
    return Server(
      // server default
        dataAccess: DataAccess(MongoDbDataAccessImplementation()),
        children: [
          Route("hello", root: HelloEndpoint()),

          // Use different service for
          // "/other/*"
          ServiceWrapper<DataAccess>(
              child: Route("other", root: HelloEndpoint()),
              service: DataAccess(SimpleCacheDataAccess())
          ),
        ]);
  }
}
Use Service
You can access all services this way :
DataAccess.of(context)
8 ) Access data
There are many ways you can access your data. One is to return an Event in the endpoint onCall function.
You can also access functions directly : DataAccess.of(context).read(...) .
The following endpoint is put on the "/greet/{name}" route.
Create greeter by name
class HelloEndpoint extends Endpoint {

  @override
  FutureOr<Object> onCall(Request request) {
    return Create(
        collection: "greeters",
        data: {"greeter": request.arguments["name"]});
  }
}
Read All Greeters
class GreetersEndpoint extends Endpoint {

  @override
  FutureOr<Object> onCall(Request request) {
    return ReadMultiple(
        collection: "greeters");
  }
}
Automate access
You can handle all data operations with a single endpoint.
You can process this completely yourself, or you can use ready-made Components.
AccessPoint
AccessPoint take a callback that runs with request and returns. This AccessEvent is handled by the
context's DataAccess.
class MyServer extends StatelessComponent {
  const MyServer({Key? key}) : super(key: key);

  @override
  Component build(BuildContext context) {
    return Server(
        httpService: DefaultHttpServiceHandler(),
        children: [
          Route("col",
              // AccessEvent
              root: AccessPoint((req, ctx) {
                return AccessEvent(
                    access: Access(
                      type: _getAccessType(req),
                      collection: req.arguments["col"],

                      ///optional parameters
                      //query
                      //identifier
                      //data
                      //pipeline
                      //settings

                    ),
                    request: req);
              }))
        ]);
  }
}
RestApi
Ready-made access points, both in the core package and developed by the developers, can be used.
RestAccessPoint("route")
It is an AccessPoint that works according to Rest API standards. RestAccessPoint documentation is being prepared.
More Documentation Coming Soon !
Packages
style
base package
style_cli
Command line app for debugging, monitoring, templating.
style_test
Test framework for style
style_cron_job
Cron job definer and executor.
Future
remote service/server
Similar to Microservice architecture, you can use to base services (logger, crypto, data access, etc.) from remote servers.
Services can be shared between servers(or microservices).
monitoring app
Monitoring app shows server status , state properties, usage statistics , logs, component tree etc. The monitoring app will be hosted by styledart.dev. It will also be available as open source.
cli improvements
Many run/test options can be set by cli app. Also, cli app will be used for monitoring app.

Mehmet Yaz ↗
如何選擇適合專案的儲存庫?
先依使用情境篩選,再比較專案活躍情況,最後到原始儲存庫確認使用要求。
- 透過儲存庫名稱、作者或描述搜尋,再依技術分類縮小範圍。
- 綜合星標、分支與最近推送比較專案;星標反映社群關注,不保證品質。
- 使用前在 GitHub 確認 README、授權條款與 Issues。
來源與維護
“A repository is the most basic element of GitHub.”
GitHub Docs — About repositories ↗