
 v4.1.0
location_picker_flutter_map
提供使用開放街圖的 Flutter 地圖地點搜尋和位置選擇器的套件,具有大量自訂選項
91喜歡 952近 30 天下載150Pub 分數
AndroidiOSWebmacOSWindowsLinux
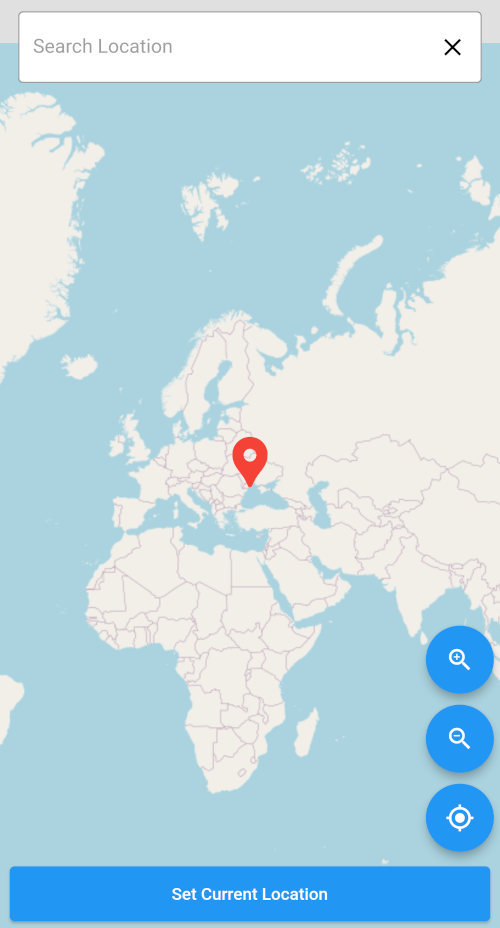
一個 Flutter 套件,使用 Open Street Map 為 Flutter 地圖提供地點搜尋和位置選擇功能,並具有大量自訂選項。

{"sdk":"flutter"}^8.2.1^1.5.0^0.20.2^0.9.1^6.3.2^10.1.0^14.0.2^6.0.0{"sdk":"flutter"}以下為英文專案原文快照,最新內容請造訪 GitHub。
A comprehensive Flutter package that provides location picking, place search, and map interactions using OpenStreetMap with extensive customization options and clean architecture.
LocationSettings APIControlsConfiguration(
zoomInIcon: Icons.add_circle, // Custom zoom icons
zoomOutIcon: Icons.remove_circle,
buttonShape: RoundedRectangleBorder( // Custom button shapes
borderRadius: BorderRadius.circular(15),
),
buttonElevation: 8.0, // Shadow effects
zoomButtonsSize: 60.0, // Individual sizing
showButtonShadow: true, // Enable/disable shadows
)
FlutterLocationPicker.withConfiguration(
  userAgent: 'MyApp/1.0.0 (contact@mycompany.com)',
  mapConfiguration: MapConfiguration(/*...*/),
  searchConfiguration: SearchConfiguration(/*...*/),
  controlsConfiguration: ControlsConfiguration(/*...*/),
  // ... other configurations
)
To add the location_picker_flutter_map to your Flutter application read the instructions. Below are some Android and iOS specifics that are required for the package to work correctly.
Upgrade pre 1.12 Android projects
Since version 5.0.0 this plugin is implemented using the Flutter 1.12 Android plugin APIs. Unfortunately this means App developers also need to migrate their Apps to support the new Android infrastructure. You can do so by following the Upgrading pre 1.12 Android projects migration guide. Failing to do so might result in unexpected behaviour.
AndroidX
The geolocator plugin requires the AndroidX version of the Android Support Libraries. This means you need to make sure your Android project supports AndroidX. Detailed instructions can be found here.
The TL;DR version is:
android.useAndroidX=true
android.enableJetifier=true
compileSdkVersion in your "android/app/build.gradle" file to 35:android {
compileSdkVersion 35
...
}
android. dependencies to their AndroidX counterparts (a full list can be found here: Migrating to AndroidX).Permissions
On Android you'll need to add either the ACCESS_COARSE_LOCATION or the ACCESS_FINE_LOCATION permission to your Android Manifest. To do so open the AndroidManifest.xml file (located under android/app/src/main) and add one of the following two lines as direct children of the <manifest> tag (when you configure both permissions the ACCESS_FINE_LOCATION will be used by the geolocator plugin):
<uses-permission android:name="android.permission.ACCESS_FINE_LOCATION" />
<uses-permission android:name="android.permission.ACCESS_COARSE_LOCATION" />
Starting from Android 10 you need to add the ACCESS_BACKGROUND_LOCATION permission (next to the ACCESS_COARSE_LOCATION or the ACCESS_FINE_LOCATION permission) if you want to continue receiving updates even when your App is running in the background:
<uses-permission android:name="android.permission.ACCESS_BACKGROUND_LOCATION" />
Starting from Android 14 (SDK 34) you need to add the FOREGROUND_SERVICE_LOCATION permission (next to the ACCESS_COARSE_LOCATION or the ACCESS_FINE_LOCATION or the ACCESS_BACKGROUND_LOCATION permission) if you want to continue receiving updates even when your App is running in the foreground:
FOREGROUND_SERVICE_LOCATION
<uses-permission android:name="android.permission.FOREGROUND_SERVICE_LOCATION"
NOTE: Specifying the
ACCESS_COARSE_LOCATIONpermission results in location updates with an accuracy approximately equivalent to a city block. It might take a long time (minutes) before you will get your first locations fix asACCESS_COARSE_LOCATIONwill only use the network services to calculate the position of the device. More information can be found here.
On iOS you'll need to add the following entry to your Info.plist file (located under ios/Runner) in order to access the device's location. Simply open your Info.plist file and add the following (make sure you update the description so it is meaningful in the context of your App):
<key>NSLocationWhenInUseUsageDescription</key>
<string>This app needs access to location when open.</string>
If you don't need to receive updates when your app is in the background, then add a compiler flag as follows: in XCode, click on Pods, choose the Target 'geolocator_apple', choose Build Settings, in the search box look for 'Preprocessor Macros' then add the BYPASS_PERMISSION_LOCATION_ALWAYS=1 flag.
Setting this flag prevents your app from requiring the NSLocationAlwaysAndWhenInUseUsageDescription entry in Info.plist, and avoids questions from Apple when submitting your app.
You can also have the flag set automatically by adding the following to the ios/Podfile of your application:
post_install do |installer|
  installer.pods_project.targets.each do |target|
    if target.name == "geolocator_apple"
      target.build_configurations.each do |config|
        config.build_settings['GCC_PREPROCESSOR_DEFINITIONS'] ||= ['$(inherited)', 'BYPASS_PERMISSION_LOCATION_ALWAYS=1']
      end
    end
  end
end
If you do want to receive updates when your App is in the background (or if you don't bypass the permission request as described above) then you'll need to:
NSLocationAlwaysAndWhenInUseUsageDescription entry to your Info.plist (use NSLocationAlwaysUsageDescription if you're targeting iOS <11.0)When using the requestTemporaryFullAccuracy({purposeKey: "YourPurposeKey"}) method, a dictionary should be added to the Info.plist file.
<key>NSLocationTemporaryUsageDescriptionDictionary</key>
<dict>
<key>YourPurposeKey</key>
<string>The example App requires temporary access to the device's precise location.</string>
</dict>
The second key (in this example called YourPurposeKey) should match the purposeKey that is passed in the requestTemporaryFullAccuracy() method. It is possible to define multiple keys for different features in your app. More information can be found in Apple's documentation.
NOTE: the first time requesting temporary full accuracy access it might take several seconds for the pop-up to show. This is due to the fact that iOS is determining the exact user location which may take several seconds. Unfortunately this is out of our hands.
On iOS 16 and above you need to specify UIBackgroundModes location to receive location updates in the background.
<key>UIBackgroundModes</key>
<array>
  <string>location</string>
</array>
On macOS you'll need to add the following entries to your Info.plist file (located under macOS/Runner) in order to access the device's location. Simply open your Info.plist file and add the following (make sure you update the description so it is meaningfull in the context of your App):
<key>NSLocationUsageDescription</key>
<string>This app needs access to location.</string>
You will also have to add the following entry to the DebugProfile.entitlements and Release.entitlements files. This will declare that your App wants to make use of the device's location services and adds it to the list in the "System Preferences" -> "Security & Privace" -> "Privacy" settings.
<key>com.apple.security.personal-information.location</key>
<true/>
When using the requestTemporaryFullAccuracy({purposeKey: "YourPurposeKey"}) method, a dictionary should be added to the Info.plist file.
<key>NSLocationTemporaryUsageDescriptionDictionary</key>
<dict>
<key>YourPurposeKey</key>
<string>The example App requires temporary access to the device's precise location.</string>
</dict>
The second key (in this example called YourPurposeKey) should match the purposeKey that is passed in the requestTemporaryFullAccuracy() method. It is possible to define multiple keys for different features in your app. More information can be found in Apple's documentation.
NOTE: the first time requesting temporary full accuracy access it might take several seconds for the pop-up to show. This is due to the fact that macOS is determining the exact user location which may take several seconds. Unfortunately this is out of our hands.
To use the Geolocator plugin on the web you need to be using Flutter 1.20 or higher. Flutter will automatically add the endorsed geolocator_web package to your application when you add the geolocator: ^6.2.0 dependency to your pubspec.yaml.
The following methods of the geolocator API are not supported on the web and will result in a UnsupportedError:
getLastKnownPosition({ bool forceAndroidLocationManager = true })openAppSettings()openLocationSettings()getServiceStatusStream()NOTE
Geolocator Web is available only in secure_contexts (HTTPS). More info about the Geolocator API can be found here.
To use the Geolocator plugin on Windows you need to be using Flutter 2.10 or higher. Flutter will automatically add the endorsed geolocator_windows package to your application when you add the geolocator: ^8.1.0 dependency to your pubspec.yaml.
Add the following to your pubspec.yaml file:
dependencies:
  location_picker_flutter_map: ^4.1.0
import 'package:location_picker_flutter_map/location_picker_flutter_map.dart';

// Simple usage
FlutterLocationPicker(
  userAgent: 'MyApp/1.0.0 (contact@example.com)', // Required!
  onPicked: (PickedData pickedData) {
    print('Location: ${pickedData.latLong}');
    print('Address: ${pickedData.address}');
  },
)
FlutterLocationPicker.withConfiguration(
  userAgent: 'MyApp/1.0.0 (contact@example.com)',
  onPicked: (pickedData) => handleLocationPicked(pickedData),

  // Map Configuration
  mapConfiguration: MapConfiguration(
    initZoom: 15.0,
    stepZoom: 2.0,
    mapLanguage: 'en',
    urlTemplate: 'https://tile.openstreetmap.org/{z}/{x}/{y}.png',
  ),

  // Search Configuration
  searchConfiguration: SearchConfiguration(
    maxSearchResults: 8,
    searchBarHintText: 'Search for places...',
    searchbarDebounceDuration: Duration(milliseconds: 300),
  ),

  // Controls Configuration
  controlsConfiguration: ControlsConfiguration(
    zoomInIcon: Icons.add_circle_outline,
    zoomOutIcon: Icons.remove_circle_outline,
    locationIcon: Icons.my_location_rounded,
    zoomButtonsColor: Colors.white,
    zoomButtonsBackgroundColor: Colors.blue.shade700,
    buttonElevation: 8.0,
    buttonShape: RoundedRectangleBorder(
      borderRadius: BorderRadius.circular(12),
    ),
  ),

  // Marker Configuration
  markerConfiguration: MarkerConfiguration(
    markerIcon: Icon(Icons.location_pin, color: Colors.red, size: 60),
    showMarkerShadow: true,
    animateMarker: true,
  ),

  // Select Button Configuration
  selectButtonConfiguration: SelectButtonConfiguration(
    selectLocationButtonText: 'Choose This Location',
    selectLocationButtonStyle: ElevatedButton.styleFrom(
      backgroundColor: Colors.green,
      foregroundColor: Colors.white,
    ),
  ),
)
Nominatim API requires a valid User-Agent header. Provide your app information:
// ✅ Correct format
userAgent: 'MyLocationApp/1.2.0 (developer@mycompany.com)'

// ❌ These will cause 403 errors
userAgent: 'Dart/2.17 (dart:io)'  // Generic HTTP library agent
userAgent: 'http'                 // Too generic
userAgent: ''                     // Empty string
MapConfiguration(
  urlTemplate: 'https://tile.openstreetmap.org/{z}/{x}/{y}.png',
  initZoom: 17.0,
  stepZoom: 1.0,
  minZoomLevel: 2.0,
  maxZoomLevel: 18.4,
  mapLanguage: 'en',
  mapAnimationDuration: Duration(milliseconds: 2000),
)
SearchConfiguration(
  showSearchBar: true,
  searchBarHintText: 'Search location',
  maxSearchResults: 5,
  searchbarDebounceDuration: Duration(milliseconds: 500),
  searchResultIcon: Icons.location_on,
)
ControlsConfiguration(
  showZoomController: true,
  showLocationController: true,
  zoomInIcon: Icons.zoom_in,
  zoomOutIcon: Icons.zoom_out,
  locationIcon: Icons.my_location,
  buttonElevation: 6.0,
  controlButtonsSpacing: 16.0,
)
MarkerConfiguration(
  markerIcon: Icon(Icons.location_pin, color: Colors.blue),
  markerIconOffset: 50.0,
  animateMarker: true,
  showMarkerShadow: true,
)
// Location operations
final locationService = LocationService();
final position = await locationService.getCurrentPosition();

// Geocoding operations
final geocodingService = GeocodingService(
  nominatimHost: 'nominatim.openstreetmap.org',
  userAgent: 'MyApp/1.0.0',
);
final results = await geocodingService.searchLocations('New York');

// Permission handling
final permissionService = PermissionService(context);
await permissionService.checkAndRequestLocationPermission();
// v3.x (old way)
FlutterLocationPicker(
  userAgent: 'MyApp/1.0',
  zoomButtonsColor: Colors.white,
  zoomButtonsBackgroundColor: Colors.blue,
  searchBarHintText: 'Search...',
  onPicked: (data) => handlePicked(data),
)

// v4.0 (new way - cleaner)
FlutterLocationPicker.withConfiguration(
  userAgent: 'MyApp/1.0',
  controlsConfiguration: ControlsConfiguration(
    zoomButtonsColor: Colors.white,
    zoomButtonsBackgroundColor: Colors.blue,
  ),
  searchConfiguration: SearchConfiguration(
    searchBarHintText: 'Search...',
  ),
  onPicked: (data) => handlePicked(data),
)
The old constructor still works! Your existing code will continue to function without changes.
You can apply themes to your map using Map Tiler
Head to the website and sign up then choose the map tile you want
Get the Maptile Url like this
https://api.maptiler.com/maps/hybrid/{z}/{x}/{y}.jpg?{apikey}
use it in the urlTemplate parameter.
FlutterLocationPicker(
    urlTemplate:
        'https://api.maptiler.com/maps/hybrid/{z}/{x}/{y}.jpg?key={apikey}',
    )
Example:
https://user-images.githubusercontent.com/25803558/186025531-8e57f941-56d2-4413-8931-1841b437e740.png
Pull requests are welcome. For major changes, please open an issue first to discuss what you would like to change.
Please make sure to update tests as appropriate.
👤 Michael Maher
Please ⭐️ this repository if this project helped you!
Copyright © 2022 Michael Maher.
This project is MIT licensed.