

 v2.0.2
proste_bezier_curve
更少的程式碼,更低的難度,繪製標準貝茲曲線。該套件可用於裁剪組件或自行繪製路徑。
67喜歡 478近 30 天下載150Pub 分數
AndroidiOSWebmacOSWindowsLinux
一個生成貝塞爾曲線路徑的外掛程式,可用於widget的裁切或路徑繪畫。

以下為英文專案原文快照,最新內容請造訪 GitHub。

English | 中文
The control points of Bezier curve are obtained through data calculation, and then the points are drawn into curves through the drawing function of flutter.
The difference between using package and drawing your own path
The common method of tracing points according to the position of elements will leave a gap. Only after the control points are calculated can the element information be completely filled. For example, in the following picture, the coordinates of the points used are the same, but the styles cut out are different. The function I want to provide is to restore the design style as much as possible. And after using the package, you only need to confirm the coordinates of each point, without other complex calculations, and the code is more concise.
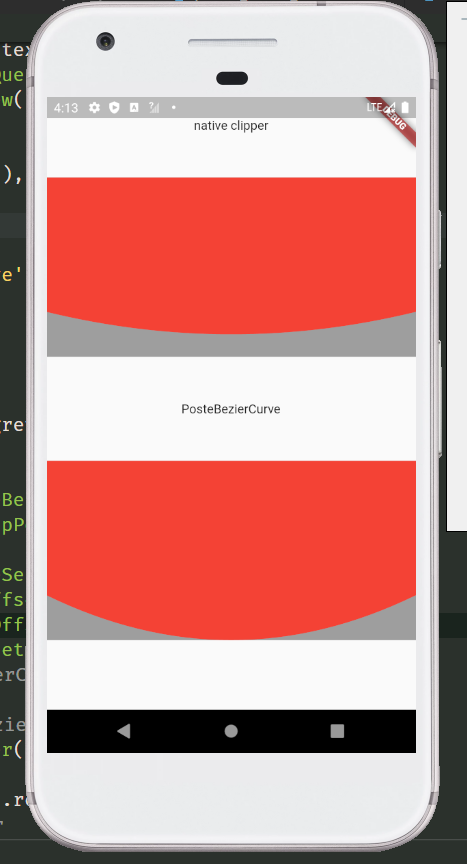
Stack(
  children: [
    Container(
      height: 200,
      color: Colors.grey,
    ),
    ClipPath(
      clipper: NativeClipper(),
      child: Container(
        height: 200,
        color: Colors.red,
      ),
    ),
  ],
)

class NativeClipper extends CustomClipper<Path> {
  @override
  Path getClip(Size size) {
    Path path = Path();

    path.lineTo(0, 0);
    path.lineTo(0, size.height - 50);
    path.quadraticBezierTo(size.width / 2, size.height, size.width, size.height - 50);
    path.lineTo(size.width, 0);
    path.lineTo(0, 0);
    return path;
  }

  @override
  bool shouldReclip(covariant CustomClipper<Path> oldClipper) => true;
}
Stack(
  children: [
    Container(
      height: 200,
      color: Colors.grey,
    ),
    ClipPath(
      clipper: ProsteBezierCurve(
        position: ClipPosition.bottom,
        list: [
          BezierCurveSection(
            start: Offset(0, 150),
            top: Offset(screenWidth / 2, 200),
            end: Offset(screenWidth, 150),
          ),
        ],
      ),
      child: Container(
        height: 200,
        color: Colors.red,
      ),
    ),
  ],
),
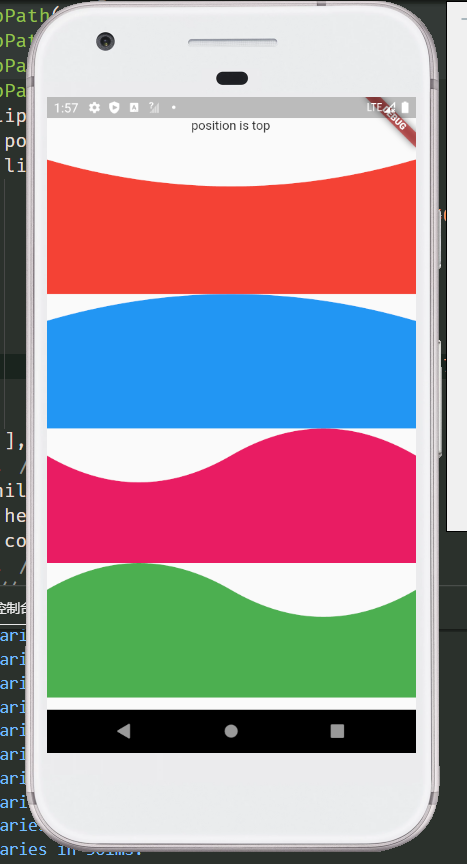
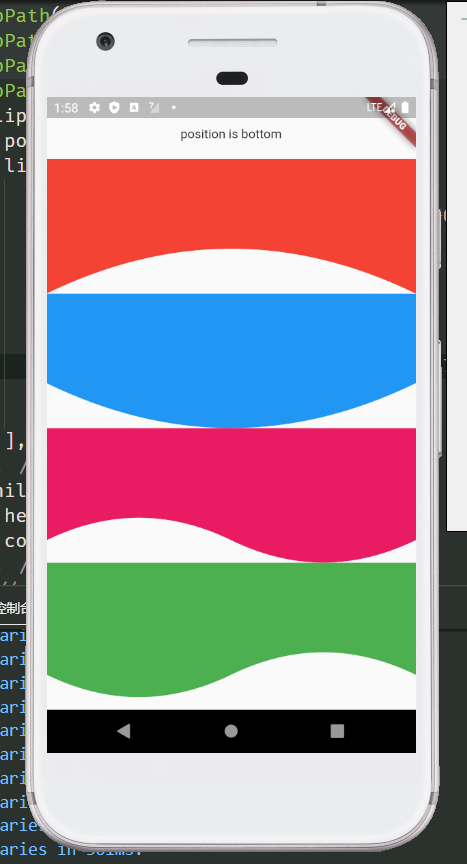
  ClipPath(
    clipper: ProsteBezierCurve(
      position: ClipPosition.top,
      list: [
        BezierCurveSection(
          start: Offset(screenWidth, 0),
          top: Offset(screenWidth / 2, 30),
          end: Offset(0, 0),
        ),
      ],
    ),
    child: Container(
      color: Colors.red,
      height: 150,
    ),
  )


  /// Wavy line
  ClipPath(
    clipper: ProsteBezierCurve(
      position: ClipPosition.bottom,
      list: [
        BezierCurveSection(
          start: Offset(0, 125),
          top: Offset(screenWidth / 4, 150),
          end: Offset(screenWidth / 2, 125),
        ),
        BezierCurveSection(
          start: Offset(screenWidth / 2, 125),
          top: Offset(screenWidth / 4 * 3, 100),
          end: Offset(screenWidth, 150),
        ),
      ],
    ),
    child: Container(
      height: 150,
      color: Colors.red,
    ),
  )
ProsteBezierCurve Used to draw and return the clipping path| parameter | type | default | describe |
|---|---|---|---|
| list | List<BezierCurveSection> | Used to draw Bezier curve, you can pass in more than one | |
| reclip | bool | true | Allow redrawing elements |
| position | ClipPosition | ClipPosition.left | Used to determine the drawing position of the curve |
  ClipPath(
    clipper: ProsteBezierCurve(
      position: ClipPosition.top,
      reclip: false,
      list: [
        ...
      ],
    ),
    child: ...,
  ),
BezierCurveSection Clips for drawing curves| parameter | type | default | describe |
|---|---|---|---|
| start | Offset | start point of Bezier curve | |
| top | Offset | top point of Bezier curve | |
| end | Offset | end point of Bezier curve | |
| proportion | double | 1/2 | the proportion of the top position of the Bezier curve,It doesn't need to be modified |
  ClipPath(
    clipper: ProsteBezierCurve(
      position: ClipPosition.top,
      reclip: false,
      list: [
        BezierCurveSection(
          proportion: 1 / 3,
          start: Offset(..,..),
          top: Offset(..,..),
          end: Offset(..,..),
        ),
      ],
    ),
    child: ...,
  )
BezierCurveDots Coordinates of Bezier curve control points| parameter | type | default | describe |
|---|---|---|---|
| x1 | double | The X-coordinate of the first point | |
| y1 | double | The Y-coordinate of the first point | |
| x2 | double | The X-coordinate of the second point | |
| y2 | double | The Y-coordinate of the second point |
BezierCurveDots calcCurveDots(BezierCurveSection param) Obtain the coordinates of the control points after calculation, and draw the path after obtaining the control points, such as drawing curves with multiple edges or combining the curves with other drawing rules
ClipPath(
  clipper: CustomSelfClipper1(),
  child: Container(
    height: 150,
    color: Colors.red,
  ),
)

class CustomSelfClipper1 extends CustomClipper<Path> {
  @override
  Path getClip(Size size) {
    Path path = Path();
    BezierCurveSection section1 = BezierCurveSection(
      start: Offset(0, 30),
      top: Offset(10, 45),
      end: Offset(0, 60),
    );
    BezierCurveSection section2 = BezierCurveSection(
      start: Offset(size.width, size.height - 90),
      top: Offset(size.width - 10, size.height - 105),
      end: Offset(size.width, size.height - 120),
    );
    BezierCurveDots dot1 = ProsteBezierCurve.calcCurveDots(section1);
    BezierCurveDots dot2 = ProsteBezierCurve.calcCurveDots(section2);

    List<double> dot1List = dot1.getList(); // Return to list<double>
    Map<String, double> dot2Map = dot1.getMap(); // Return to Map<String, double>

    print(dot1List); // [20.0, 45.0, 0.0, 60.0]
    print(dot2Map); // {x1: 20.0, y1: 45.0, x2: 0.0, y2: 60.0}

    path.lineTo(0, 0);
    path.lineTo(0, 30);
    path.quadraticBezierTo(dot1.x1, dot1.y1, dot1.x2, dot1.y2);
    path.lineTo(0, size.height);
    path.lineTo(size.width, size.height);
    path.lineTo(size.width, size.height - 90);
    path.quadraticBezierTo(dot2.x1, dot2.y1, dot2.x2, dot2.y2);
    path.lineTo(size.width, 0);
    path.lineTo(0, 0);
    return path;
  }

  @override
  bool shouldReclip(covariant CustomClipper<Path> oldClipper) => true;
}

/// This method can splice the third-order Bezier curve, but is not recommended. You can use the ProsteThirdOrderBezierCurve

class CustomSelfClipper2 extends CustomClipper<Path> {
  @override
  Path getClip(Size size) {
    Path path = Path();
    BezierCurveSection section1 = BezierCurveSection(
      start: Offset(0, size.height),
      top: Offset(30, size.height - 50),
      end: Offset(80, size.height - 70),
    );
    BezierCurveSection section2 = BezierCurveSection(
      start: Offset(size.width - 100, size.height - 70),
      top: Offset(size.width - 30, size.height - 95),
      end: Offset(size.width, size.height - 160),
    );
    BezierCurveDots dot1 = ProsteBezierCurve.calcCurveDots(section1);
    BezierCurveDots dot2 = ProsteBezierCurve.calcCurveDots(section2);

    path.lineTo(0, 0);
    path.lineTo(0, size.height);
    path.quadraticBezierTo(dot1.x1, dot1.y1, dot1.x2, dot1.y2);
    path.lineTo(size.width - 100, size.height - 70);
    path.quadraticBezierTo(dot2.x1, dot2.y1, dot2.x2, dot2.y2);
    path.lineTo(size.width, 0);
    path.lineTo(0, 0);
    return path;
  }

  @override
  bool shouldReclip(covariant CustomClipper<Path> oldClipper) => true;
}
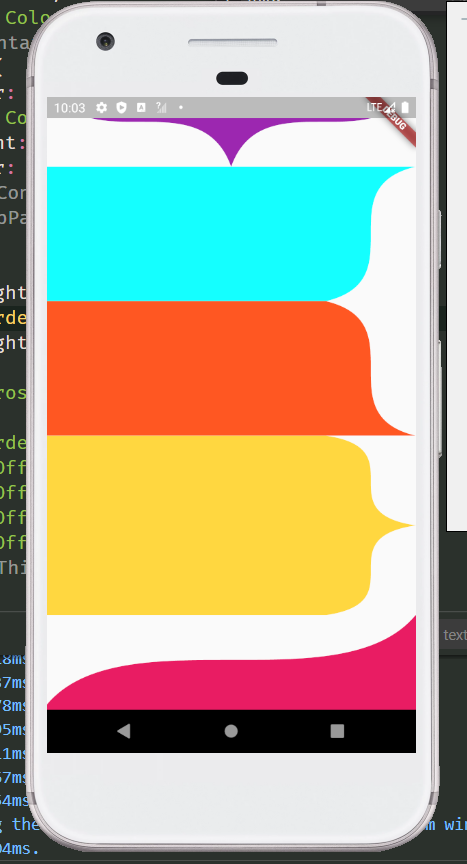
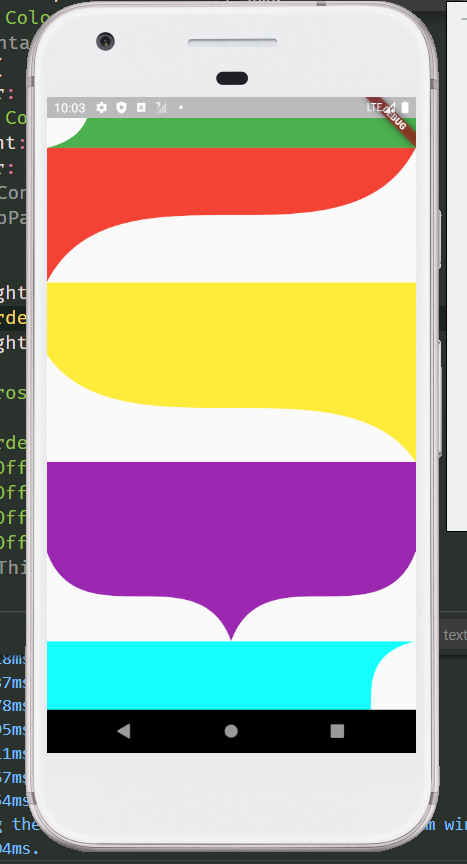
  ClipPath(
    clipper: ProsteThirdOrderBezierCurve(
      position: ClipPosition.bottom,
      list: [
        ThirdOrderBezierCurveSection(
          p1: Offset(0, 100),
          p2: Offset(0, 200),
          p3: Offset(screenWidth, 100),
          p4: Offset(screenWidth, 200),
        ),
      ],
    ),
    child: Container(
      height: 200,
      color: Colors.red,
    ),
  )
ProsteThirdOrderBezierCurve Clipping path for drawing and returning third order Bezier curves| parameter | type | default | describe |
|---|---|---|---|
| list | List<ThirdOrderBezierCurveSection> | Used to draw Bezier curve, you can pass in more than one | |
| reclip | bool | true | Allow redrawing elements |
| position | ClipPosition | ClipPosition.left | Used to determine the drawing position of the curve |
ClipPath(
  clipper: ProsteThirdOrderBezierCurve(
    position: ClipPosition.bottom,
    list: [
      ...
    ],
  ),
  child: ...,
)
ThirdOrderBezierCurveSection Fragment for drawing third order Bezier curve| parameter | type | default | describe |
|---|---|---|---|
| p1 | Offset | The coordinates of the first point | |
| p2 | Offset | The coordinates of the second point | |
| p3 | Offset | The coordinates of the third point | |
| p4 | Offset | The coordinates of the fourth point | |
| smooth | double | .5 | The greater the value of smoothness 0 ~ 1, the straighter the value is, the smaller the value is, and the larger the arc is. When the drawing distance is short and saw tooth appears, try to increase this value |
ClipPath(
  clipper: ProsteThirdOrderBezierCurve(
    position: ClipPosition.bottom,
    list: [
      ThirdOrderBezierCurveSection(
        smooth: .7,
        p1: Offset(0, 100),
        p2: Offset(0, 200),
        p3: Offset(screenWidth, 100),
        p4: Offset(screenWidth, 200),
      ),
    ],
  ),
  child: Container(
    height: 200,
    color: Colors.red,
  ),
)

/// Spire shape
ClipPath(
  clipper: ProsteThirdOrderBezierCurve(
    position: ClipPosition.top,
    list: [
      ThirdOrderBezierCurveSection(
        p1: Offset(screenWidth, 0),
        p2: Offset(screenWidth, 100),
        p4: Offset(screenWidth / 2, 100),
        p3: Offset(screenWidth / 2, 0),
      ),
      ThirdOrderBezierCurveSection(
        p1: Offset(screenWidth / 2, 100),
        p2: Offset(screenWidth / 2, 0),
        p3: Offset(0, 100),
        p4: Offset(0, 0),
      ),
    ],
  ),
  child: Container(
    height: 200,
    color: Colors.teal,
  ),
)
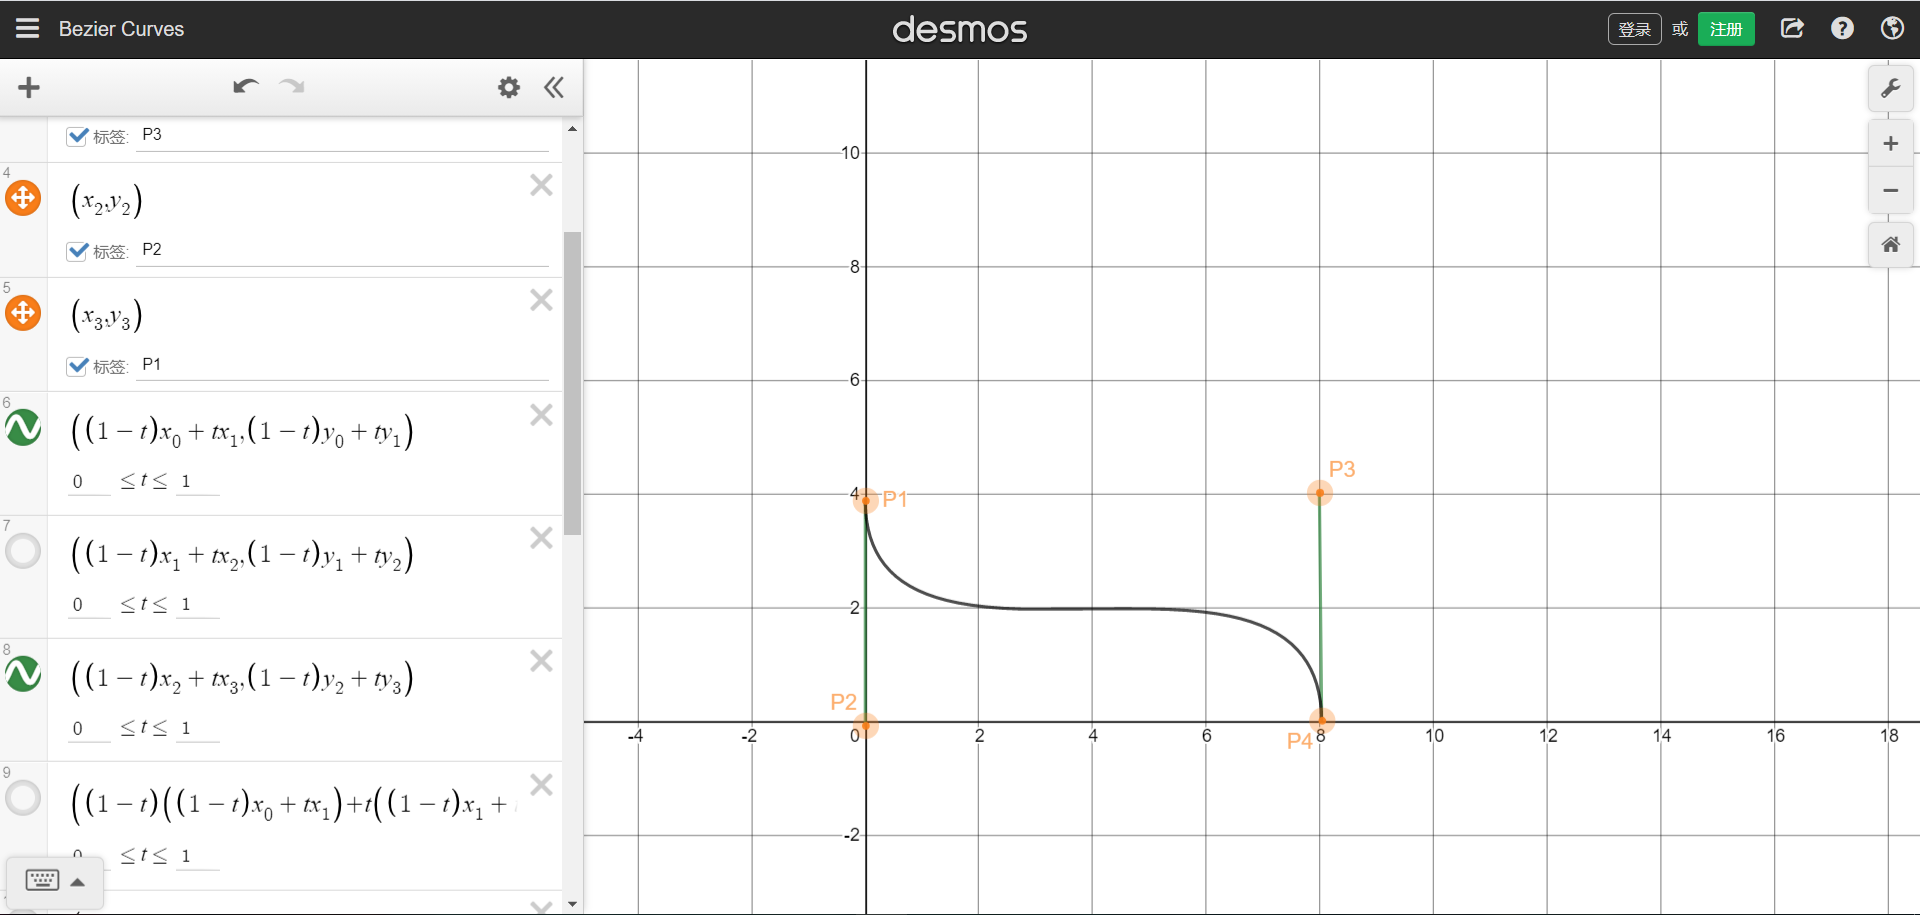
The position coordinates of the four points can refer to the figure below. The starting and ending points are P1 and P4 respectively.Picture sample URL。You can understand that four points form a rectangle, and the four coordinates are the positions of the four points. The curve will be drawn in the rectangle.
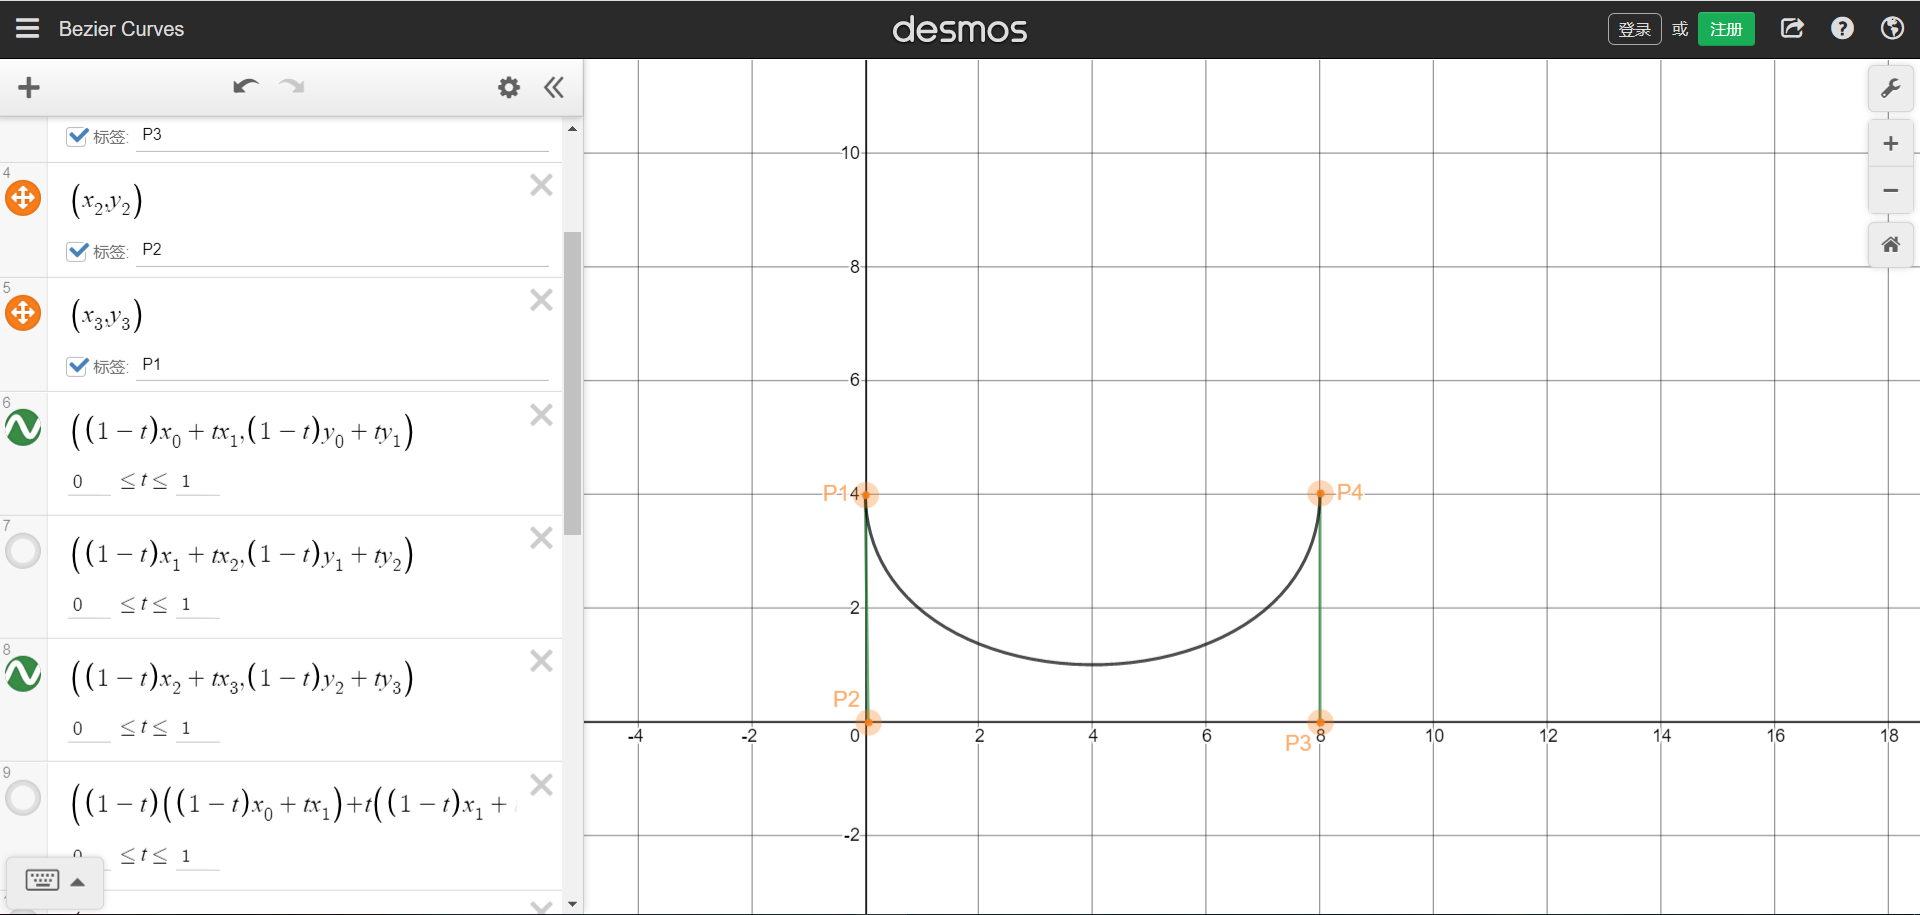
We can also draw a single arc graph through the third-order Bessel function, need P1 and P4 are on the same side,But that brings up the problem that was stated at the beginning,The arc does not cling to the bottom.
ThirdOrderBezierCurveDots Coordinates of third order Bezier curve control points| parameter | type | default | describe |
|---|---|---|---|
| x1 | double | The X-coordinate of the first point | |
| y1 | double | The Y-coordinate of the first point | |
| x2 | double | The X-coordinate of the second point | |
| y2 | double | The Y-coordinate of the second point | |
| x3 | double | The X-coordinate of the third point | |
| y3 | double | The Y-coordinate of the third point |
ThirdOrderBezierCurveDots calcCurveDots(ThirdOrderBezierCurveSection param) Obtain the coordinates of the control points after calculation, and draw the path after obtaining the control points, such as drawing curves with multiple edges or combining the curves with other drawing rules
ClipPath(
  clipper: CustomSelfClipper1(),
  child: Container(
    height: 200,
    color: Colors.teal,
  ),
)

class CustomSelfClipper1 extends CustomClipper<Path> {
  @override
  Path getClip(Size size) {
    Path path = Path();
    ThirdOrderBezierCurveSection param = ThirdOrderBezierCurveSection(
      smooth: 0.3,
      p1: Offset(0, size.height),
      p2: Offset(0, 0),
      p3: Offset(size.width, size.height),
      p4: Offset(size.width, 0),
    );
    ThirdOrderBezierCurveDots dots = ProsteThirdOrderBezierCurve.calcCurveDots(param);

    List<double> dotsList = dots.getList(); // Return to list<double>
    Map<String, double> dotsMap = dots.getMap(); // Return to Map<String, double>

    print(dotsList); // [71.56809408040556, 0.0, 339.8604773481659, 200.0, 411.42857142857144, 0.0]
    print(dotsMap); // {x1: 71.56809408040556, y1: 0.0, x2: 339.8604773481659, y2: 200.0, x3: 411.42857142857144, y3: 0.0}

    path.lineTo(0, 0);
    path.lineTo(0, size.height);
    path.cubicTo(dots.x1, dots.y1, dots.x2, dots.y2, dots.x3, dots.y3);
    path.lineTo(0, 0);

    return path;
  }

  @override
  bool shouldReclip(covariant CustomClipper<Path> oldClipper) => true;
}
If you have any issue, please submit them to issues, I will deal with them as soon as I see them. Thank you!
依賴清單 2 項
{"sdk":"flutter"}{"sdk":"flutter"}先依使用情境篩選,再比較專案活躍情況,最後到原始儲存庫確認使用要求。
“A repository is the most basic element of GitHub.”
GitHub Docs — About repositories ↗