
 v0.9.1
xl
加速度計およびポインターまたはタッチで駆動されるパララックスアニメーションを、独自のXLレイヤリングパラダイムで実装します。ジャイロスコープ対応。
25いいね 1230日間ダウンロード140Pub ポイント
AndroidiOSWeb
加速度計およびポインターまたはタッチで駆動されるパララックスアニメーションを実装するためのFlutterウィジェット。独自のXLレイヤリングパラダイムを使用。ジャイロスコープ対応。

{"sdk":"flutter"}^1.0.1^1.0.4{"sdk":"flutter"}以下は英語原文のスナップショットです。最新版は GitHub をご覧ください。
XL| XL Package Logotype | XL Logotype "Spinning Top" |
|---|---|
| Starfield | Warpspeed |
A package providing the XL stack widget to implement accelerometer- and
pointer-fueled parallax animations that smoothly transform
children according to a spatial, three-dimensional layer definition.
Touch and Gyroscope support included.
Design simple or elaborate XL-erometer driven interactions and interfaces.
To get started with sensor data, use an XL with XLayers:
const Widget xl = XL(layers: [XLayer(. . .), ...]);
To distinguish between pointer data (mouse/touch) and sensors data,
employ PLayers and the relevant flags:
const Widget xl = XL(
 sharesPointer = false, // default is true
 sharesSensors = false, // default is false
 layers: [
   PLayer(. . .), // ignores sensors
   PLayer(. . .), // ignores sensors
   XLayer(. . .), // ignores pointer
   ...
 ],
);
The XL.layers property takes a list of XLayers or PLayers.
These layers allow you to define the animatable properties
of their child widgets.
Delicious parallax by accelerometer 🤤 is the result of the below
Example:
class Example extends StatelessWidget {
 @override
 Widget build(BuildContext context) {
   return MaterialApp(home: Scaffold(
     body: XL(
       layers: [
         XLayer(
           xRotation: 1.0,
           yRotation: 1.0,
           xOffset: 200,
           yOffset: 200,
           child: Center(
             child: Container(
               width: 250,
               height: 250,
               color: Colors.black,
         ))),
         XLayer(
           xRotation: 1.5,
           yRotation: 1.5,
           xOffset: 300,
           yOffset: 300,
           child: Center(
             child: Container(
               width: 200,
               height: 200,
               color: Colors.red,
         ))),
       ],
     ),
   ));
 }
}
As stated, an XL may have both varieties of layer interspersed.
The default function of the stack is to apply pointer data to both
varieties of Layer, and to only apply sensors data to XLayers;
there are, however, flags available to toggle either functionality, as:
const layers = [
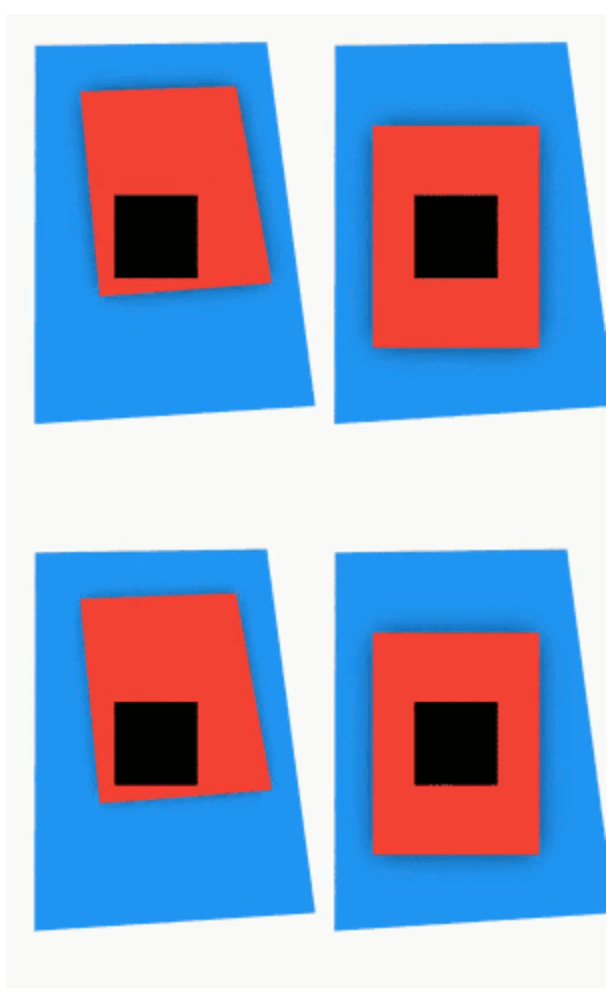
  XLayer(/* Blue X Layer; reactive */),
  PLayer(/* Red P Layer; more reactive */),
  XLayer(/* Black Layer; non-reactive control */),
];

final example = Column(children: [
  Expanded(
    child: Row(children: [
      const Expanded(
        child: XL(
          // X and P Layers behave the same way with these flags
          // (but still may differ slightly on parameters for Z axis rotation).
          sharesPointer: true,
          sharesSensors: true,
          layers: layers,
      )),
      const Expanded(
        child: XL(
          // All Layers react to pointers, but only XLayers
          // will recognize sensors. Default flags.
          sharesPointer: true, // default
          sharesSensors: false, // default
          layers: layers,
  ))])),
  Expanded(
    child: Row(children: [
      const Expanded(
        child: XL(
          // All Layers react to sensors,
          // but only PLayers will recognize pointer.
          sharesPointer: false,
          sharesSensors: true,
          layers: layers,
      )),
      const Expanded(
        child: XL(
          // Each Layer will deal only with its prescribed input data.
          sharesPointer: false,
          sharesSensors: false,
          layers: layers,
  ))])),
]);
That same stack of
layerslaid out in a demonstration with the two flags in their four possible configurations:Flags to handle `XLayers` and `PLayers` separately
🟥 Red layers are
PLayers and react primarily to pointers data.
👈 The left two 🟥PLayers also consider sensors data🟦 Blue layers are
XLayers and react primarily to sensors data.
👆 The top two 🟦XLayers also consider pointer data⬛ Black layers are control
XLayers with no animation properties. They make no reaction to any input.
Layers in new ways
AccelSpec and GyroSpec that would enable transformation
of any axis based on input from any axis, determined by parameter.
yRotation is controlled by accelerometer X axis
rotation. zRotation may also be controlled by accelerometer X axis rotation
with parameter zRotationByX. However, zRotationByGyro may interpret
Z axis gyroscope rotations. It is the only axis with two such inputs.Widget vertically and rotating it over Y axis
based on only one input from accelerometer.0
values unless the device is moving.XL stack that simply accepts a List<Widget>
(not necessarily XLayers) and dynamically generates progressively greater
translation and rotation values for each layer.AutoXL which makes a parallax stack even easier to implement. layers and optionally tinker
with the depthFactor or max layer depth.AutoXL.pane, AutoXL.wiggler, AutoXL.deep
For posterity and developer preference, there are three extension "wrappers" available.
XL, consider a ParallaxStackXLayer, consider an AcceleraxLayerPLayer, consider a ParallaxLayerfinal xl = ParallaxStack( // XL
sharesSensors: true, // same parameters and functionality
layers: [
AcceleraxLayer(. . .), // XLayer
ParallaxLayer(. . .), // PLayer
],
);
mouse_parallax considering the required AnimatedParallaxStack widget is not exported with the original package and that accelerometers have nothing to do with mice.| transparent 600x1 pixel-pusher (ignore) | 📚 |
|---|