
 v24.0.0
simple_3d_renderer
Sp3dObj 렌더러. 간단한 카메라, 조명, 세계 등을 포함합니다. 사용자 터치도 지원합니다.
62좋아요 15730일 다운로드160Pub 점수
AndroidiOSWebmacOSWindowsLinux
Sp3dObj 렌더러. 간단한 카메라, 조명, 세계 등을 포함합니다. 사용자 터치도 지원합니다.

{"sdk":"flutter"}^17.3.1^12.0.7{"sdk":"flutter"}^2.0.0아래는 영문 원문 스냅샷입니다. 최신 내용은 GitHub에서 확인하세요.
(en)Japanese ver is here.
(ja)この解説の日本語版はここにあります。
This package is for rendering Sp3dObj.
Sp3dObj is an implementation of the Simple 3D Format created for science.
It is created mainly for use by scientists.
Please refer to the following for the packages to be used together.
If you want to implement Undo/Redo functionality in an app that directly edits Sp3dObj,
you can use the following package.
file_state_manager
For examples of using this package, see the following package:
sakura_blizzard
Although this is a very experimental project, there are also packages for converting from other 3D formats.
However, Sp3dObj is intended for scientific use and has significant differences in functionality, so only minimal compatibility is supported.
convert_simple_3d
import 'package:flutter/material.dart';
import 'package:simple_3d/simple_3d.dart';
import 'package:util_simple_3d/util_simple_3d.dart';
import 'package:simple_3d_renderer/simple_3d_renderer.dart';

void main() async {
  runApp(const MyApp());
}

class MyApp extends StatefulWidget {
  const MyApp({Key? key}) : super(key: key);

  @override
  State<StatefulWidget> createState() => _MyAppState();
}

class _MyAppState extends State<MyApp> {
  late List<Sp3dObj> objs = [];
  late Sp3dWorld world;
  bool isLoaded = false;

  @override
  void initState() {
    super.initState();
    // Create Sp3dObj.
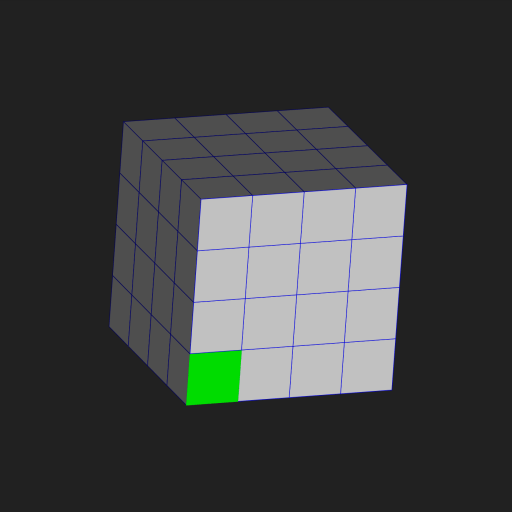
    Sp3dObj obj = UtilSp3dGeometry.cube(200, 200, 200, 4, 4, 4);
    obj.materials.add(FSp3dMaterial.green.deepCopy());
    obj.fragments[0].faces[0].materialIndex = 1;
    obj.materials[0] = FSp3dMaterial.grey.deepCopy()
      ..strokeColor = const Color.fromARGB(255, 0, 0, 255);
    obj.rotate(Sp3dV3D(1, 1, 0).nor(), 30 * 3.14 / 180);
    objs.add(obj);
    loadImage();
  }

  void loadImage() async {
    world = Sp3dWorld(objs);
    world.initImages().then((List<Sp3dObj> errorObjs) {
      setState(() {
        isLoaded = true;
      });
    });
  }

  @override
  Widget build(BuildContext context) {
    if (!isLoaded) {
      return MaterialApp(
              title: 'Sp3dRenderer',
              home: Scaffold(
                      appBar: AppBar(
                        backgroundColor: const Color.fromARGB(255, 0, 255, 0),
                      ),
                      backgroundColor: const Color.fromARGB(255, 33, 33, 33),
                      body: Container()));
    } else {
      return MaterialApp(
        title: 'Sp3dRenderer',
        home: Scaffold(
          appBar: AppBar(
            backgroundColor: const Color.fromARGB(255, 0, 255, 0),
          ),
          backgroundColor: const Color.fromARGB(255, 33, 33, 33),
          body: Column(
            children: [
              Sp3dRenderer(
                const Size(800, 800),
                const Sp3dV2D(400, 400),
                world,
                // If you want to reduce distortion, shoot from a distance at high magnification.
                Sp3dCamera(Sp3dV3D(0, 0, 3000), 6000),
                Sp3dLight(Sp3dV3D(0, 0, -1), syncCam: true),
              ),
            ],
          ),
        ),
      );
    }
  }
}
Cube Sample
For example, rewrite sample code as follows.(*Note that some unnecessary parameters remain for simplicity)
sample_image.png
  // Change Cube of initState().
  Sp3dObj obj = UtilSp3dGeometry.cube(200,200,200,1,1,1);
  --------------------------------------------------------------------
  // Change function
  void loadImage() async {
    this.objs[0].fragments[0].faces[0].materialIndex=1;
    this.objs[0].fragments[0].faces[1].materialIndex=1;
    this.objs[0].fragments[0].faces[2].materialIndex=1;
    this.objs[0].fragments[0].faces[3].materialIndex=1;
    this.objs[0].materials[1].imageIndex = 0;
    // You can use images by creating an assets/images folder under your project, adding images, and adding the asset path to pubspec.yaml.
    // For Flutter Web, you also need to copy it to your web folder.
    this.objs[0].images.add(await _readFileBytes("./assets/images/sample_image.png"));
    this.world = Sp3dWorld(objs);
    this.world.initImages().then(
            (List<Sp3dObj> errorObjs){
          setState(() {
            this.isLoaded = true;
          });
        }
    );
  }

  // Add function
  Future<Uint8List> _readFileBytes(String filePath) async {
    ByteData bd = await rootBundle.load(filePath);
    return bd.buffer.asUint8List(bd.offsetInBytes,bd.lengthInBytes);
  }
Texture Sample
If the drawing destination of the image is a triangular mesh, the image is automatically divided into triangles with the vertices at the upper left, lower left, and lower right, and displayed.
Texture Sample
You can also use the Sp3dMaterial parameters to control the cutout position with respect to the triangular mesh.
*Note that the size of the image of paste to cone is (width, height) = (128, 128).
Since textureCoordinates specifies the position where you want to cut out the image, it indicate the points on the image.
And this image is (0,0) in the upper left and (128,128) in the lower right.
For example, the following sample is cut out at the upper left, the middle of the lower side, and the upper right.
In the case of a square mesh, it is necessary to specify two triangles, so six vertices are required.
Sp3dObj obj = UtilSp3dGeometry.cone(100,200);
obj.materials[0].strokeColor = Color.fromARGB(255, 0, 255, 0);
obj.materials[0].textureCoordinates = [Offset(0,0),Offset(64,128),Offset(128,0)];
Texture Sample
For example, rewrite sample code as follows.
The return value Sp3dFaceObj in onPanDown is a class that contains information about the touched surface.
The sample uses this information to move the object touched by the user.
  // Add variable to _MyAppState.
  ValueNotifier<int> vn = ValueNotifier<int>(0);
  --------------------------------------------------------------------
  // Rewrite Sp3dRenderer.
  Sp3dRenderer(
    const Size(800, 800),
    const Sp3dV2D(400, 400),
    world,
    // If you want to reduce distortion, shoot from a distance at high magnification.
    Sp3dCamera(Sp3dV3D(0, 0, 30000), 60000),
    Sp3dLight(Sp3dV3D(0, 0, -1), syncCam: true),
    allowUserWorldRotation: true,
    checkTouchObj: true,
    vn: vn,
    onPanDown: (Sp3dGestureDetails d, Sp3dFaceObj? info){
      print("onPanDown");
      if(info!=null) {
        info.obj.move(Sp3dV3D(50, 0, 0));
        vn.value++;
      }
    },
    onPanCancel: (){
      print("onPanCancel");
    },
    onPanStart: (Sp3dGestureDetails d){
      print("onPanStart");
      print(d.toOffset());
    },
    onPanUpdate: (Sp3dGestureDetails d){
      print("onPanUpdate");
      print(d.toOffset());
    },
    onPanEnd: (Sp3dGestureDetails d){
      print("onPanEnd");
    },
    onPinchStart: (Sp3dGestureDetails d){
      print("onPinchStart");
      print(d.diffV);
    },
    onPinchUpdate: (Sp3dGestureDetails d){
      print("onPinchUpdate");
      print(d.diffV);
    },
    onPinchEnd: (Sp3dGestureDetails d){
      print("onPinchEnd");
      print(d.diffV);
    },
    onMouseScroll: (Sp3dGestureDetails d){
      print("onMouseScroll");
      print(d.diffV);
    },
  )
If you want to save / restore multiple Sp3dObj along with their location, Sp3dWorld also has toDict and fromDict methods.
The extension when saving is recommended to be .s3dw to avoid confusion.
If you need paid support for any reason, please contact my company.
This package is developed by me personally, but may be supported via the company.
SimpleAppli Inc.
When using CPU Ryzen5 5600, it is a consideration of the time it takes to draw in debug mode and on a web browser.
There are some speed issues, such as running on a CPU and being single-threaded.
In the case of real-time rendering, the limit is about 1000 cubes (8000 vertices), and anything higher than that is heavy.
Note: Not all objects will perform equally well due to acceleration logic.
For models such as spheres with many vertices, the amount you can comfortably manipulate is much smaller.
/// use cube obj(8 vertices / 1 obj)
Sp3dObj obj = UtilSp3dGeometry.cube(2, 2, 2, 1, 1, 1);
The C part will be changed at the time of version upgrade.
This software is released under the MIT License, see LICENSE file.
The “Dart” name and “Flutter” name are trademarks of Google LLC.
*The developer of this package is not Google LLC.