
 v6.0.0
dynamic_widget
백엔드 기반의 UI 툴킷으로 JSON을 사용하여 동적 UI를 구축할 수 있으며, JSON 형식은 Flutter 위젯 코드와 매우 유사합니다.
452좋아요 42630일 다운로드140Pub 점수
AndroidiOSWebmacOSWindowsLinux
백엔드 기반의 UI 툴킷으로, JSON을 사용하여 동적 UI를 구축할 수 있으며, JSON 형식은 플러터 위젯 코드와 매우 유사합니다.

{"sdk":"flutter"}^0.6.1^1.0.1^2.0.17^1.0.0^10.0.0{"sdk":"flutter"}아래는 영문 원문 스냅샷입니다. 최신 내용은 GitHub에서 확인하세요.
A Backend-Driven UI toolkit, build your dynamic UI with json, and the json format is very similar with flutter widget code.
From 4.0.0-nullsafety.1 version, it supports null-safety.
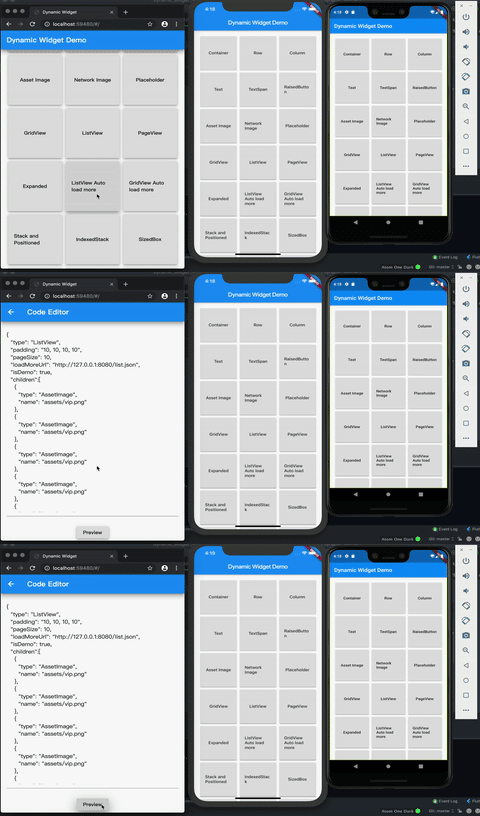
From 3.0.0 version, it supports exporting your flutter code to json code. please check How to write the json code
From 1.0.4 version, it supports flutter web application.
https://github.com/dengyin2000/dynamic_widget/raw/master/img/Sample.pngI work for an e-commerce company. We need to build flexible pages. So we define a light UI protocol, and implement on Android and iOS. We can dynamic update App UIs by pushing a json file. With this ability, we can do some UI A/B testing without publishing App to app store. Flutter allows you to build beautiful native apps on iOS and Android from a single codebase, it can allow you to build web app later. Flutter's hot reload helps you quickly and easily experiment, build UIs, add features, and fix bugs faster. But it still build native app, the UIs can't be dynamic updated. If you want to modify the UIs, you need to publish the updated app to app store. With this project, you can build your UIs from a json string, which is the UI protocol. The json string is very similar with the Flutter widget dart code. All widget type and widget properties are the same.
Widget type will be a type property, and widget's properties will be the json properties too. All properties and their values will be almost the same. You can checkout the following document.
Currently support flutter widgets and properties
Add this to your package's pubspec.yaml file:
dependencies:
  dynamic_widget: ^6.0.0
You can install packages from the command line:
with Flutter:
$ flutter packages get
Alternatively, your editor might support flutter packages get. Check the docs for your editor to learn more.
Now in your Dart code, you can use:
import 'package:dynamic_widget/dynamic_widget.dart';
You should use DynamicWidgetBuilder().build method to covert a json string into flutter widget. It will be time-consuming. so you'd better using FutureBuilder to build the UI.
import 'package:dynamic_widget/dynamic_widget.dart';

class PreviewPage extends StatelessWidget {
  final String jsonString;

  PreviewPage(this.jsonString);

  @override
  Widget build(BuildContext context) {
    return Scaffold(
      appBar: AppBar(
        // Here we take the value from the MyHomePage object that was created by
        // the App.build method, and use it to set our appbar title.
        title: Text("Preview"),
      ),
      body: FutureBuilder<Widget?>(
        future: _buildWidget(context),
        builder: (BuildContext context, AsyncSnapshot<Widget?> snapshot) {
          if (snapshot.hasError) {
            print(snapshot.error);
          }
          return snapshot.hasData
              ? SizedBox.expand(
                  child: snapshot.data,
                )
              : Text("Loading...");
        },
      ),
    );
  }

  Future<Widget?> _buildWidget(BuildContext context) async {
    return DynamicWidgetBuilder.build(
        jsonString, context, DefaultClickListener());
  }
}
WidgetParser abstract class.DynamicWidgetBuilder.addParser(WidgetParser parser) method.This is a RaisedButton widget parser.
import 'package:dynamic_widget/dynamic_widget/utils.dart';
import 'package:dynamic_widget/dynamic_widget.dart';
import 'package:flutter/material.dart';

class RaisedButtonParser extends WidgetParser {
  @override
  String get widgetName => "RaisedButton";

  @override
  Widget parse(Map<String, dynamic> map, BuildContext buildContext, ClickListener listener) {
    String clickEvent =
        map.containsKey("click_event") ? map['click_event'] : "";

    var raisedButton = RaisedButton(
      color: map.containsKey('color') ? parseHexColor(map['color']) : null,
      disabledColor: map.containsKey('disabledColor')
          ? parseHexColor(map['disabledColor'])
          : null,
      disabledElevation:
          map.containsKey('disabledElevation') ? map['disabledElevation']?.toDouble() : 0.0,
      disabledTextColor: map.containsKey('disabledTextColor')
          ? parseHexColor(map['disabledTextColor'])
          : null,
      elevation: map.containsKey('elevation') ? map['elevation']?.toDouble() : 0.0,
      padding: map.containsKey('padding')
          ? parseEdgeInsetsGeometry(map['padding'])
          : null,
      splashColor: map.containsKey('splashColor')
          ? parseHexColor(map['splashColor'])
          : null,
      textColor:
          map.containsKey('textColor') ? parseHexColor(map['textColor']) : null,
      child: DynamicWidgetBuilder.buildFromMap(map['child'], buildContext, listener),
      onPressed: () {
        listener.onClicked(clickEvent);
      },
    );

    return raisedButton;
  }
}
Add it to parsers list.
DynamicWidgetBuilder.addParser(RaisedButtonParser());
Add "click_event" property to your widget json definition. for example:
var raisedButton_json =
'''
{
  "type": "Container",
  "alignment": "center",
  "child": {
    "type": "RaisedButton",
    "color": "##FF00FF",
    "padding": "8,8,8,8",
    "textColor": "#00FF00",
    "elevation" : 8.0,
    "splashColor" : "#00FF00",
    "click_event" : "route://productDetail?goods_id=123",
    "child" : {
      "type": "Text",
      "data": "I am a button"
    }
  }
}
'''
We suggest you'd better to use an URI to define the event, as the exmaple, it's a event for going to a product detail page.
Then, define a ClickListener
class DefaultClickListener implements ClickListener{
  @override
  void onClicked(String event) {
    print("Receive click event: " + event);
  }
}
Finally, pass the listener to build method.
  Future<Widget> _buildWidget() async{

    return DynamicWidgetBuilder.build(jsonString, buildContext, new DefaultClickListener());
  }
You don't need to write the json code by hand, you can export your flutter code to json code efficiently with DynamicWidgetJsonExportor widget. You just need to wrap your flutter code with DynamicWidgetJsonExportor widget, then invoke its exportJsonString() method, look at following example, click the "export" button, it will find the DynamicWidgetJsonExportor widget, and export its child to json code efficiently.
class _JSONExporterState extends State<JSONExporter> {
  GlobalKey key = GlobalKey();

  @override
  Widget build(BuildContext context) {
    return Scaffold(
      appBar: AppBar(
        // Here we take the value from the MyHomePage object that was created by
        // the App.build method, and use it to set our appbar title.
        title: Text("export example"),
      ),
      body: Builder(
        builder: (context) => Column(
          children: [
            Expanded(
              child: DynamicWidgetJsonExportor(
                key: key,
                child: Container(
                  child: GridViewWidget(
                      GridViewParams(
                          mainAxisSpacing: 2.0,
                          crossAxisSpacing: 2.0,
                          crossAxisCount: 2,
                          childAspectRatio: 1.6,
                          padding: EdgeInsets.all(10.0),
                          pageSize: 10,
                          children: [
                            ListTile(
                              leading: Text("Leading text"),
                              title: Text("title"),
                              subtitle: Text("subtitle"),
                            ),
                            ListTile(
                              leading: Text("Leading text"),
                              title: Text("title"),
                              subtitle: Text("subtitle"),
                            )
                          ]),
                      context),
                ),
              ),
            ),
            RaisedButton(
              child: Text("Export"),
              onPressed: () {
                var exportor = key.currentWidget as DynamicWidgetJsonExportor;
                var exportJsonString = exportor.exportJsonString();
                Scaffold.of(context).showSnackBar(SnackBar(
                    content: Text("json string was exported to editor page.")));
                Future.delayed(Duration(seconds: 3), (){
                  Navigator.push(
                      context,
                      MaterialPageRoute(
                          builder: (context) =>
                              CodeEditorPage(exportJsonString)));
                });
              },
            )
          ],
        ),
      ),
    );
  }
}
You can use whatever your favorite IDE to build the UI, then use DynamicWidgetJsonExportor to export to json code. For detail, please check the Dynamic Widget Demo source code.
https://raw.githubusercontent.com/dengyin2000/dynamic_widget/HEAD/img/export.gifBy using DynamicWidget, you can pass JavaScript code(string) as parameters to achieve dynamic UI and logic in the app.
import 'package:dynamic_widget/dynamic_widget.dart';
import 'package:flutter/material.dart';
import 'package:flutter/services.dart';

class MyHomePage extends StatefulWidget {
  const MyHomePage({super.key, required this.title});

  final String title;

  @override
  State<MyHomePage> createState() => _MyHomePageState();
}

class _MyHomePageState extends State<MyHomePage> {
  late Future<String> _uiFuture;

  @override
  void initState() {
    super.initState();
    _uiFuture = rootBundle.loadString("assets/ui.js");
  }

  @override
  Widget build(BuildContext context) {
    return Scaffold(
      appBar: AppBar(
        backgroundColor: Theme.of(context).colorScheme.inversePrimary,
        title: Text(widget.title),
      ),
      body: Center(
        child: FutureBuilder<String>(
          future: _uiFuture,
          builder: (context, snapshot) {
            if (snapshot.connectionState == ConnectionState.waiting) {
              return const SizedBox();
            } else if (snapshot.hasError) {
              return Text('Error: ${snapshot.error}');
            }
            return DynamicWidget(snapshot.data!);
          }
        )
      )
    );
  }
}
Let's look at a calculator example. The js code can be divided into three parts:
grid_app are generated through the buttons array.const buttons = [
{ label: '+', event: "op('add')" },
{ label: '-', event: "op('sub')" },
{ label: 'x', event: "op('mul')" },
{ label: '÷', event: "op('div')" },
{ label: '1', event: "digit(1)" },
{ label: '2', event: "digit(2)" },
{ label: '3', event: "digit(3)" },
{ label: 'C', event: "clear()" },
{ label: '4', event: "digit(4)" },
{ label: '5', event: "digit(5)" },
{ label: '6', event: "digit(6)" },
{ label: '0', event: "digit(0)" },
{ label: '7', event: "digit(7)" },
{ label: '8', event: "digit(8)" },
{ label: '9', event: "digit(9)" },
{ label: '=', event: "equal()" }
];
const grid_app = {
"type": "GridView",
"crossAxisCount": 4,
"padding": "10, 10, 10, 10",
"mainAxisSpacing": 4.0,
"crossAxisSpacing": 4.0,
"childAspectRatio": 1.6,
"children": buttons.map(button => ({
"type": "TextButton",
"child": {
"type": "Text",
"data": button.label,
"style": {
"fontSize": 30.0
}
},
"click_event": button.event
}))
};
App object describes the structure of the UI. Dynamically modifying components involves changing the properties of the App object. In the App, the text component and grid_app are assembled to form the complete calculator UI.App =
{
"type": "Column",
"crossAxisAlignment": "end",
"mainAxisAlignment": "end",
"mainAxisSize": "max",
"textBaseline": "alphabetic",
"textDirection": "ltr",
"verticalDirection": "down",
"children": [{
"type": "Text",
"data": "",
}, {
"type": "Text",
"data": " ",
"maxLines": 3,
"overflow": "ellipsis",
"style": {
"color": "#000000",
"fontSize": 40.0,
"fontWeight": "bold",
}
},
{
"type": "Expanded",
"child": grid_app
}]
}
clear, digit, and equal.var _pending = 0;
var _pendingOp = 'none';
var _display = 0;
var _displayLocked = false;
var _afterEquals = false;
function _resolve() {
if (_pendingOp === 'add') {
_display = _pending + _display;
} else if (_pendingOp === 'sub') {
_display = _pending - _display;
} else if (_pendingOp === 'mul') {
_display = _pending * _display;
} else if (_pendingOp === 'div') {
_display = _pending / _display;
}
_pendingOp = 'none';
}
function clear() {
_pending = 0;
_pendingOp = 'none';
_display = 0;
_displayLocked = false;
_afterEquals = false;
App.children[1].data = ""
}
function digit(n) {
if (_displayLocked || _afterEquals) {
_display = 0;
_displayLocked = false;
_afterEquals = false;
}
_display = _display * 10 + n;
App.children[1].data = _display + " ";
}
function op(operation) {
_resolve();
if (_afterEquals) {
_pending = _display;
_afterEquals = false;
} else {
_pending = _display;
}
_pendingOp = operation;
_display = 0;
_displayLocked = false;
App.children[1].data = (operation === 'add' ? '+' : operation === 'sub' ? '-' : operation === 'mul' ? 'x' : '÷') + " ";
}
function equal() {
_resolve();
_pending = _display;
_displayLocked = true;
_afterEquals = true;
App.children[1].data = _display + " ";
}
Upon running example_js, you will see:
Already completed widgets:
You can view Currently support widgets and properties here.
Checkout this project and run demo.
Created by @deng.yin@gmail.com - feel free to contact me