
 v2.1.2
floating_logger
floating_logger는 실시간 API 요청 로그를 위한 플로팅 위젯을 제공하는 Flutter 라이브러리입니다.
38좋아요 92930일 다운로드160Pub 점수
AndroidiOSmacOSWindowsLinux
floating_logger는 실시간 API 요청 로그를 위한 플로팅 위젯을 제공하는 Flutter 라이브러리입니다. 개발자들은 API fetch 응답을 모니터링하고 테스트 또는 디버깅을 위해 해당 curl 요청을 쉽게 복사할 수 있게 해주며, 효율적인 개발과 디버깅을 위한 필수 도구입니다.

^5.8.0+1^2.0.7{"sdk":"flutter"}{"sdk":"flutter"}^5.0.0^2.4.13^5.4.4^1.1.1아래는 영문 원문 스냅샷입니다. 최신 내용은 GitHub에서 확인하세요.
floating_logger is a Flutter library designed to help developers debug and test API calls with ease. It provides a floating widget that allows you to monitor API requests in real-time and even copy the curl command for quick testing. Perfect for anyone who wants to streamline the development and debugging process! ⚡
To get started, add floating_logger to your pubspec.yaml:
dependencies:
  floating_logger: ^latest_version
package import :
import 'package:floating_logger/floating_logger.dart';
logo
Check out the live demo of Floating Logger:
Here is the preview of the debug console log for the HTTP request:
logo
Above: Example of the HTTP request.
logo
Middle: HTTP response log.
logo
Below: HTTP error log.
There are two ways to ensure your API calls are captured by the floating logger. Choose the one that best fits your project:
FloatingLoggerInterceptor (For existing custom Dio)If you already have your own Dio instance and don't want to change it, simply add the interceptor:
final dio = Dio();
dio.interceptors.add(FloatingLoggerInterceptor());
DioLogger (Easiest / No-config)If you don't want the hassle of configuring a custom Dio instance, use the built-in DioLogger directly:
Future<void> fetchData() async {
  try {
    final response = await DioLogger.instance.get(
      'https://api.genderize.io',
      queryParameters: { "name": "james" },
    );
    // ... handle response
  } catch (e) {
    // ... handle error
  }
}
FloatingLoggerControlOnce you've set up the logging (Step 1), you need to wrap your app (or a specific page) with FloatingLoggerControl to show the floating debug button.
return FloatingLoggerControl(
  child: Scaffold(
    appBar: AppBar(
      title: const Text("Floating Logger Test"),
    ),
    body: Center(child: Text("Logger is active!")),
  ),
);
Use ValueNotifier to toggle the logger visibility dynamically. This allows you to enable or disable the logger and persist the setting across app sessions.
final ValueNotifier<bool> isLoggerVisible = ValueNotifier<bool>(true);

@override
void initState() {
  loadLoggerSettings();
  super.initState();
}

Future<void> loadLoggerSettings() async {
  try {
    bool pref = await getStoredPreference();
    setState(() {
      isLoggerVisible.value = pref;
    });
  } catch (e) {
    print(e);
  }
}

Future<bool> getStoredPreference() async {
  return await CustomSharedPreferences.getDebugger();
}
FloatingLoggerControlreturn FloatingLoggerControl(
getPreference: getStoredPreference,
isShow: isLoggerVisible,
child: Scaffold(
appBar: AppBar(title: Text("Logger Toggle Test")),
body: Switch(
activeTrackColor: Colors.blue,
value: isLoggerVisible.value,
onChanged: (value) {
setState(() {
isLoggerVisible.value = value;
CustomSharedPreferences.saveDebugger(value);
});
},
),
),
);
You can modify the floating logger’s UI using widgetItemBuilder to create a custom log display format.
return FloatingLoggerControl(
  widgetItemBuilder: (index, data) {
    final item = data[index];
    return Padding(
      padding: const EdgeInsets.only(bottom: 10),
      child: Card(
        child: ListTile(
          title: Text('${item.type!} [${item.response}]', style: TextStyle(fontSize: 12.0)),
          subtitle: Column(
            crossAxisAlignment: CrossAxisAlignment.start,
            children: [
              Text("URL   : ${item.path}", style: TextStyle(fontSize: 12.0)),
              Text("Data  : ${item.data}", style: TextStyle(fontSize: 12.0)),
              Text("cURL  : ${item.curl}", style: TextStyle(fontSize: 12.0)),
            ],
          ),
        ),
      ),
    );
  },
  child: child,
);
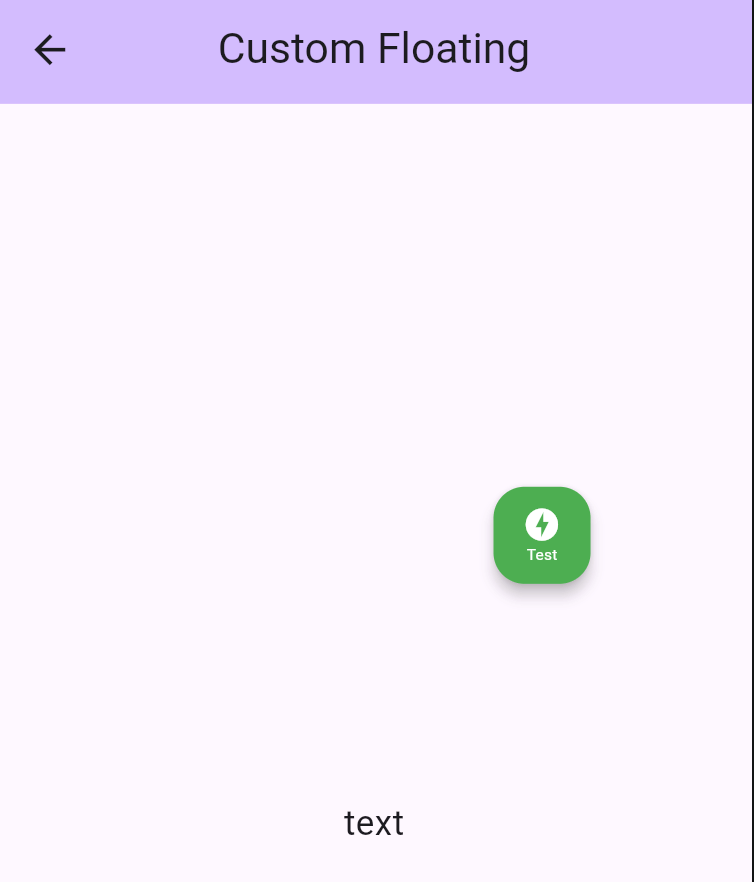
You can easily customize the appearance of your floating logger widget by using the style property. This allows you to adjust the background color, tooltip, icon, and even the size of the floating widget to match your app’s theme. 🎨✨
FloatingLoggerControl(
      style: FloatingLoggerStyle(
        backgroundColor: Colors.green,
        tooltip: "Testing",
        icon: Column(
          mainAxisAlignment: MainAxisAlignment.center,
          children: [
            Icon(
              Icons.offline_bolt,
              color: Colors.white,
              size: 20,
            ),
            Text(
              "Test",
              style: TextStyle(
                fontSize: 8.0,
                color: Colors.white,
              ),
            ),
          ],
        ),
      ),
      child : child,
),
🖌️ What You Can Customize:
backgroundColor: Set a vibrant color to make your floating widget stand out.tooltip: Add a custom tooltip text to provide helpful hints when hovering over the widget.icon: Choose an icon (like offline_bolt, info, etc.) and customize its size, color, and appearance.size: Adjust the size using Size class to adjust floating widget size.To add a single custom interceptor to DioLogger, you can use the addInterceptor method. Here’s an example of adding a custom InterceptorsWrapper that handles the onResponse and onError events.
/// Example to add a custom single interceptor
DioLogger.instance.addInterceptor(
  InterceptorsWrapper(
    onResponse: (response, handler) {
      // Add custom logic for onResponse
      print('Custom onResponse interceptor');
      handler.next(response);
    },
    onError: (error, handler) {
      // Add custom logic for onError
      print('Custom onError interceptor');
      handler.next(error);
    },
  ),
);
Explanation:
onResponse : This is triggered when a successful response is received. You can add custom logic here, such as logging or modifying the response.onError : This is triggered when an error occurs. You can handle errors, log them, or perform recovery actions.handler.next() : This ensures the interceptor chain continues to the next interceptor or the final handler.If you want to add multiple interceptors at once, you can use the addListInterceptor method. This is useful when you have several interceptors that need to be applied together.
Here’s an example:
DioLogger.instance.addListInterceptor(
  [
    InterceptorsWrapper(
      onResponse: (response, handler) {
        // Add custom logic for onResponse
        print('Custom onResponse interceptor');
        handler.next(response);
      },
      onError: (error, handler) {
        // Add custom logic for onError
        print('Custom onError interceptor');
        handler.next(error);
      },
    ),
    // You can add more interceptors in the list
  ],
);
Explanation:
floating_logger comes with a powerful Network Simulator built right in! No extra packages needed. You can easily simulate different network conditions to test how your app handles:
// Enable logs (default)
NetworkSimulator.instance.setSimulation(NetworkSimulation.normal);

// Simulate slow network (3s delay)
NetworkSimulator.instance.setSimulation(NetworkSimulation.slow);

// Simulate offline mode (throws error)
NetworkSimulator.instance.setSimulation(NetworkSimulation.offline);
floating_logger is a powerful tool that simplifies debugging API calls in Flutter applications. Whether you need to inspect responses, copy cURL commands, or customize the UI, this package provides a seamless experience for developers. Integrate it today and streamline your debugging process! 🚀
📌 For more details, visit the GitHub Repository. 📌 For floating logger boilerplate, visit the Boilerplate Repository.