
 v2.0.0
flavor
플레이버 설정을 구성하고 플레이버 배너를 표시하는 간편한 방법입니다.
55좋아요 1.2천30일 다운로드160Pub 점수
AndroidiOSWebmacOSWindowsLinux
플레이버 설정을 구성하고 플레이버 배너를 표시하는 간편한 방법입니다.

{"sdk":"flutter"}{"sdk":"flutter"}^1.8.0아래는 영문 원문 스냅샷입니다. 최신 내용은 GitHub에서 확인하세요.
pub package build Buy Me A Coffee
A Flutter plugin for configuring flavor settings and optionally display a flavor banner on the app.
Each app needs some kind of flavor during its development lifecycle. You often have an api you use that is different during dev, beta, production, or log settings for example. That's when flavors come in.
You can define different start main methods, each can be configured with a flavor.
So for example, you can create a main_dev.dart file for your development environment:
void main() {
  Flavor.create(
    Environment.dev,
    color: Colors.green,
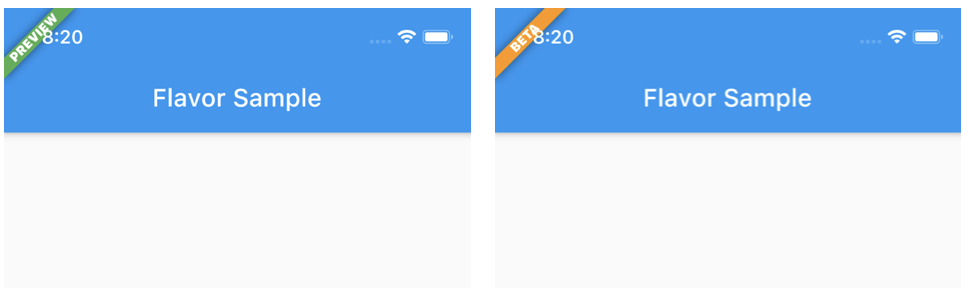
    name: 'PREVIEW',
    properties: {
      Keys.apiUrl: 'https://api.dev.company.com',
      Keys.apiKey: 'jksdhfkjhs83rjkh324kj23h4',
      logLevelKey: 100,
    },
  );
  setupApp();
}
And a main_prod.dart file for your production environment:
void main() {
  Flavor.create(
    Environment.production,
    properties: {
      Keys.apiUrl: 'https://api.company.com',
      Keys.apiKey: 'lksdhjfkjhdsf8sdfjkhsdf896',
      logLevelKey: 5,
    },
  );
  setupApp();
}
Each of these files will point to another main.dart file:
void setupApp() {
  final logLevel = Flavor.I.getInt(logLevelKey);
  print('LogLevel set for this flavor: $logLevel');
  runApp(FlavorApp());
}
| DEV | BETA | PROD |
|---|---|---|
| https://raw.githubusercontent.com/stefandevo/flutter-flavor/HEAD/screenshots/flavor_dev.png | https://raw.githubusercontent.com/stefandevo/flutter-flavor/HEAD/screenshots/flavor_beta.png | https://raw.githubusercontent.com/stefandevo/flutter-flavor/HEAD/screenshots/flavor_prod.png |
Note that in the PROD flavor no flavor banner is showed.
In Visual Code you can define following to use the different flavors:
{
	"version": "0.2.0",
	"configurations": [
		{
			"name": "DEV",
			"request": "launch",
			"type": "dart",
			"program": "example/lib/main_dev.dart",
			// "args": [
			// 	"--flavor",
			// 	"dev"
			// ]
		},
		{
			"name": "BETA",
			"request": "launch",
			"type": "dart",
			"program": "example/lib/main_beta.dart",
			// "args": [
			// 	"--flavor",
			// 	"beta"
			// ]
		},
		{
			"name": "PRD",
			"request": "launch",
			"type": "dart",
			"program": "example/lib/main_prod.dart",
			// "args": [
			// 	"--flavor",
			// 	"prod"
			// ]
		},
	]
}
Note: The args keys are currently commented. These only works if you created the flavors in the iOS / Android native projects too.
You can also define additional properties for each flavor/configuration. This is handy to store url's, api keys, etc. Further in your app you can access these values.
Flavor.I.getString(Keys.apiUrl)
The package has some default Keys at the moment which will be extended over time.
The defaults:
apiUrl, apiKey, appTitle
Of course you can add custom keys yourself as showed in the example.
Or you can check what flavor is currently running:
if (Flavor.I.isDevelopment) {
// do something nice in development
}
Checkout the example folder for a complete setup.
If you want to change bundle ids, or even assets (icon, splash screen) check out flutter_flavorizr. This nice tool will help you create flavors in Android and iOS.
API documentation can be found here