搜尋套件、儲存庫與 APP 分類

dynamic_widget 封面
套件詳情v6.0.0

dynamic_widget

一個後端驅動的 UI 工具包,使用 JSON 建立您的動態 UI,JSON 格式與 Flutter widget 程式碼非常相似。

AndroidiOSWebmacOSWindowsLinux
近 30 天下載
419
喜歡數
452
Pub 分數
140

安裝套件

flutter pub add dynamic_widget

套件介紹

根據套件公開資料產生的選型評估,僅供參考。

Dynamic Widget 是一個後端驅動的 UI 工具包,讓開發者能使用 JSON 建立動態使用者介面。JSON 結構與 Flutter widget 程式碼非常接近,讓 Flutter 開發者能直觀地從伺服器回應中程式化設計與呈現 UI。它支援多個平台,包括 Android、iOS、Web、macOS、Windows 和 Linux,可在不同環境中實現一致的 UI 渲染。此套件簡化了彈性、資料驅動介面的建立,無需更新應用程式即可變更 UI。

適用情境

  • 伺服器驅動的 UI 更新
  • 使用 JSON 快速原型設計
  • 跨平台動態佈局
  • 應用內內容自定義
  • 遠端 UI 設定
  • 透過卸載UI邏輯來減少應用大小

主要特色

  • 基於 JSON 的小部件定義
  • JSON 中的 Flutter 類似語法
  • 多平台支援
  • 可擴展的組件註冊表
  • 執行時小部件渲染
  • JSON 變更的熱重新載入

適合對象

  • 開發伺服器驅動應用程式的開發者
  • 需要頻繁更新UI的團隊
  • 針對每個使用者的個人化內容應用
  • 需要快速UI迭代的項目
  • 前端團隊與後端設計師協作

使用建議

  • 需要仔細管理 JSON 架構
  • 複雜組件可能帶來的效能開銷
  • 來自不受信任的JSON來源的安全風險
  • 有限的除錯功能用於格式錯誤的 JSON
  • 需要在執行時進行適當的錯誤處理
  • 依賴於前後端之間一致的合約

原始 README

以下為關聯原始碼儲存庫的 README 原文快照,最新內容請造訪原始碼儲存庫。

Pub  Awesome Flutter

Flutter Dynamic Widget

A Backend-Driven UI toolkit, build your dynamic UI with json, and the json format is very similar with flutter widget code.

From 4.0.0-nullsafety.1 version, it supports null-safety.

From 3.0.0 version, it supports exporting your flutter code to json code. please check How to write the json code

From 1.0.4 version, it supports flutter web application.

Table of contents

General info

I work for an e-commerce company. We need to build flexible pages. So we define a light UI protocol, and implement on Android and iOS. We can dynamic update App UIs by pushing a json file. With this ability, we can do some UI A/B testing without publishing App to app store. Flutter allows you to build beautiful native apps on iOS and Android from a single codebase, it can allow you to build web app later. Flutter's hot reload helps you quickly and easily experiment, build UIs, add features, and fix bugs faster. But it still build native app, the UIs can't be dynamic updated. If you want to modify the UIs, you need to publish the updated app to app store. With this project, you can build your UIs from a json string, which is the UI protocol. The json string is very similar with the Flutter widget dart code. All widget type and widget properties are the same.

Widget type will be a type property, and widget's properties will be the json properties too. All properties and their values will be almost the same. You can checkout the following document.

Currently support flutter widgets and properties

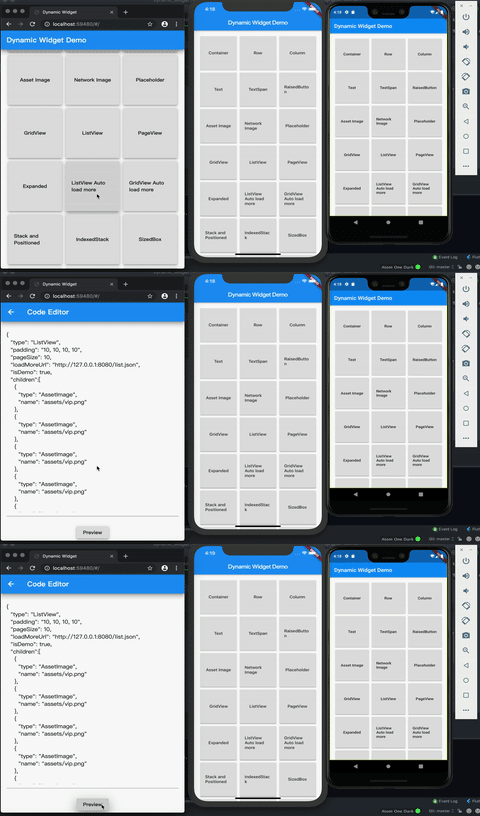
Screenshots

Install

1. Depend on it

Add this to your package's pubspec.yaml file:

dependencies:
  dynamic_widget: ^6.0.0
2. Install it

You can install packages from the command line:

with Flutter:

$ flutter packages get

Alternatively, your editor might support flutter packages get. Check the docs for your editor to learn more.

3. Import it

Now in your Dart code, you can use:

import 'package:dynamic_widget/dynamic_widget.dart';

Get started

You should use DynamicWidgetBuilder().build method to covert a json string into flutter widget. It will be time-consuming. so you'd better using FutureBuilder to build the UI.

import 'package:dynamic_widget/dynamic_widget.dart';

class PreviewPage extends StatelessWidget {
  final String jsonString;

  PreviewPage(this.jsonString);

  @override
  Widget build(BuildContext context) {
    return Scaffold(
      appBar: AppBar(
        // Here we take the value from the MyHomePage object that was created by
        // the App.build method, and use it to set our appbar title.
        title: Text("Preview"),
      ),
      body: FutureBuilder<Widget?>(
        future: _buildWidget(context),
        builder: (BuildContext context, AsyncSnapshot<Widget?> snapshot) {
          if (snapshot.hasError) {
            print(snapshot.error);
          }
          return snapshot.hasData
              ? SizedBox.expand(
                  child: snapshot.data,
                )
              : Text("Loading...");
        },
      ),
    );
  }

  Future<Widget?> _buildWidget(BuildContext context) async {
    return DynamicWidgetBuilder.build(
        jsonString, context, DefaultClickListener());
  }
}

How to implement a WidgetParser

  1. You need to implement the WidgetParser abstract class.
  2. Add new created WidgetParser by DynamicWidgetBuilder.addParser(WidgetParser parser) method.

This is a RaisedButton widget parser.

import 'package:dynamic_widget/dynamic_widget/utils.dart';
import 'package:dynamic_widget/dynamic_widget.dart';
import 'package:flutter/material.dart';

class RaisedButtonParser extends WidgetParser {
  @override
  String get widgetName => "RaisedButton";

  @override
  Widget parse(Map<String, dynamic> map, BuildContext buildContext, ClickListener listener) {
    String clickEvent =
        map.containsKey("click_event") ? map['click_event'] : "";

    var raisedButton = RaisedButton(
      color: map.containsKey('color') ? parseHexColor(map['color']) : null,
      disabledColor: map.containsKey('disabledColor')
          ? parseHexColor(map['disabledColor'])
          : null,
      disabledElevation:
          map.containsKey('disabledElevation') ? map['disabledElevation']?.toDouble() : 0.0,
      disabledTextColor: map.containsKey('disabledTextColor')
          ? parseHexColor(map['disabledTextColor'])
          : null,
      elevation: map.containsKey('elevation') ? map['elevation']?.toDouble() : 0.0,
      padding: map.containsKey('padding')
          ? parseEdgeInsetsGeometry(map['padding'])
          : null,
      splashColor: map.containsKey('splashColor')
          ? parseHexColor(map['splashColor'])
          : null,
      textColor:
          map.containsKey('textColor') ? parseHexColor(map['textColor']) : null,
      child: DynamicWidgetBuilder.buildFromMap(map['child'], buildContext, listener),
      onPressed: () {
        listener.onClicked(clickEvent);
      },
    );

    return raisedButton;
  }
}

Add it to parsers list.

DynamicWidgetBuilder.addParser(RaisedButtonParser());

How to add a click listener

Add "click_event" property to your widget json definition. for example:

var raisedButton_json =
'''
{
  "type": "Container",
  "alignment": "center",
  "child": {
    "type": "RaisedButton",
    "color": "##FF00FF",
    "padding": "8,8,8,8",
    "textColor": "#00FF00",
    "elevation" : 8.0,
    "splashColor" : "#00FF00",
    "click_event" : "route://productDetail?goods_id=123",
    "child" : {
      "type": "Text",
      "data": "I am a button"
    }
  }
}
'''

We suggest you'd better to use an URI to define the event, as the exmaple, it's a event for going to a product detail page.

Then, define a ClickListener

class DefaultClickListener implements ClickListener{
  @override
  void onClicked(String event) {
    print("Receive click event: " + event);
  }
}

Finally, pass the listener to build method.

  Future<Widget> _buildWidget() async{

    return DynamicWidgetBuilder.build(jsonString, buildContext, new DefaultClickListener());
  }

How to write the json code

You don't need to write the json code by hand, you can export your flutter code to json code efficiently with DynamicWidgetJsonExportor widget. You just need to wrap your flutter code with DynamicWidgetJsonExportor widget, then invoke its exportJsonString() method, look at following example, click the "export" button, it will find the DynamicWidgetJsonExportor widget, and export its child to json code efficiently.

class _JSONExporterState extends State<JSONExporter> {
  GlobalKey key = GlobalKey();

  @override
  Widget build(BuildContext context) {
    return Scaffold(
      appBar: AppBar(
        // Here we take the value from the MyHomePage object that was created by
        // the App.build method, and use it to set our appbar title.
        title: Text("export example"),
      ),
      body: Builder(
        builder: (context) => Column(
          children: [
            Expanded(
              child: DynamicWidgetJsonExportor(
                key: key,
                child: Container(
                  child: GridViewWidget(
                      GridViewParams(
                          mainAxisSpacing: 2.0,
                          crossAxisSpacing: 2.0,
                          crossAxisCount: 2,
                          childAspectRatio: 1.6,
                          padding: EdgeInsets.all(10.0),
                          pageSize: 10,
                          children: [
                            ListTile(
                              leading: Text("Leading text"),
                              title: Text("title"),
                              subtitle: Text("subtitle"),
                            ),
                            ListTile(
                              leading: Text("Leading text"),
                              title: Text("title"),
                              subtitle: Text("subtitle"),
                            )
                          ]),
                      context),
                ),
              ),
            ),
            RaisedButton(
              child: Text("Export"),
              onPressed: () {
                var exportor = key.currentWidget as DynamicWidgetJsonExportor;
                var exportJsonString = exportor.exportJsonString();
                Scaffold.of(context).showSnackBar(SnackBar(
                    content: Text("json string was exported to editor page.")));
                Future.delayed(Duration(seconds: 3), (){
                  Navigator.push(
                      context,
                      MaterialPageRoute(
                          builder: (context) =>
                              CodeEditorPage(exportJsonString)));
                });
              },
            )
          ],
        ),
      ),
    );
  }
}

You can use whatever your favorite IDE to build the UI, then use DynamicWidgetJsonExportor to export to json code. For detail, please check the Dynamic Widget Demo source code.

Logic Dynamicization

By using DynamicWidget, you can pass JavaScript code(string) as parameters to achieve dynamic UI and logic in the app.

import 'package:dynamic_widget/dynamic_widget.dart';
import 'package:flutter/material.dart';
import 'package:flutter/services.dart';

class MyHomePage extends StatefulWidget {
  const MyHomePage({super.key, required this.title});

  final String title;

  @override
  State<MyHomePage> createState() => _MyHomePageState();
}

class _MyHomePageState extends State<MyHomePage> {
  late Future<String> _uiFuture;

  @override
  void initState() {
    super.initState();
    _uiFuture = rootBundle.loadString("assets/ui.js");
  }

  @override
  Widget build(BuildContext context) {
    return Scaffold(
      appBar: AppBar(
        backgroundColor: Theme.of(context).colorScheme.inversePrimary,
        title: Text(widget.title),
      ),
      body: Center(
        child: FutureBuilder<String>(
          future: _uiFuture,
          builder: (context, snapshot) {
            if (snapshot.connectionState == ConnectionState.waiting) {
              return const SizedBox();
            } else if (snapshot.hasError) {
              return Text('Error: ${snapshot.error}');
            }
            return DynamicWidget(snapshot.data!);
          }
        )
      )
    );
  }
}

Let's look at a calculator example. The js code can be divided into three parts:

  1. The calculator's buttons (grid widget) grid_app are generated through the buttons array.
const buttons = [
    { label: '+', event: "op('add')" },
    { label: '-', event: "op('sub')" },
    { label: 'x', event: "op('mul')" },
    { label: '÷', event: "op('div')" },
    { label: '1', event: "digit(1)" },
    { label: '2', event: "digit(2)" },
    { label: '3', event: "digit(3)" },
    { label: 'C', event: "clear()" },
    { label: '4', event: "digit(4)" },
    { label: '5', event: "digit(5)" },
    { label: '6', event: "digit(6)" },
    { label: '0', event: "digit(0)" },
    { label: '7', event: "digit(7)" },
    { label: '8', event: "digit(8)" },
    { label: '9', event: "digit(9)" },
    { label: '=', event: "equal()" }
];

const grid_app = {
    "type": "GridView",
    "crossAxisCount": 4,
    "padding": "10, 10, 10, 10",
    "mainAxisSpacing": 4.0,
    "crossAxisSpacing": 4.0,
    "childAspectRatio": 1.6,
    "children": buttons.map(button => ({
        "type": "TextButton",
        "child": {
            "type": "Text",
            "data": button.label,
            "style": {
                "fontSize": 30.0
            }
        },
        "click_event": button.event
    }))
};
  1. In DynamicWidget, the App object describes the structure of the UI. Dynamically modifying components involves changing the properties of the App object. In the App, the text component and grid_app are assembled to form the complete calculator UI.
App =
{
    "type": "Column",
    "crossAxisAlignment": "end",
    "mainAxisAlignment": "end",
    "mainAxisSize": "max",
    "textBaseline": "alphabetic",
    "textDirection": "ltr",
    "verticalDirection": "down",
    "children": [{
        "type": "Text",
        "data": "",
    }, {
        "type": "Text",
        "data": "          ",
        "maxLines": 3,
        "overflow": "ellipsis",
        "style": {
            "color": "#000000",
            "fontSize": 40.0,
            "fontWeight": "bold",
        }
    },
    {
        "type": "Expanded",
        "child": grid_app
    }]
}
  1. The calculator’s computation logic is completed through functions such as clear, digit, and equal.
var _pending = 0;
var _pendingOp = 'none';
var _display = 0;
var _displayLocked = false;
var _afterEquals = false;

function _resolve() {
    if (_pendingOp === 'add') {
        _display = _pending + _display;
    } else if (_pendingOp === 'sub') {
        _display = _pending - _display;
    } else if (_pendingOp === 'mul') {
        _display = _pending * _display;
    } else if (_pendingOp === 'div') {
        _display = _pending / _display;
    }
    _pendingOp = 'none';
}

function clear() {
    _pending = 0;
    _pendingOp = 'none';
    _display = 0;
    _displayLocked = false;
    _afterEquals = false;
    App.children[1].data = ""
}

function digit(n) {
    if (_displayLocked || _afterEquals) {
        _display = 0;
        _displayLocked = false;
        _afterEquals = false;
    }
    _display = _display * 10 + n;
    App.children[1].data = _display + "          ";
}

function op(operation) {
    _resolve();
    if (_afterEquals) {
        _pending = _display;
        _afterEquals = false;
    } else {
        _pending = _display;
    }
    _pendingOp = operation;
    _display = 0;
    _displayLocked = false;
    App.children[1].data = (operation === 'add' ? '+' : operation === 'sub' ? '-' : operation === 'mul' ? 'x' : '÷') + "          ";
}

function equal() {
    _resolve();
    _pending = _display;
    _displayLocked = true;
    _afterEquals = true;
    App.children[1].data = _display + "          ";
}

Upon running example_js, you will see:

calculator

Widget Documents

Already completed widgets:

You can view Currently support widgets and properties here.

Code Examples

Checkout this project and run demo.

Contact

Created by @deng.yin@gmail.com - feel free to contact me

所屬分類

依賴

依賴清單 3 項

原始碼儲存庫

使用此套件的專案