搜尋套件、儲存庫與 APP 分類

floating_logger 封面
套件詳情v2.1.3

floating_logger

floating_logger 是一個 Flutter 庫,提供了一個浮動組件,用於即時 API 請求日誌。

AndroidiOSmacOSWindowsLinux
近 30 天下載
1220
喜歡數
38
Pub 分數
150

安裝套件

flutter pub add floating_logger

套件介紹

根據套件公開資料產生的選型評估,僅供參考。

floating_logger 是一個 Flutter 套件,可提供浮動小組件以在應用程式開發期間顯示即時 API 請求日誌。它幫助開發者輕鬆監控網路活動,顯示請求 URL、方法、回應時間和狀態碼等詳細資訊。該組件懸浮於螢幕上,方便存取而不會中斷使用者流程。專為除錯與測試設計,可無縫整合至跨多個平台的 Flutter 應用程式中。適合需要快速掌握 API 行為而無需依賴外部工具的團隊。

適用情境

  • 開發過程中的即時 API 監控
  • 在 Flutter 應用中調試網路請求
  • 快速檢查HTTP呼叫詳細資訊
  • 改善團隊在API問題上的協作
  • 在各種條件下測試API效能

主要特色

  • 用於持續日誌可視化的浮動 UI
  • 即時顯示API請求/回應資料
  • 支援所有主要的桌面和行動平台
  • 使用一條命令進行最小化設定
  • 可自訂的日誌過濾和樣式

適合對象

  • 正在開發中的Flutter開發者
  • 專注於API除錯的團隊
  • 需要頻繁進行網路測試的應用程式
  • 使用 REST API 的前端工程師
  • 在需要對網路呼叫進行快速反饋的專案中

使用建議

  • 不適用於生產環境
  • 如果記錄過多資料,可能會影響效能
  • 發布應用前需手動移除
  • 僅限除錯建構
  • UI 可能會遮蔽小尺寸裝置上的螢幕內容

原始 README

以下為關聯原始碼儲存庫的 README 原文快照,最新內容請造訪原始碼儲存庫。

floating_logger 🚀

floating_logger is a Flutter library designed to help developers debug and test API calls with ease. It provides a floating widget that allows you to monitor API requests in real-time and even copy the curl command for quick testing. Perfect for anyone who wants to streamline the development and debugging process! ⚡

📌 Features

  • ✅ Advanced Search & Deep Debugging - Search log path, headers, body, response, and deep JSON content with highlighting and auto-expansion
  • ✅ Dynamic Search Navigation - Easily navigate through multiple search matches with up/down arrows
  • ✅ Beautify JSON Response Item - Collapsible and formatted JSON viewer
  • ✅ Network Simulator - Test Slow, Offline, and Normal network conditions
  • ✅ Copy cURL (Long Tap) - Easily copy API requests
  • ✅ Floating Button (Flexible Logger) - Moveable debugging widget
  • ✅ Preferences for Global Hide/Show - Toggle visibility globally
  • ✅ Custom Item List - Customize how log items are displayed

Installation 🔧

To get started, add floating_logger to your pubspec.yaml:

dependencies:
  floating_logger: ^latest_version

package import :

import 'package:floating_logger/floating_logger.dart';

Demo 🎥

logo

Check out the live demo of Floating Logger:

Live Demo

Preview Debug

Here is the preview of the debug console log for the HTTP request:

logo
Above: Example of the HTTP request.

logo
Middle: HTTP response log.

logo
Below: HTTP error log.

📖 Usage

🚀 Step 1: Logging Your API Calls

There are two ways to ensure your API calls are captured by the floating logger. Choose the one that best fits your project:

Option A: Use FloatingLoggerInterceptor (For existing custom Dio)

If you already have your own Dio instance and don't want to change it, simply add the interceptor:

final dio = Dio();
dio.interceptors.add(FloatingLoggerInterceptor());
Option B: Use DioLogger (Easiest / No-config)

If you don't want the hassle of configuring a custom Dio instance, use the built-in DioLogger directly:

Future<void> fetchData() async {
  try {
    final response = await DioLogger.instance.get(
      'https://api.genderize.io',
      queryParameters: { "name": "james" },
    );
    // ... handle response
  } catch (e) {
    // ... handle error
  }
}

🏗 Step 2: Displaying the Logger with FloatingLoggerControl

Once you've set up the logging (Step 1), you need to wrap your app (or a specific page) with FloatingLoggerControl to show the floating debug button.

return FloatingLoggerControl(
  child: Scaffold(
    appBar: AppBar(
      title: const Text("Floating Logger Test"),
    ),
    body: Center(child: Text("Logger is active!")),
  ),
);

🎚 Toggle Floating Logger Visibility Using Preferences

Use ValueNotifier to toggle the logger visibility dynamically. This allows you to enable or disable the logger and persist the setting across app sessions.

📌 Define the Visibility Notifier
final ValueNotifier<bool> isLoggerVisible = ValueNotifier<bool>(true);

@override
void initState() {
  loadLoggerSettings();
  super.initState();
}

Future<void> loadLoggerSettings() async {
  try {
    bool pref = await getStoredPreference();
    setState(() {
      isLoggerVisible.value = pref;
    });
  } catch (e) {
    print(e);
  }
}

Future<bool> getStoredPreference() async {
  return await CustomSharedPreferences.getDebugger();
}
📌 Apply Preferences in FloatingLoggerControl
return FloatingLoggerControl(
  getPreference: getStoredPreference,
  isShow: isLoggerVisible,
  child: Scaffold(
    appBar: AppBar(title: Text("Logger Toggle Test")),
    body: Switch(
      activeTrackColor: Colors.blue,
      value: isLoggerVisible.value,
      onChanged: (value) {
        setState(() {
          isLoggerVisible.value = value;
          CustomSharedPreferences.saveDebugger(value);
        });
      },
    ),
  ),
);

🎨 Customizing Floating Logger UI

You can modify the floating logger’s UI using widgetItemBuilder to create a custom log display format.

return FloatingLoggerControl(
  widgetItemBuilder: (index, data) {
    final item = data[index];
    return Padding(
      padding: const EdgeInsets.only(bottom: 10),
      child: Card(
        child: ListTile(
          title: Text('${item.type!} [${item.response}]', style: TextStyle(fontSize: 12.0)),
          subtitle: Column(
            crossAxisAlignment: CrossAxisAlignment.start,
            children: [
              Text("URL   : ${item.path}", style: TextStyle(fontSize: 12.0)),
              Text("Data  : ${item.data}", style: TextStyle(fontSize: 12.0)),
              Text("cURL  : ${item.curl}", style: TextStyle(fontSize: 12.0)),
            ],
          ),
        ),
      ),
    );
  },
  child: child,
);

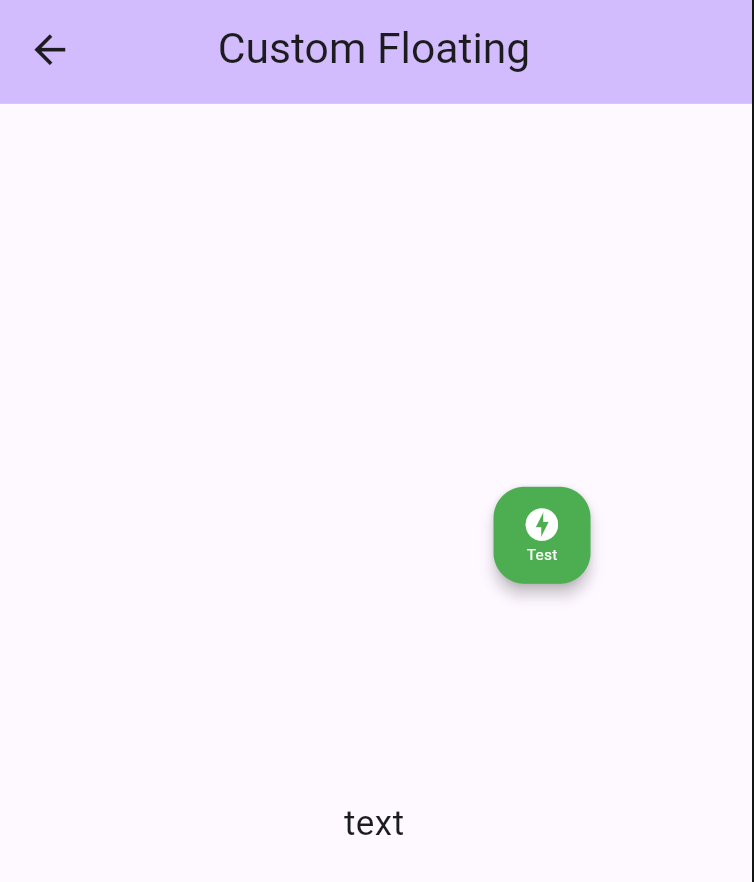
🎨 Add Style to Floating Widget

You can easily customize the appearance of your floating logger widget by using the style property. This allows you to adjust the background color, tooltip, icon, and even the size of the floating widget to match your app’s theme. 🎨✨

FloatingLoggerControl(
      style: FloatingLoggerStyle(
        backgroundColor: Colors.green,
        tooltip: "Testing",
        icon: Column(
          mainAxisAlignment: MainAxisAlignment.center,
          children: [
            Icon(
              Icons.offline_bolt,
              color: Colors.white,
              size: 20,
            ),
            Text(
              "Test",
              style: TextStyle(
                fontSize: 8.0,
                color: Colors.white,
              ),
            ),
          ],
        ),
      ),
      child : child,
),

🖌️ What You Can Customize:

  • backgroundColor: Set a vibrant color to make your floating widget stand out.
  • tooltip: Add a custom tooltip text to provide helpful hints when hovering over the widget.
  • icon: Choose an icon (like offline_bolt, info, etc.) and customize its size, color, and appearance.
  • size: Adjust the size using Size class to adjust floating widget size.

🛠️ Adding a Single Custom Interceptor

To add a single custom interceptor to DioLogger, you can use the addInterceptor method. Here’s an example of adding a custom InterceptorsWrapper that handles the onResponse and onError events.

/// Example to add a custom single interceptor
DioLogger.instance.addInterceptor(
  InterceptorsWrapper(
    onResponse: (response, handler) {
      // Add custom logic for onResponse
      print('Custom onResponse interceptor');
      handler.next(response);
    },
    onError: (error, handler) {
      // Add custom logic for onError
      print('Custom onError interceptor');
      handler.next(error);
    },
  ),
);

Explanation:

  • onResponse : This is triggered when a successful response is received. You can add custom logic here, such as logging or modifying the response.
  • onError : This is triggered when an error occurs. You can handle errors, log them, or perform recovery actions.
  • handler.next() : This ensures the interceptor chain continues to the next interceptor or the final handler.

🛠️ Add List Custom Interceptor

If you want to add multiple interceptors at once, you can use the addListInterceptor method. This is useful when you have several interceptors that need to be applied together.

Here’s an example:

DioLogger.instance.addListInterceptor(
  [
    InterceptorsWrapper(
      onResponse: (response, handler) {
        // Add custom logic for onResponse
        print('Custom onResponse interceptor');
        handler.next(response);
      },
      onError: (error, handler) {
        // Add custom logic for onError
        print('Custom onError interceptor');
        handler.next(error);
      },
    ),
    // You can add more interceptors in the list
  ],
);

Explanation:

  • List of Interceptors: You can define multiple InterceptorsWrapper objects in a list. Each interceptor will be executed in the order they are added.
  • Order Matters: The first interceptor in the list will be executed first, followed by the next, and so on.

⚡ Network Simulator (Built-in)

floating_logger comes with a powerful Network Simulator built right in! No extra packages needed. You can easily simulate different network conditions to test how your app handles:

  • Normal: Standard network behavior.
  • Slow: Simulates a 3-second delay (configurable).
  • Offline: Simulates no internet connection (throws error).
Usage
// Enable logs (default)
NetworkSimulator.instance.setSimulation(NetworkSimulation.normal);

// Simulate slow network (3s delay)
NetworkSimulator.instance.setSimulation(NetworkSimulation.slow);

// Simulate offline mode (throws error)
NetworkSimulator.instance.setSimulation(NetworkSimulation.offline);

🎯 Conclusion

floating_logger is a powerful tool that simplifies debugging API calls in Flutter applications. Whether you need to inspect responses, copy cURL commands, or customize the UI, this package provides a seamless experience for developers. Integrate it today and streamline your debugging process! 🚀

📌 For more details, visit the GitHub Repository. 📌 For floating logger boilerplate, visit the Boilerplate Repository.

所屬分類

依賴

依賴清單 2 項

原始碼儲存庫

使用此套件的專案

暫無相關資料。