搜尋套件、儲存庫與 APP 分類

套件詳情v1.0.10

riverpod_navigator

使用 riverpod 和 Navigator 2.0 的簡單但強大的 Flutter 實作導航

近 30 天下載
91
喜歡數
25
Pub 分數
60

安裝套件

flutter pub add riverpod_navigator

套件介紹

根據套件公開資料產生的選型評估,僅供參考。

Riverpod_Navigator 是一個輕量級的 Flutter 套件,透過使用 Riverpod 進行狀態管理以及 Navigator 2.0 的宣告式方法來簡化導航。它支援乾淨、可擴展的路由,具備反應式路由處理功能,讓應用程式導航流程能以狀態驅動的方式輕鬆管理。此套件與 Riverpod 無縫整合,使路由能夠動態回應應用程式狀態的變更。專為現代 Flutter 應用設計,透過將路由邏輯與 UI 元件分離,提升可維護性與可測試性。

適用情境

  • Flutter 應用中的宣告式導航
  • 狀態感知的路由轉換
  • 基於提供者值的響應式路由
  • 複雜的導航流程,包含嵌套路由
  • 獨立測試導航邏輯

主要特色

  • 與 Riverpod 的狀態管理整合
  • 支援 Navigator 2.0 的宣告式路由
  • 基於狀態的動態路由更新
  • 路由邏輯的清晰分離
  • 用於定義和導航路由的簡單 API

適合對象

  • 使用 Riverpod 進行狀態管理的開發者
  • 需要反應式導航的應用
  • 旨在實現可擴展路由架構的項目
  • 專注於可測試和可維護代碼的團隊
  • 具有複雜導航的現代 Flutter 應用程式

使用建議

  • 需要熟悉 Riverpod 和 Navigator 2.0
  • 可能為簡單應用增加複雜性
  • 有限的平台支援(未列出具體平台)

原始 README

以下為關聯原始碼儲存庫的 README 原文快照,最新內容請造訪原始碼儲存庫。

Riverpod navigation

If you are interested in the motivation why the package was created and a detailed description of what problems it solves, read this MEDIUM article: Simple Flutter navigation with Riverpod.

Simple but powerful Flutter navigation with riverpod and Navigator 2.0 that solves the following:
  • Strictly typed navigation:
    you can use navigate([HomeSegment(),BookSegment(id: 2)]); instead of navigate('home/book;id:2'); in your code
  • asynchronous navigation ...
    ... is the case when changing the navigation state requires asynchronous actions (such as loading or saving data from the Internet)
  • multiple providers ...
    ... is the case when the navigation state depends on multiple riverpod providers
  • easier coding:
    the navigation problem is reduced to manipulating the class collection
  • better separation of concerns: UI x Model (thanks to riverpod :+1:):
    navigation logic can be developed and tested without typing a single flutter widget
  • nested navigation
    just use the nested riverpod ProviderScope() and Flutter Router widget

Index

Terminology used

Take a look at the following terms related to URL path home/book;id=2

  • string-path: e.g. home/book;id=2
  • string-segment: the string-path consists of two slash-delimited string-segments (home and book;id=2)
  • typed-segment describes coresponding string-segments (HomeSegment() for 'home' and BookSegment(id:2) for 'book;id=2')
    typed-segment is class TypedSegment {}'s descendant.
  • typed-path describes coresponding string-path ([HomeSegment(), BookSegment(id:2)])
    typed-path is typedef TypedPath = List<TypedSegment>
  • Flutter Navigator 2.0 navigation-stack is uniquely determined by the TypedPath (where each TypedPath's TypedSegment instance corresponds to a screen and page instance):
    pages = [MaterialPage (child: HomeScreen(HomeSegment())), MaterialPage (child: BookScreen(BookSegment(id:2)))]

Simple example

Create an application using these simple steps:

Step1 - define classes for the typed-segment
class HomeSegment extends TypedSegment {
  const HomeSegment();
  factory HomeSegment.decode(UrlPars pars) => const HomeSegment();
}

class BookSegment extends TypedSegment {
  const BookSegment({required this.id});
  factory BookSegment.decode(UrlPars pars) => BookSegment(id: pars.getInt('id'));

  final int id;
  @override
  void encode(UrlPars pars) => pars.setInt('id', id);
}

encode and decncode helps to convert typed-segment to string-segment and back.

Step2 - configure AppNavigator...

... by extending the RNavigator class.

class AppNavigator extends RNavigator {
  AppNavigator(Ref ref)
      : super(
          ref,
          [
            /// 'home' and 'book' strings are used in web URL, e.g. 'home/book;id=2'
            /// decode is used to decode URL to HomeSegment/BookSegment
            /// HomeScreen/BookScreen.new are screen builders for a given segment
            RRoute<HomeSegment>(
              'home',
              HomeSegment.decode,
              HomeScreen.new,
            ),
            RRoute<BookSegment>(
              'book',
              BookSegment.decode,
              BookScreen.new,
            ),
          ],
        );
}
Step3 - use the AppNavigator in MaterialApp.router

If you are familiar with the Flutter Navigator 2.0 and the riverpod, the following code is clear:

class App extends ConsumerWidget {
  const App({Key? key}) : super(key: key);

  @override
  Widget build(BuildContext context, WidgetRef ref) {
    final navigator = ref.read(navigatorProvider) as AppNavigator;
    return MaterialApp.router(
      title: 'Riverpod Navigator Example',
      routerDelegate: navigator.routerDelegate,
      routeInformationParser: navigator.routeInformationParser,
    );
  }
}
Step4 - configure riverpod ProviderScope ...

... in main entry point

void main() => runApp(
      ProviderScope(
        // [HomeSegment()] as home TypedPath and navigator constructor are required
        overrides: riverpodNavigatorOverrides([HomeSegment()], AppNavigator.new),
        child: const App(),
      ),
    );
Step5 - code screen widgets

There are two screen to code: HomeScreen and BookScreen. Extend this screens from RScreen widget.

class BookScreen extends RScreen<AppNavigator, BookSegment> {
  const BookScreen(BookSegment segment) : super(segment);

  @override
  Widget buildScreen(ref, navigator, appBarLeading) => Scaffold(
        appBar: AppBar(
          title: Text('Book ${segment.id}'),
          /// [appBarLeading] overrides standard back button behavior
          leading: appBarLeading,
        ),
        body: 
...

RScreen widget:

  • replaces the standard Android back button behavior (using Flutter BackButtonListener widget)
  • will provide appBarLeading icon to replace the standard AppBar back button behavior

This is essential for asynchronous navigation to function properly.

And that's all

See:

The link Go to book: [3, 13, 103] in the running example would not make much sense in the real Books application. But it shows the navigation to the four-screen navigation stack:

  • string-path = home/book;id=3/book;id=13/book;id=103.
  • typed-path = [HomeSegment(), BookSegment(id:3), BookSegment(id:13), BookSegment(id:103)].
  • navigation-stack (flutter Navigator.pages) = [MaterialPage (child: HomeScreen(HomeSegment())), MaterialPage (child: BookScreen(BookSegment(id:3))), MaterialPage (child: BookScreen(BookSegment(id:13))), MaterialPage (child: BookScreen(BookSegment(id:103)))].

Development and testing without GUI

Navigation logic can be developed and tested without typing a single flutter widget:

  test('navigation model', () async {
    final container = ProviderContainer(
      overrides: riverpodNavigatorOverrides([HomeSegment()], AppNavigator.new),
    );
    final navigator = container.read(navigatorProvider);
    
    Future navigTest(Future action(), String expected) async {
      await action();
      await container.pump();
      expect(navigator.navigationStack2Url, expected);
    }

    await navigTest(
      () => navigator.navigate([HomeSegment(), BookSegment(id: 1)]),
      'home/book;id=1',
    );
    await navigTest(
      () => navigator.pop(),
      'home',
    );
    await navigTest(
      () => navigator.push(BookSegment(id: 2)),
      'home/book;id=2',
    );
    await navigTest(
      () => navigator.replaceLast<BookSegment>((old) => BookSegment(id: old.id + 1)),
      'home/book;id=3',
    );
  });

URL parsing

Flutter Navigator 2.0 and its MaterialApp.router constructor requires a URL parser (RouteInformationParser). We use URL syntax, see section 3.3. of RFC 3986, note *For example, one URI producer might use a segment such as "name;v=1.1"..."

Each TypedSegment must be converted to string-segment and back. The format of string-segment is

<unique TypedSegment id>[;<property name>=<property value>]*, e.g. book;id=3.

encode/decode example:

Instead of directly converting to/from the string, we convert to/from
typedef UrlPars = Map<String,String>

So far, we support the following types of TypedSegment property:
int, double, bool, String, int?, double?, bool?, String?.

class TestSegment extends TypedSegment {
  const TestSegment({required this.i, this.s, required this.b, this.d});

  factory TestSegment.decode(UrlPars pars) => TestSegment(
        i: pars.getInt('i'),
        s: pars.getStringNull('s'),
        b: pars.getBool('b'),
        d: pars.getDoubleNull('d'),
      );

  @override
  void encode(UrlPars pars) => 
    pars.setInt('i', i).setString('s', s).setBool('b', b).setDouble('d', d);

  final int i;
  final String? s;
  final bool b;
  final double? d;
}

After registering TestSegment by RRoute<TestSegment>('test',TestSegment.decode, the following URL's are correct:

  • test;i=1;b=true
  • test;i=2;b=true;d=12.6;s=abcd
  • test;i=2;b=true/test;i=2;b=true;d=12.6;s=abcd/test;i=3;b=false
Customization

Every aspect of URL conversion can be customized, e.g.

  • support another property type (as a DateTime, providing getDateTime, getDateTimeNull and setDateTime in your own UrlPars's extension)
    See extension UrlParsEx on UrlPars in path_parser.dart.
  • rewrite the entire IPathParser and use a completely different URL syntax. Then use your parser in AppNavigator:
class AppNavigator extends RNavigator {
  AppNavigator(Ref ref)
      : super(
....
  	pathParserCreator: (router) => MyPathParser(router),
...         

Place navigation events in AppNavigator

It is good practice to place the code for all events (specific to navigation) in AppNavigator. These can then be used not only for writing screen widgets, but also for testing.

class AppNavigator extends RNavigator {
  ......
  /// navigate to next book
  Future toNextBook() => replaceLast<BookSegment>((last) => BookSegment(id: last.id + 1));
  /// navigate to home
  Future toHome() => navigate([HomeSegment()]);
}

In the screen widget, it is used as follows:

...
ElevatedButton(
  onPressed: navigator.toNextBook,
  child: Text('Book $id'),
), 
... 

and in the test code as follows:

  await navigTest(navigator.toNextBook, 'home/book;id=3');

Async navigation

Async navigation means that navigation is delayed until the asynchronous actions are performed. These actions for each screen are:

  • opening (before opening a new screen)
  • closing (before closing the old screen)
  • replacing (before replacing the screen with a screen with the same segment type)

The opening and closing actions can return an asynchronous result that can be used later when building a new screen.

Define classes for the typed-segment

Apply a AsyncSegment mixin with appropriate type (String) to TypedSegment's.

class HomeSegment extends TypedSegment with AsyncSegment<String>{
  ....
}

class BookSegment extends TypedSegment  with AsyncSegment<String>{
  ....
}
Configure AppNavigator

Add opening, closing or replacing actions to RRoute definition.

class AppNavigator extends RNavigator {
  AppNavigator(Ref ref)
      : super(
          ref,
          [
            RRoute<HomeSegment>(
              'home',
              HomeSegment.decode,
              HomeScreen.new,
              opening: (sNew) => sNew.setAsyncValue(_simulateAsyncResult('Home.opening', 2000)),
            ),
            RRoute<BookSegment>(
              'book',
              BookSegment.decode,
              BookScreen.new,
              opening: (sNew) => sNew.setAsyncValue(_simulateAsyncResult('Book ${sNew.id}.opening', 240)),
              replacing: (sOld, sNew) => sNew.setAsyncValue(_simulateAsyncResult('Book ${sOld.id}=>${sNew.id}.replacing', 800)),
              closing: (sOld) => Future.delayed(Duration(milliseconds: 500)),
            ),
          ],
        );
....
}

// simulates an action such as saving-to/loading-from external storage
Future<String> _simulateAsyncResult(String asyncResult, int msec) async {
  await Future.delayed(Duration(milliseconds: msec));
  return '$asyncResult: async result after $msec msec';
}
Use the result of an asynchronous action when building the screen
...
Text('Async result: "${segment.asyncValue}"'),
...
See:

Other features and examples

Installation of examples

After cloning the riverpod_navigator repository, go to examples/doc subdirectory and execute:

  • flutter create .
  • flutter pub get

See the /lib subdirectory for examples.

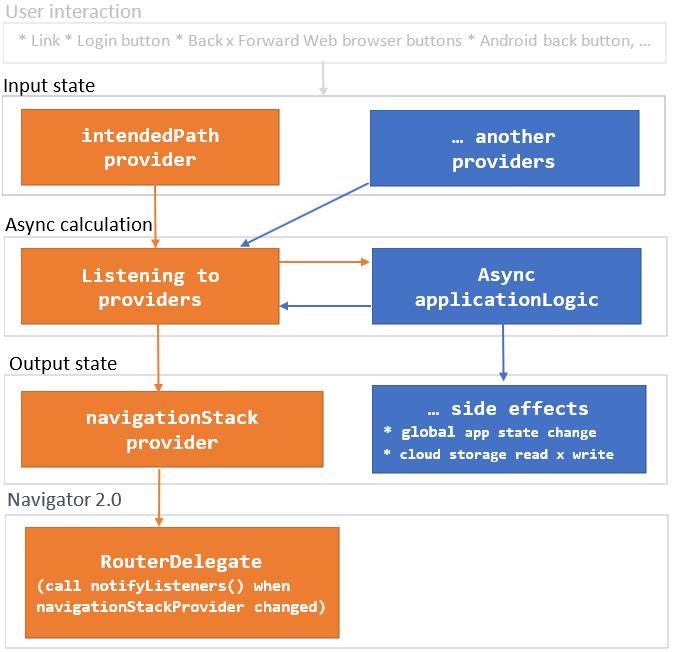
Navigator Data Flow Diagram:

riverpod_navigator

As you can see, changing the Input state starts the async calculation. The result of the calculations is Output state which can have app-specific Side effects. Navigator 2.0 RouterDelegate is then synchronized with navigationStackProvider

Roadmap

I prepared this package for my new project. Its further development depends on whether the community will use it.

  • proofreading because my English is not good. Community help is warmly welcomed.
  • parameterization allowing Cupertino

所屬分類

依賴

依賴清單 5 項

原始碼儲存庫

使用此套件的專案

暫無相關資料。