Buscar pacotes, repositórios e categorias de apps

Capa de dynamic_widget
Detalhes do pacotev6.0.0

dynamic_widget

Uma ferramenta de interface do usuário orientada por backend, crie sua interface dinâmica com JSON, e o formato JSON é muito semelhante ao código do widget do Flutter.

AndroidiOSWebmacOSWindowsLinux
Downloads em 30 dias
419
Curtidas
452
Pontos Pub
140

Instalar pacote

flutter pub add dynamic_widget

Visão geral do pacote

Orientação gerada a partir de informações públicas. Apenas para referência.

Dynamic Widget é uma ferramenta de interface do usuário orientada por backend que permite aos desenvolvedores criar interfaces dinâmicas usando JSON. A estrutura JSON se assemelha muito ao código de widget do Flutter, tornando intuitivo para desenvolvedores do Flutter projetarem e renderizarem interfaces programaticamente a partir de respostas do servidor. Ele suporta múltiplas plataformas, incluindo Android, iOS, Web, macOS, Windows e Linux, permitindo a renderização consistente da interface em diferentes ambientes. Este pacote simplifica a criação de interfaces flexíveis e baseadas em dados sem a necessidade de atualizações de aplicativo para mudanças na interface.

Casos de uso

  • Atualizações de UI impulsionadas por servidor
  • Prototipagem rápida com JSON
  • Layouts dinâmicos multiplataforma
  • Personalização de conteúdo no aplicativo
  • Configuração remota da interface do usuário
  • Reduzindo o tamanho do aplicativo ao deslocar a lógica da interface

Principais recursos

  • definição de widget baseada em JSON
  • Sintaxe semelhante ao Flutter em JSON
  • Suporte multiplataforma
  • registro de widget extensível
  • Renderização de widget em tempo de execução
  • Recarregamento rápido para alterações no JSON

Indicado para

  • Desenvolvedores construindo aplicativos orientados por servidor
  • Equipes que precisam de atualizações frequentes da interface
  • Aplicativos com conteúdo personalizado por usuário
  • Projetos que exigem iteração rápida da interface
  • Equipes de frontend trabalhando com designers de backend

Considerações

  • Requer gerenciamento cuidadoso do esquema JSON
  • Sobrecarga de desempenho potencial com widgets complexos
  • Riscos de segurança com fontes de JSON não confiáveis
  • Depuração limitada para JSON mal formado
  • Necessita de tratamento adequado de erros em tempo de execução
  • Depende de contrato consistente entre backend e frontend

README original

Snapshot do README original do repositório-fonte vinculado. Consulte o repositório para o conteúdo mais recente.

Pub  Awesome Flutter

Flutter Dynamic Widget

A Backend-Driven UI toolkit, build your dynamic UI with json, and the json format is very similar with flutter widget code.

From 4.0.0-nullsafety.1 version, it supports null-safety.

From 3.0.0 version, it supports exporting your flutter code to json code. please check How to write the json code

From 1.0.4 version, it supports flutter web application.

Table of contents

General info

I work for an e-commerce company. We need to build flexible pages. So we define a light UI protocol, and implement on Android and iOS. We can dynamic update App UIs by pushing a json file. With this ability, we can do some UI A/B testing without publishing App to app store. Flutter allows you to build beautiful native apps on iOS and Android from a single codebase, it can allow you to build web app later. Flutter's hot reload helps you quickly and easily experiment, build UIs, add features, and fix bugs faster. But it still build native app, the UIs can't be dynamic updated. If you want to modify the UIs, you need to publish the updated app to app store. With this project, you can build your UIs from a json string, which is the UI protocol. The json string is very similar with the Flutter widget dart code. All widget type and widget properties are the same.

Widget type will be a type property, and widget's properties will be the json properties too. All properties and their values will be almost the same. You can checkout the following document.

Currently support flutter widgets and properties

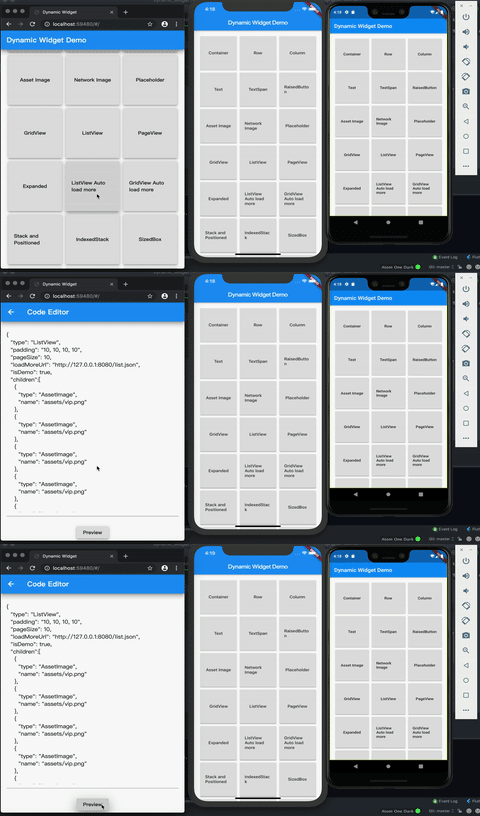
Screenshots

Install

1. Depend on it

Add this to your package's pubspec.yaml file:

dependencies:
  dynamic_widget: ^6.0.0
2. Install it

You can install packages from the command line:

with Flutter:

$ flutter packages get

Alternatively, your editor might support flutter packages get. Check the docs for your editor to learn more.

3. Import it

Now in your Dart code, you can use:

import 'package:dynamic_widget/dynamic_widget.dart';

Get started

You should use DynamicWidgetBuilder().build method to covert a json string into flutter widget. It will be time-consuming. so you'd better using FutureBuilder to build the UI.

import 'package:dynamic_widget/dynamic_widget.dart';

class PreviewPage extends StatelessWidget {
  final String jsonString;

  PreviewPage(this.jsonString);

  @override
  Widget build(BuildContext context) {
    return Scaffold(
      appBar: AppBar(
        // Here we take the value from the MyHomePage object that was created by
        // the App.build method, and use it to set our appbar title.
        title: Text("Preview"),
      ),
      body: FutureBuilder<Widget?>(
        future: _buildWidget(context),
        builder: (BuildContext context, AsyncSnapshot<Widget?> snapshot) {
          if (snapshot.hasError) {
            print(snapshot.error);
          }
          return snapshot.hasData
              ? SizedBox.expand(
                  child: snapshot.data,
                )
              : Text("Loading...");
        },
      ),
    );
  }

  Future<Widget?> _buildWidget(BuildContext context) async {
    return DynamicWidgetBuilder.build(
        jsonString, context, DefaultClickListener());
  }
}

How to implement a WidgetParser

  1. You need to implement the WidgetParser abstract class.
  2. Add new created WidgetParser by DynamicWidgetBuilder.addParser(WidgetParser parser) method.

This is a RaisedButton widget parser.

import 'package:dynamic_widget/dynamic_widget/utils.dart';
import 'package:dynamic_widget/dynamic_widget.dart';
import 'package:flutter/material.dart';

class RaisedButtonParser extends WidgetParser {
  @override
  String get widgetName => "RaisedButton";

  @override
  Widget parse(Map<String, dynamic> map, BuildContext buildContext, ClickListener listener) {
    String clickEvent =
        map.containsKey("click_event") ? map['click_event'] : "";

    var raisedButton = RaisedButton(
      color: map.containsKey('color') ? parseHexColor(map['color']) : null,
      disabledColor: map.containsKey('disabledColor')
          ? parseHexColor(map['disabledColor'])
          : null,
      disabledElevation:
          map.containsKey('disabledElevation') ? map['disabledElevation']?.toDouble() : 0.0,
      disabledTextColor: map.containsKey('disabledTextColor')
          ? parseHexColor(map['disabledTextColor'])
          : null,
      elevation: map.containsKey('elevation') ? map['elevation']?.toDouble() : 0.0,
      padding: map.containsKey('padding')
          ? parseEdgeInsetsGeometry(map['padding'])
          : null,
      splashColor: map.containsKey('splashColor')
          ? parseHexColor(map['splashColor'])
          : null,
      textColor:
          map.containsKey('textColor') ? parseHexColor(map['textColor']) : null,
      child: DynamicWidgetBuilder.buildFromMap(map['child'], buildContext, listener),
      onPressed: () {
        listener.onClicked(clickEvent);
      },
    );

    return raisedButton;
  }
}

Add it to parsers list.

DynamicWidgetBuilder.addParser(RaisedButtonParser());

How to add a click listener

Add "click_event" property to your widget json definition. for example:

var raisedButton_json =
'''
{
  "type": "Container",
  "alignment": "center",
  "child": {
    "type": "RaisedButton",
    "color": "##FF00FF",
    "padding": "8,8,8,8",
    "textColor": "#00FF00",
    "elevation" : 8.0,
    "splashColor" : "#00FF00",
    "click_event" : "route://productDetail?goods_id=123",
    "child" : {
      "type": "Text",
      "data": "I am a button"
    }
  }
}
'''

We suggest you'd better to use an URI to define the event, as the exmaple, it's a event for going to a product detail page.

Then, define a ClickListener

class DefaultClickListener implements ClickListener{
  @override
  void onClicked(String event) {
    print("Receive click event: " + event);
  }
}

Finally, pass the listener to build method.

  Future<Widget> _buildWidget() async{

    return DynamicWidgetBuilder.build(jsonString, buildContext, new DefaultClickListener());
  }

How to write the json code

You don't need to write the json code by hand, you can export your flutter code to json code efficiently with DynamicWidgetJsonExportor widget. You just need to wrap your flutter code with DynamicWidgetJsonExportor widget, then invoke its exportJsonString() method, look at following example, click the "export" button, it will find the DynamicWidgetJsonExportor widget, and export its child to json code efficiently.

class _JSONExporterState extends State<JSONExporter> {
  GlobalKey key = GlobalKey();

  @override
  Widget build(BuildContext context) {
    return Scaffold(
      appBar: AppBar(
        // Here we take the value from the MyHomePage object that was created by
        // the App.build method, and use it to set our appbar title.
        title: Text("export example"),
      ),
      body: Builder(
        builder: (context) => Column(
          children: [
            Expanded(
              child: DynamicWidgetJsonExportor(
                key: key,
                child: Container(
                  child: GridViewWidget(
                      GridViewParams(
                          mainAxisSpacing: 2.0,
                          crossAxisSpacing: 2.0,
                          crossAxisCount: 2,
                          childAspectRatio: 1.6,
                          padding: EdgeInsets.all(10.0),
                          pageSize: 10,
                          children: [
                            ListTile(
                              leading: Text("Leading text"),
                              title: Text("title"),
                              subtitle: Text("subtitle"),
                            ),
                            ListTile(
                              leading: Text("Leading text"),
                              title: Text("title"),
                              subtitle: Text("subtitle"),
                            )
                          ]),
                      context),
                ),
              ),
            ),
            RaisedButton(
              child: Text("Export"),
              onPressed: () {
                var exportor = key.currentWidget as DynamicWidgetJsonExportor;
                var exportJsonString = exportor.exportJsonString();
                Scaffold.of(context).showSnackBar(SnackBar(
                    content: Text("json string was exported to editor page.")));
                Future.delayed(Duration(seconds: 3), (){
                  Navigator.push(
                      context,
                      MaterialPageRoute(
                          builder: (context) =>
                              CodeEditorPage(exportJsonString)));
                });
              },
            )
          ],
        ),
      ),
    );
  }
}

You can use whatever your favorite IDE to build the UI, then use DynamicWidgetJsonExportor to export to json code. For detail, please check the Dynamic Widget Demo source code.

Logic Dynamicization

By using DynamicWidget, you can pass JavaScript code(string) as parameters to achieve dynamic UI and logic in the app.

import 'package:dynamic_widget/dynamic_widget.dart';
import 'package:flutter/material.dart';
import 'package:flutter/services.dart';

class MyHomePage extends StatefulWidget {
  const MyHomePage({super.key, required this.title});

  final String title;

  @override
  State<MyHomePage> createState() => _MyHomePageState();
}

class _MyHomePageState extends State<MyHomePage> {
  late Future<String> _uiFuture;

  @override
  void initState() {
    super.initState();
    _uiFuture = rootBundle.loadString("assets/ui.js");
  }

  @override
  Widget build(BuildContext context) {
    return Scaffold(
      appBar: AppBar(
        backgroundColor: Theme.of(context).colorScheme.inversePrimary,
        title: Text(widget.title),
      ),
      body: Center(
        child: FutureBuilder<String>(
          future: _uiFuture,
          builder: (context, snapshot) {
            if (snapshot.connectionState == ConnectionState.waiting) {
              return const SizedBox();
            } else if (snapshot.hasError) {
              return Text('Error: ${snapshot.error}');
            }
            return DynamicWidget(snapshot.data!);
          }
        )
      )
    );
  }
}

Let's look at a calculator example. The js code can be divided into three parts:

  1. The calculator's buttons (grid widget) grid_app are generated through the buttons array.
const buttons = [
    { label: '+', event: "op('add')" },
    { label: '-', event: "op('sub')" },
    { label: 'x', event: "op('mul')" },
    { label: '÷', event: "op('div')" },
    { label: '1', event: "digit(1)" },
    { label: '2', event: "digit(2)" },
    { label: '3', event: "digit(3)" },
    { label: 'C', event: "clear()" },
    { label: '4', event: "digit(4)" },
    { label: '5', event: "digit(5)" },
    { label: '6', event: "digit(6)" },
    { label: '0', event: "digit(0)" },
    { label: '7', event: "digit(7)" },
    { label: '8', event: "digit(8)" },
    { label: '9', event: "digit(9)" },
    { label: '=', event: "equal()" }
];

const grid_app = {
    "type": "GridView",
    "crossAxisCount": 4,
    "padding": "10, 10, 10, 10",
    "mainAxisSpacing": 4.0,
    "crossAxisSpacing": 4.0,
    "childAspectRatio": 1.6,
    "children": buttons.map(button => ({
        "type": "TextButton",
        "child": {
            "type": "Text",
            "data": button.label,
            "style": {
                "fontSize": 30.0
            }
        },
        "click_event": button.event
    }))
};
  1. In DynamicWidget, the App object describes the structure of the UI. Dynamically modifying components involves changing the properties of the App object. In the App, the text component and grid_app are assembled to form the complete calculator UI.
App =
{
    "type": "Column",
    "crossAxisAlignment": "end",
    "mainAxisAlignment": "end",
    "mainAxisSize": "max",
    "textBaseline": "alphabetic",
    "textDirection": "ltr",
    "verticalDirection": "down",
    "children": [{
        "type": "Text",
        "data": "",
    }, {
        "type": "Text",
        "data": "          ",
        "maxLines": 3,
        "overflow": "ellipsis",
        "style": {
            "color": "#000000",
            "fontSize": 40.0,
            "fontWeight": "bold",
        }
    },
    {
        "type": "Expanded",
        "child": grid_app
    }]
}
  1. The calculator’s computation logic is completed through functions such as clear, digit, and equal.
var _pending = 0;
var _pendingOp = 'none';
var _display = 0;
var _displayLocked = false;
var _afterEquals = false;

function _resolve() {
    if (_pendingOp === 'add') {
        _display = _pending + _display;
    } else if (_pendingOp === 'sub') {
        _display = _pending - _display;
    } else if (_pendingOp === 'mul') {
        _display = _pending * _display;
    } else if (_pendingOp === 'div') {
        _display = _pending / _display;
    }
    _pendingOp = 'none';
}

function clear() {
    _pending = 0;
    _pendingOp = 'none';
    _display = 0;
    _displayLocked = false;
    _afterEquals = false;
    App.children[1].data = ""
}

function digit(n) {
    if (_displayLocked || _afterEquals) {
        _display = 0;
        _displayLocked = false;
        _afterEquals = false;
    }
    _display = _display * 10 + n;
    App.children[1].data = _display + "          ";
}

function op(operation) {
    _resolve();
    if (_afterEquals) {
        _pending = _display;
        _afterEquals = false;
    } else {
        _pending = _display;
    }
    _pendingOp = operation;
    _display = 0;
    _displayLocked = false;
    App.children[1].data = (operation === 'add' ? '+' : operation === 'sub' ? '-' : operation === 'mul' ? 'x' : '÷') + "          ";
}

function equal() {
    _resolve();
    _pending = _display;
    _displayLocked = true;
    _afterEquals = true;
    App.children[1].data = _display + "          ";
}

Upon running example_js, you will see:

calculator

Widget Documents

Already completed widgets:

You can view Currently support widgets and properties here.

Code Examples

Checkout this project and run demo.

Contact

Created by @deng.yin@gmail.com - feel free to contact me

Categorias

Dependências

Lista de dependências 3 itens

Repositório-fonte

Projetos que usam este pacote