Buscar pacotes, repositórios e categorias de apps

Capa de floating_view
Detalhes do pacotev1.0.4

floating_view

Um plugin para alcançar o comportamento de janela colapsável do YouTube.

AndroidiOSWebmacOSWindowsLinux
Downloads em 30 dias
63
Curtidas
18
Pontos Pub
160

Instalar pacote

flutter pub add floating_view

Visão geral do pacote

Orientação gerada a partir de informações públicas. Apenas para referência.

Floating View é um plugin Flutter que habilita funcionalidades semelhantes ao picture-in-picture, permitindo que widgets flutuem sobre outros conteúdos — semelhante ao comportamento de janela colapsável do YouTube. Ele suporta múltiplas plataformas, incluindo Android, iOS, Web, macOS, Windows e Linux. Desenvolvedores podem criar janelas flutuantes arrastáveis, redimensionáveis e interativas para melhorar a experiência do usuário em aplicativos que exigem elementos de interface persistentes. O plugin se integra suavemente a projetos Flutter existentes por meio de uma instalação simples via linha de comando.

Casos de uso

  • Implementando widgets de bate-papo persistentes
  • Criando controles flutuantes para reprodução de mídia
  • Habilitando multitarefa com painéis de sobreposição pequenos
  • Ferramentas de navegação sempre visíveis
  • Designando menus flutuantes interativos

Principais recursos

  • Janelas flutuantes arrastáveis e redimensionáveis
  • Suporte multiplataforma (Android, iOS, Web, macOS, Windows, Linux)
  • Integração simples com o sistema de widgets do Flutter
  • Aparência e comportamento personalizáveis
  • Suporta interações de toque e ponteiro

Indicado para

  • Desenvolvedores construindo aplicativos de mídia
  • Aplicativos que precisam de sobreposições de UI persistentes
  • aplicações de multitarefa ou focadas na produtividade
  • Designers de UI procurando padrões inovadores de interação
  • Projetos que exigem funcionalidade de vídeo sobre vídeo

Considerações

  • Pode exigir permissões específicas da plataforma em alguns sistemas operacionais
  • Impacto no desempenho com widgets aninhados complexos
  • Suporte limitado a animação nativa em algumas plataformas
  • Conflitos potenciais de interface com layouts em tela cheia
  • Requer manipulação cuidadosa dos eventos de ciclo de vida

README original

Snapshot do README original do repositório-fonte vinculado. Consulte o repositório para o conteúdo mais recente.

FloatingView Package

The FloatingView package enables you to create a floating window similar to YouTube's floating video feature. This allows the window to float on the screen and be draggable while scrolling.

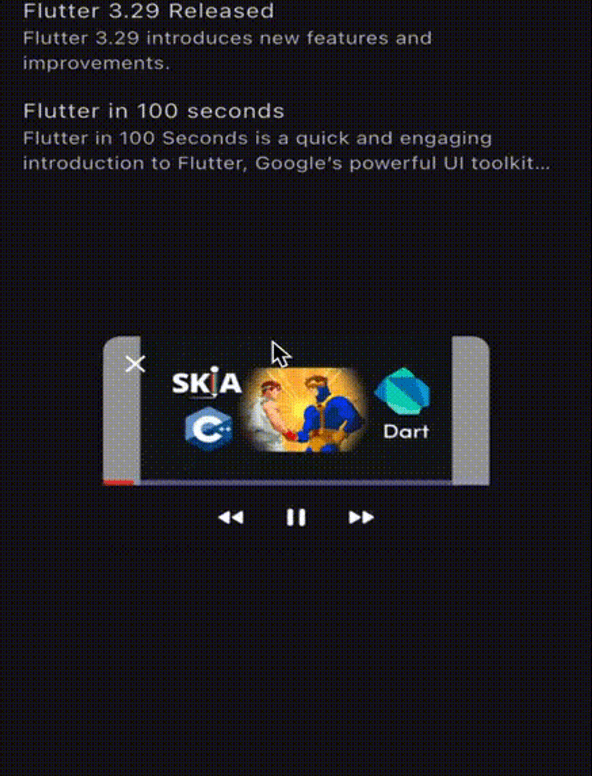
The example app running in iOS

Table of Contents

Integration Steps

To integrate the package into your Flutter application, follow these steps:

  1. Wrap the Screen:

    Wrap the screen where you want to display the FloatingView:

    late final FloatingController _controller = FloatingController(
        context,
        initialPosition: FloatingPosition.bottomLeft,
    );
    
    @override
    void dispose() {
        super.dispose();
        _controller.dispose();
    }
    
    @override
    Widget build(BuildContext context) {
        return FloatingView(
            controller: _controller,
            childBuilder: () => Scaffold(
                body: ItemBuilder(list: dummyList, controller: _controller),
            ),
        );
    }
    

    Note: FloatingView will disappear when changing routes. To display it across routes, wrap your desired route screen with the FloatingView and use the same controller. The controller can be passed down in the widget tree or stored in state management solutions such as BLoC, Provider, etc. The FloatingView will be passed down across the screen using the Hero widget, which is currently the only option available.

    Navigator.push(
        context,
        MaterialPageRoute(
            builder: (context) => FloatingView(
                controller: _controller,
                childBuilder: () => NavigationTestScreen(),
            ),
        ),
    );
    
  2. Initialize the FloatingView:

    Initialize the controller and store the widget you want to display, such as a video, screen, or text. Here is an example of using FloatingView with a Video Player or a simple screen:

    void onTap(dynamic data) {
        switch (data) {
            case Video _:
                VideoPlayerController? videoController;
                videoController = VideoPlayerController.asset(data.url)
                    ..initialize().then((_) {
                        videoController?.play();
                    });
    
                widget.controller.initialize(
                    maxChild: MaximizedVideo(
                        videoController: videoController,
                        floatingController: widget.controller,
                        video: data,
                    ),
                    minChild: MinimizedVideo(
                        videoController: videoController,
                        floatingController: widget.controller,
                        video: data,
                    ),
                    onDispose: () {
                        videoController?.dispose();
                    },
                );
                break;
    
            case News _:
                widget.controller.initialize(
                    maxChild: MaximizedNewsScreen(
                        news: data,
                        controller: widget.controller,
                    ),
                    minChild: MinimizedNewsScreen(
                        news: data,
                        controller: widget.controller,
                    ),
                    onDispose: () {},
                );
                break;
    
            default:
                break;
        }
    }
    

    Note: controller.initialize() will run the previous onDispose() method to clear the previous controller data if you initialize another FloatingView while having an active one.

  3. Using the APIs:

    You can use the passed-down controller to control the FloatingView state like this:

    Padding(
        padding: const EdgeInsets.fromLTRB(15, 15, 15, 0),
        child: Row(
            children: [
                GestureDetector(
                    onTap: () {
                        widget.controller.close();
                    },
                    child: Icon(Icons.close, size: 24),
                ),
                const SizedBox(width: 20),
                GestureDetector(
                    onTap: () {
                        widget.controller.toggleSize();
                    },
                    child: Icon(Icons.aspect_ratio, size: 24),
                ),
            ],
        ),
    );
    
Available API Methods in FloatingController
  1. Initialize the Floating View:

    controller.initialize({
        required Widget maxChild,
        required Widget minChild,
        required VoidCallback onDispose,
    })
    
  2. Close an Active Floating View:

    controller.close()
    
  3. Toggle the Floating View Size:

    controller.toggleSize()
    
  4. #Dispose the controller:

    controller.dispose()
    

Contributing

Contributions are welcome! Please open an issue or submit a pull request if you have any improvements or bug fixes.

License

This project is licensed under the MIT License. See the LICENSE file for details.

Support Me

If you find this package helpful and want to support its development, consider making a donation. Thank you for your support!

Support via PayPal

Categorias

Repositório-fonte

Projetos que usam este pacote

Ainda não há dados.