搜尋套件、儲存庫與 APP 分類

select2dot1 封面
套件詳情v2.0.9

select2dot1

Select2dot1 為您提供一個完全可自定義的單選/多選方塊,支援搜尋、分組選項、額外資訊和頭像。使用覆蓋層和模態框實現。

AndroidiOSWebmacOSWindowsLinux
近 30 天下載
386
喜歡數
46
Pub 分數
150

安裝套件

flutter pub add select2dot1

套件介紹

根據套件公開資料產生的選型評估,僅供參考。

Select2dot1 是一個高度可自訂的 Flutter 套件,用於建立單選或多重選擇下拉選單,具備進階功能,例如搜尋功能、分組選項、自訂選項細節以及頭像支援。此套件使用覆蓋層和對話方塊建構,可在各個平台提供無縫的使用者體驗。該套件非常適合需要豐富互動與視覺自訂的表單和資料選擇介面。它支援所有主要平台,包括 Android、iOS、Web、macOS、Windows 和 Linux。

適用情境

  • 帶可搜尋選項的表單輸入
  • 儀表板中的多選下拉選單
  • 分組類別選擇
  • 使用者檔案選擇帶頭像
  • 大型數據集的動態篩選

主要特色

  • 可搜尋的下拉選單
  • 對分組選項的支援
  • 可自定義選項小部件
  • 頭像和附加資訊顯示
  • 基於疊加層的模態實現

適合對象

  • 需要豐富選擇組件的開發者
  • 具有複雜資料選擇需求的應用程式
  • 跨平台應用程式
  • UI 豐富的表單與管理面板

使用建議

  • 需要仔細的樣式設計以獲得最佳使用者體驗
  • 處理非常大的資料集時可能需要效能調優
  • 疊加行為可能需要平台特定的調整

原始 README

以下為關聯原始碼儲存庫的 README 原文快照,最新內容請造訪原始碼儲存庫。

platform build pub package pub points License: MIT Buy Me A Coffee

Select2dot1

Introduction

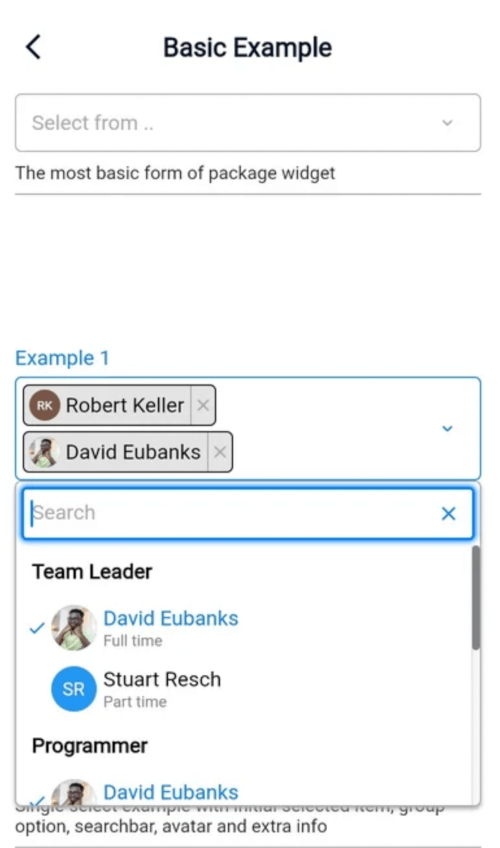
Select2dot1 gives you a customizable single/multiple select box with support for searching, group option, extra info and avatar. Select2dot1 utilizes overlays on (web, desktop) and modal for mobile. Its entirely customizable through settings and builder.

Screenshots

Desktop Example Mobile Example

Table of Contents

Platform Support

Android iOS Web Linux macOS Windows
✔ ✔ ✔ ✔ ✔ ✔

Installation

  1. Add the dependency below in pubspec.yaml
flutter pub add select2dot1
  1. Add this import to your file.
import 'package:select2dot1/select2dot1.dart';
  1. Go to the usage section for further details on how to use it.

Usage

  1. The first step is you need to create a list of the data that you would like to display.
static const List<SingleCategoryModel> exampleData = [
    SingleCategoryModel(
      nameCategory: 'Team Leader',
      singleItemCategoryList: [
        SingleItemCategoryModel(
          nameSingleItem: 'David Eubanks',
          extraInfoSingleItem: 'Full time',
          avatarSingleItem: CircleAvatar(
            backgroundColor: Colors.transparent,
            foregroundColor: Colors.transparent,
            backgroundImage: AssetImage('assets/images/avatar1.jpg'),
          ),
        ),
        SingleItemCategoryModel(
          nameSingleItem: 'Stuart Resch',
          extraInfoSingleItem: 'Part time',
          avatarSingleItem: CircleAvatar(
            backgroundColor: Colors.blue,
            child: Text('SR', style: TextStyle(color: Colors.white)),
          ),
        ),
      ],
    ),
  ];
  1. Use the select2dot1 widget and insert your data. You can also pass scrollController if you want to use it.
Select2dot1(
    selectDataController: SelectDataController(data: exampleData),
    scrollController: scrollController,
),

Features

Scroll Controller

ScrollController is used to control anchor position of dropdown menu. You can pass your own ScrollController to Select2dot1 widget.

Fully Customizable

If you want to change something that is not available in settings, you will have to make your own component through using the builder option. Check the customization section for more information.

Components and Settings

Components View

In this section you can see how the components of Select2dot1 widget look like as well as their hierarchy. You can also see how to customize them by settings and builder. For more details hierarchy of components , go to Tree View Components with Settings section.

Component Pillbox Configuration 1

  1. Pillbox
  2. PillboxTitle
  3. PillboxContent
  4. PillboxContentMulti / PillboxContentSingle
  5. SelectEmptyInfo
  6. PillboxIcon

Component Pillbox Configuration 2

  1. Pillbox
  2. PillboxTitle
  3. PillboxContent
  4. PillboxContentMulti
  5. SelectChip
  6. PillboxIcon

Component Pillbox Configuration 3

  1. Pillbox
  2. PillboxTitle
  3. PillboxContent
  4. PillboxContentMulti
  5. SelectOverloadInfo
  6. PillboxIcon

Component Pillbox Configuration 4

  1. Pillbox
  2. PillboxTitle
  3. PillboxContent
  4. PillboxContentSingle
  5. SelectSingle
  6. PillboxIcon

Component Dropdown Overlay Configuration 1

  1. DropdownOverlay, DropdownContentOverlay
  2. SearchBarOverlay
  3. ListDataViewOverlay
  4. CategoryNameOverlay
  5. CategoryItemOverlay

Component Dropdown Overlay Configuration 2

  1. DropdownOverlay, DropdownContentOverlay
  2. SearchBarOverlay
  3. ListDataViewOverlay
  4. SearchEmptyOverlay

Component Dropdown Overlay Configuration 3

  1. DropdownOverlay, DropdownContentOverlay
  2. SearchBarOverlay
  3. ListDataViewOverlay
  4. LoadingDataOverlay

Component Dropdown Modal Configuration 1

  1. showModalBottomSheet, DropdownModal, DropdownContentModal
  2. TitleModal
  3. ButtonModal
  4. SearchBarModal
  5. ListDataViewModal
  6. CategoryNameModal
  7. CategoryItemModal

Component Dropdown Modal Configuration 2

  1. showModalBottomSheet, DropdownModal, DropdownContentModal
  2. TitleModal
  3. ButtonModal
  4. SearchBarModal
  5. ListDataViewModal
  6. SearchEmptyModal

Component Dropdown Modal Configuration 3

  1. showModalBottomSheet, DropdownModal, DropdownContentModal
  2. TitleModal
  3. ButtonModal
  4. SearchBarModal
  5. ListDataViewModal
  6. LoadingDataModal

Tree View Components with Settings

If you want to see treeview components with all settings you can access here.

Miro is an absolutely wonderful app that im familiar with, i would highly recommend you checking it outTree View was created by . If you want to customize any of the components of Select2dot1 widget, you can use Tree View to see all the components and settings.

Customization

If you want to customize Select2dot1 widget you can do it through utilizing the settings and builder. The first option you can try to use is to use settings to customize, if you have a hard time with that you can use builder.

By Settings
Use global settings to customize all components of Select2dot1 widget

You can pass global settings to Select2dot1 widget. Global settings will be used by the components of Select2dot1 widget.

In the following example you will be shown how to customize mainColor and fontFamily for all the components of Select2dot1 widget.

Select2dot1(
  selectDataController: SelectDataController(data: exampleData),
  globalSettings: const GlobalSettings(
    fontFamily: 'Roboto',
    mainColor: Colors.blue,
  ),
);
Use single component settings to customize only one component of Select2dot1 widget

You can pass the single component settings to Select2dot1 widget. Single component settings will be used only by one component of Select2dot1 widget.

In the following example you will be shown how to customize the CategoryNameOverlay component and CategoryItemOverlay component in Dropdown (modification of the design only be done through desktop overlay).

Select2dot1(
  selectDataController: SelectDataController(data: exampleData),
  categoryNameOverlaySettings: CategoryNameOverlaySettings(
    constraints: const BoxConstraints(minHeight: 27),
    textStyle: const TextStyle(
      color: Color(0xFF6B7893),
      fontSize: 14,
      fontWeight: FontWeight.w500,
     ),
    defaultDecoration: const BoxDecoration(color: Colors.transparent),
    hoverDecoration:
        BoxDecoration(color: const Color(0xFF00183D).withOpacity(0.5)),
  ),
  categoryItemOverlaySettings: CategoryItemOverlaySettings(
    constraints: const BoxConstraints(minHeight: 35),
    defaultTextStyle: const TextStyle(
      color: Colors.white,
      fontSize: 14,
      fontWeight: FontWeight.w500,
    ),
    selectedTextStyle: const TextStyle(
      color: Color(0xFF1DEDB2),
      fontSize: 14,
      fontWeight: FontWeight.w500,
    ),
    iconSize: 14,
    iconSelectedColor: const Color(0xFF1DEDB2),
    defaultDecoration: const BoxDecoration(color: Colors.transparent),
    hoverDecoration:
        BoxDecoration(color: const Color(0xFF00183D).withOpacity(0.5)),
    showExtraInfo: extraInfoInDropdown,
  ),
);
By Builder

Using builder you can customize all components of Select2dot1 widget. You can use your own components or you can use the default components that are available in Select2dot1 widget.

Create your own component completely

You can create your own component by using Select2dot1Builder class. You have to pass your own component to Select2dot1Builder class and then pass this class to Select2dot1 widget. When you are using builder you have access to all data that you need to create your own component.

Select2dot1(
    selectDataController: SelectDataController(data: exampleData),
    selectChipBuilder: (context, selectChipDetails) {
          return Container(
            height: 29,
            padding: const EdgeInsets.symmetric(horizontal: 12, vertical: 6),
            constraints: const BoxConstraints(maxWidth: 200),
            decoration: BoxDecoration(
              color: const Color(0xFF001029),
              borderRadius: BorderRadius.circular(16),
              border: Border.all(color: Colors.white),
            ),
            child: Row(
              mainAxisSize: MainAxisSize.min,
              children: [
                Flexible(
                  child: Text(
                    selectChipDetails.singleItemCategory.getNameSingleItem,
                    softWrap: false,
                    overflow: TextOverflow.ellipsis,
                    style: const TextStyle(color: Colors.white),
                  ),
                ),
                Padding(
                  padding: const EdgeInsets.only(top: 1.0, left: 2.0),
                  child: MouseRegion(
                    cursor: SystemMouseCursors.click,
                    child: GestureDetector(
                      onTap: () {
                        selectChipDetails.selectDataController
                            .removeSingleSelectedChip(
                          selectChipDetails.singleItemCategory,
                        );
                      },
                      child: const Icon(
                        Icons.clear,
                        color: Colors.white,
                        size: 14,
                      ),
                    ),
                  ),
                )
              ],
            ),
          );
        },
    ),
Use default components

If you want to change the layout of your component you can utilize other component templates, so you can use the default components that are available. Remember that when using this builder, you must make sure that the code thats written is correct before you do anything else.

Select2dot1(
  selectDataController: SelectDataController(data: exampleData),
  pillboxTitleSettings:
      const PillboxTitleSettings(title: 'Example use builder'),
  pillboxBuilder: (context, pillboxDetails) => Material(
    color: Colors.transparent,
    child: InkWell(
      onTap: pillboxDetails.showDropdown,
      mouseCursor: SystemMouseCursors.click,
      onHover: (hoverState) => mounted
          ? setState(() => pillboxDetails.hover = hoverState)
          : null,
      splashColor: Colors.transparent,
      highlightColor: Colors.transparent,
      hoverColor: Colors.transparent,
      focusColor: Colors.transparent,
      child: Row( // In this builder I changed layout of pillbox (Column to Row)
        mainAxisSize: MainAxisSize.min,
        children: [
          pillboxDetails.pillboxTitle(),
          const SizedBox(width: 8),
          Expanded(child: pillboxDetails.pillboxContent()),
        ],
      ),
    ),
  ),
);

Model Structur Data

To use Select2dot1 widget you have to pass data to SelectDataController. Data must be on the list of SingleCategoryModel.

The SingleCategoryModel is a model which contains data about single category. Parameters:

  • nameCategory - name of category (It is optional if you don't want to show group select)
  • singleItemCategoryList - list of SingleItemCategoryModel (It is required)

SingleItemCategoryModel is a model which contains data about single item in category. Parameters:

  • nameSingleItem - visible name of single item (It is required)
  • value - value of single item (It is optional)
  • extraInfoSingleItem - extra info about single item (It is optional)
  • avatarSingleItem - avatar of single item (It is optional)
Value parametr in SingleItemCategoryModel

It's used to get the specific id of a single item. It's necessary when you want to distinguish between single items with the same nameSingleItem.

static const List<SingleCategoryModel> exampleData = [
  SingleCategoryModel(
    singleItemCategoryList: [
      SingleItemCategoryModel(nameSingleItem: 'Alabama', value: 'Alabama1'),
      SingleItemCategoryModel(nameSingleItem: 'Alabama', value: 'Alabama2'),
      SingleItemCategoryModel(nameSingleItem: 'Arkansas'),
      SingleItemCategoryModel(nameSingleItem: 'Illonois'),
    ],
  ),
];
Example data
static const List<SingleCategoryModel> exampleData = [
    SingleCategoryModel(
      nameCategory: 'Team Leader',
      singleItemCategoryList: [
        SingleItemCategoryModel(
          nameSingleItem: 'David Eubanks',
          extraInfoSingleItem: 'Full time',
          avatarSingleItem: CircleAvatar(
            backgroundColor: Colors.transparent,
            foregroundColor: Colors.transparent,
            backgroundImage: AssetImage('assets/images/avatar1.jpg'),
          ),
        ),
        SingleItemCategoryModel(
          nameSingleItem: 'Stuart Resch',
          extraInfoSingleItem: 'Part time',
          avatarSingleItem: CircleAvatar(
            backgroundColor: Colors.blue,
            child: Text('SR', style: TextStyle(color: Colors.white)),
          ),
        ),
      ],
    ),
    SingleCategoryModel(
      nameCategory: 'UX Designer',
      singleItemCategoryList: [
        SingleItemCategoryModel(
          nameSingleItem: 'Jan Foxstein',
          extraInfoSingleItem: 'Full time',
        ),
        SingleItemCategoryModel(
          nameSingleItem: 'Jhony Steward',
          extraInfoSingleItem: 'Part time',
          avatarSingleItem: CircleAvatar(
            backgroundColor: Colors.blue,
            child: Text('JS', style: TextStyle(color: Colors.white)),
          ),
        ),
      ],
    ),
  ];

Controllers

SelectDataController

ATTENTION: For better performance create SelectDataController as field in class not in build

class _BasicExample1State extends State<BasicExample1> {
  final SelectDataController selectDataController = SelectDataController(
    data: ExampleData.exampleData1,
  );

    @override
  Widget build(BuildContext context) {
    // Do not create SelectDataController in build method!
    // return Select2dot1(selectDataController: SelectDataController(data: ExampleData.exampleData1))
    return Select2dot1(selectDataController: selectDataController);
  } 
}

SelectDataController is a controller that is used to manage the data in Select2dot1 widget. You can use it to add, remove, select and deselect data. All the data that you want to display in Select2dot1 widget must be added to SelectDataController Remember that when isMultiple is false, you can add only one position to initialSelectedData.

In SelectDataController you can also set:

  • inital selected data
  • multiple select or single select
Select2dot1(
  selectDataController: 
    SelectDataController(
      data: exampleData, 
      isMultiple: false, 
      initialSelectedData: [ // Remember that when isMultiple is false, you can add only one position to initialSelectedData.
        SingleItemCategoryModel(
          nameSingleItem: 'Stuart Resch',
          value: 'Stuart Resch 1', 
        ),
      ],
    ),
);

Contributing

Pull requests (the pull request template is available for use) are welcome. For major changes, please open an issue first to discuss what you would like to change. More information about contributing you can find here. Remember to follow the code of conduct.

Issues

If you find any issues (bug, feature, performance or other), please report them here.

Please do not ask questions in the issue tracker. Use Q&A section instead.

Please do not report security vulnerabilities on the public issue tracker. The SECURITY page details the procedure for disclosing security issues.

Security

If you discover any security related issues, please go to SECURITY page.

Contributors

  • Roman Dykyj (@romanjrdykyj)

QA

If you have any questions, feel free to ask them here.

FAQ

How to get selected item?

Use 'onChanged' Callback Function

You can pass callback function to Select2dot1 widget. This function will be called every time when user select an item.

Select2dot1(
    selectDataController: SelectDataController(data: exampleData),
    onChanged: (value) {
        print(value); // value is a list of selected items
    },
),
How to init selected data?
Select2dot1(
    selectDataController: SelectDataController(data: exampleData, 
    initialSelectedData: [
        SingleItemCategoryModel(
          nameSingleItem: 'Alabama',
        ),
        SingleItemCategoryModel(
          nameSingleItem: 'California',
        ),
      ],
    ),
),
How to used only overlay or modal mode on all platforms?

It is not possible to use only overlay or modal mode on all platforms. It is automatically set by the package. Overlay mode is used on desktop and modal mode is used on mobile.

How to set NO group select?

If you dont want to group select, you dont need to use name parameter in SingleCategoryModel.

static const List<SingleCategoryModel> exampleData3 = [
  SingleCategoryModel(
    nameCategory: null, // If you dont want to group select, you dont need to use name parameter in SingleCategoryModel or set it to null.
    singleItemCategoryList: [
      SingleItemCategoryModel(nameSingleItem: 'Alabama',),
      SingleItemCategoryModel(nameSingleItem: 'Arkansas'),
      SingleItemCategoryModel(nameSingleItem: 'Illonois'),
    ],
  ),
];

License

This package is licensed under the MIT license. To see the full license text, see the LICENSE file.

所屬分類

原始碼儲存庫

使用此套件的專案

暫無相關資料。
