패키지, 저장소 및 앱 카테고리 검색

flutter_paytabs_bridge 표지
패키지 상세v2.7.15

flutter_paytabs_bridge

카드, APMS 등으로 결제를 처리하는 데 사용되는 Paytabs용 Flutter 플러그인입니다.

AndroidiOS
30일 다운로드
1.4천
좋아요
41
Pub 점수
120

패키지 설치

flutter pub add flutter_paytabs_bridge

패키지 개요

공개 정보를 바탕으로 생성한 선택 가이드입니다.

모바일 애플리케이션에 Paytabs 결제 솔루션을 통합하는 Flutter 플러그인으로, 카드 및 대체 결제 수단(APM)의 안전한 처리를 가능하게 합니다. 이 플러그인은 Android와 iOS 플랫폼을 지원하며, Flutter 앱 내에서 결제를 원활하게 처리할 수 있도록 도와줍니다. 플러그인은 Flutter 프레임워크와 Paytabs의 네이티브 SDK 사이의 다리 역할을 하여 호환성과 성능을 보장합니다. 개발자는 최소한의 설정으로 체크아웃 흐름을 구현할 수 있습니다. 소스 코드는 투명성과 사용자 맞춤화를 위해 GitHub에서 공개되어 있습니다.

사용 사례

  • 앱 내 구매
  • 전자상거래 체크아웃
  • 구독 결제
  • 모바일 지갑 통합
  • 결제 게이트웨이 통합

주요 기능

  • 카드 및 APM 결제를 지원합니다
  • 크로스 플랫폼(안드로이드 및 iOS)
  • 공식 Paytabs SDK 브리지
  • 보안 거래 처리
  • Flutter와의 간편한 통합

적합한 대상

  • 전자상거래 앱
  • 디지털 서비스 제공자
  • 모바일 지갑
  • 구독 기반 플랫폼
  • 글로벌 결제 처리

고려 사항

  • Paytabs 계정 설정이 필요합니다
  • 적절한 API 키와 자격 증명이 필요합니다
  • 특정 지역에 대해 추가 구성이 필요할 수 있습니다
  • Paytabs 서버 가용성에 따라 다릅니다
  • Paytabs에서 지원하는 결제 수단에 한정됨

원본 README

연결된 소스 저장소의 README 원문 스냅샷입니다. 최신 내용은 저장소에서 확인하세요.

Flutter PayTabs Bridge

Version

Flutter paytabs plugin is a wrapper for the native PayTabs Android and iOS SDKs, It helps you integrate with PayTabs payment gateway.

Plugin Support:

  • [x] iOS
  • [x] Android

Installation

dependencies:
   flutter_paytabs_bridge: ^2.7.15

Usage

import 'package:flutter_paytabs_bridge/BaseBillingShippingInfo.dart';
import 'package:flutter_paytabs_bridge/PaymentSdkConfigurationDetails.dart';
import 'package:flutter_paytabs_bridge/PaymentSdkLocale.dart';
import 'package:flutter_paytabs_bridge/PaymentSdkTokenFormat.dart';
import 'package:flutter_paytabs_bridge/PaymentSdkTokeniseType.dart';
import 'package:flutter_paytabs_bridge/flutter_paytabs_bridge.dart';
import 'package:flutter_paytabs_bridge/IOSThemeConfiguration.dart';
import 'package:flutter_paytabs_bridge/PaymentSDKSavedCardInfo.dart';
import 'package:flutter_paytabs_bridge/PaymentSdkTransactionClass.dart';
import 'package:flutter_paytabs_bridge/PaymentSDKQueryConfiguration.dart';
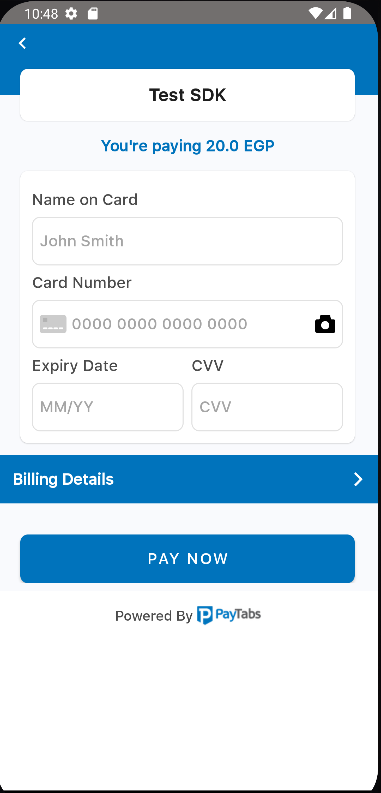
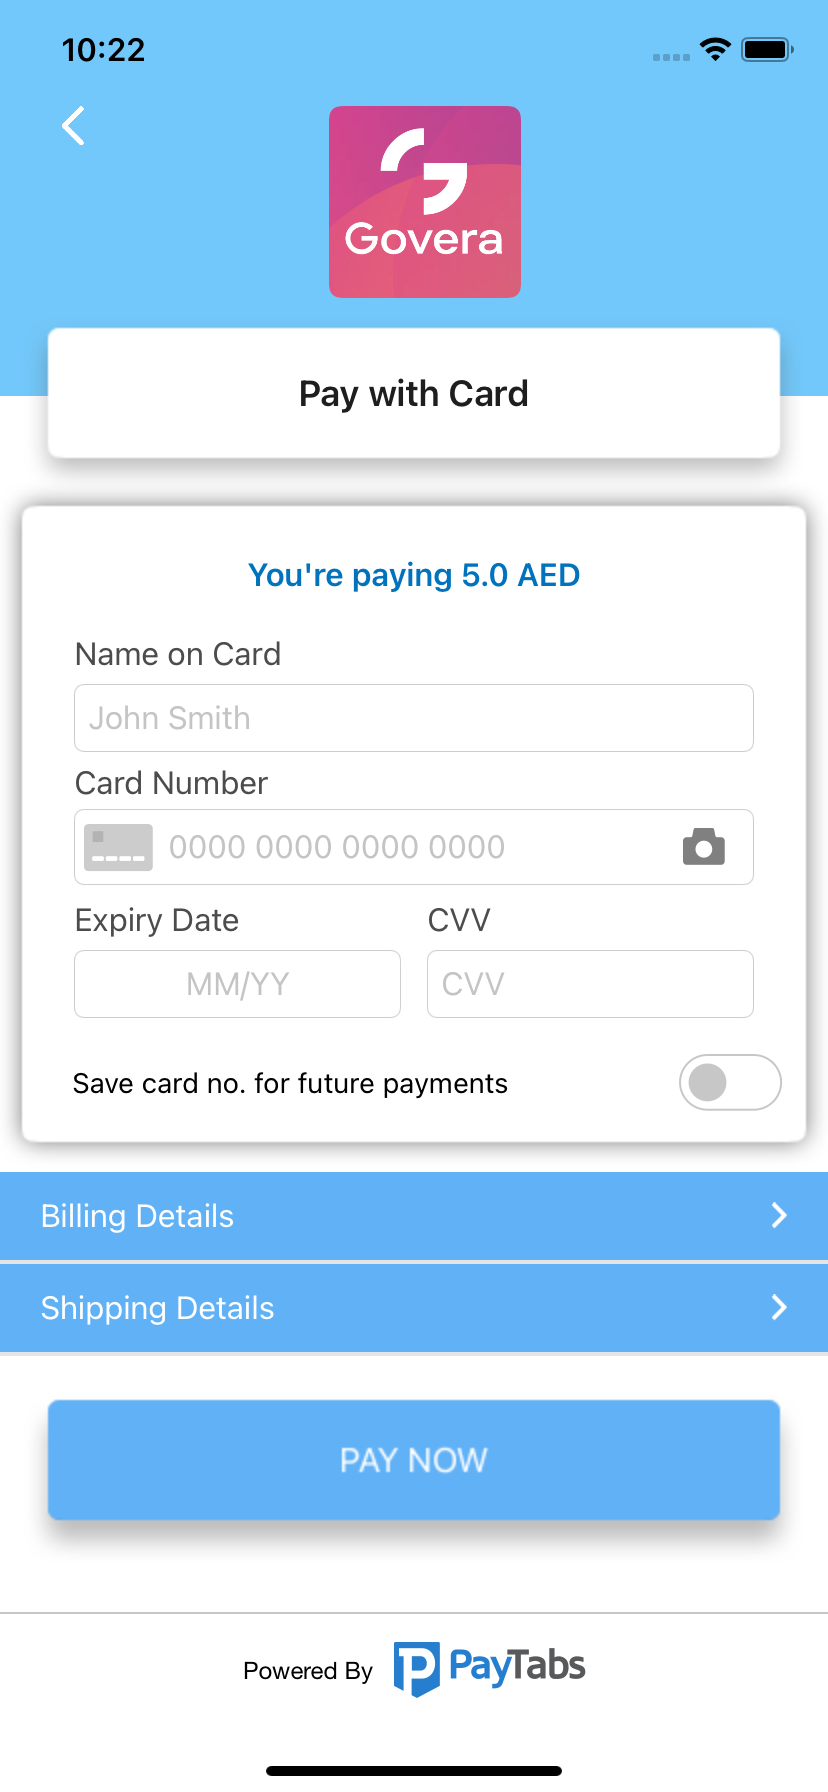
Pay with Card
  1. Configure the billing & shipping info, the shipping info is optional
  var billingDetails = new BillingDetails("billing name", 
    "billing email", 
    "billing phone",
        "address line", 
        "country", 
        "city", 
        "state", 
        "zip code");
        
var shippingDetails = new ShippingDetails("shipping name", 
     "shipping email", 
     "shipping phone",
     "address line", 
     "country", 
     "city", 
     "state", 
     "zip code");
                                              
  1. Create object of PaymentSDKConfiguration and fill it with your credentials and payment details.

 var configuration = PaymentSdkConfigurationDetails(
        profileId: "profile id",
        serverKey: "your server key",
        clientKey: "your client key",
        cartId: "cart id",
        cartDescription: "cart desc",
        merchantName: "merchant name",
        screentTitle: "Pay with Card",
        billingDetails: billingDetails,
        shippingDetails: shippingDetails,
        locale: PaymentSdkLocale.EN, //PaymentSdkLocale.AR, PaymentSdkLocale.FR, PaymentSdkLocale.TR, PaymentSdkLocale.UR or PaymentSdkLocale.DEFAULT. 
        amount: "amount in double",
        currencyCode: "Currency code",
        merchantCountryCode: "2 chars iso country code");

Options to show billing and shipping info

	configuration.showBillingInfo = true;
	configuration.showShippingInfo = true;

Options to set expiry timeout for the card payment screen

/** To establish a timeout of 2 minutes.
 * Set to zero to deactivate the timeout feature.
 * Note that the expiryTime cannot be set to less than 60 seconds.
 * */
PaymentSdkConfigurationDetails(...,expiryTime:120);

You have the option to close the payment screen if there are no ongoing transactions.

 FlutterPaytabsBridge.cancelPayment((_) {});
  1. Set merchant logo from the project assets:
  • create 'assets' directory and put the image inside it.
  • be sure you add in the Runner iOS Project in the infor.plist the image usage description. NSPhotoLibraryUsageDescription Get Logo From Assets
  • under flutter section in the pubspec.yaml declare your logo.
flutter:
  assets:
   - assets/logo.png
  • be sure you pass the image path like this:-
var configuration = PaymentSdkConfigurationDetails();
var theme = IOSThemeConfigurations();
theme.logoImage = "assets/logo.png";
configuration.iOSThemeConfigurations = theme;

1-Pay with Card

Start payment by calling startCardPayment method and handle the transaction details


FlutterPaytabsBridge.startCardPayment(configuration, (event) {
      setState(() {
        if (event["status"] == "success") {
          // Handle transaction details here.
          var transactionDetails = event["data"];
          print(transactionDetails);
          
          if (transactionDetails["isSuccess"]) {
            print("successful transaction");
          } else {
            print("failed transaction");
          }
        } else if (event["status"] == "error") {
          // Handle error here.
        } else if (event["status"] == "event") {
          // Handle cancel events here.
        }
      });
    });
     
card

2-Pay with Token

To enable tokenization please follow the below instructions.

 // to request token and transaction reference pass tokeniseType and Format
 tokeniseType: PaymentSdkTokeniseType.MERCHANT_MANDATORY,
 tokenFormat: PaymentSdkTokenFormat.AlphaNum20Format,

 // you will receive token and reference after the first transaction       
 // to pass the token and transaction reference returned from sdk 
 token: "token returned from the last trx",
 transactionReference: "last trx reference returned",

Then payment by calling startTokenizedCardPayment method and handle the transaction details


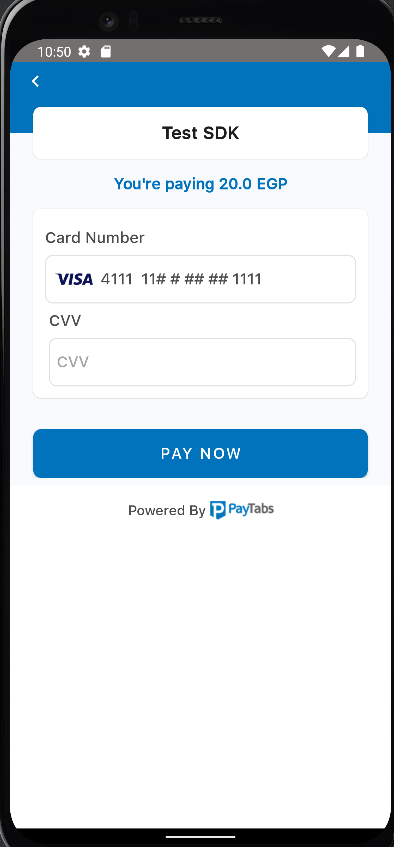
FlutterPaytabsBridge.startTokenizedCardPayment(configuration, "Token", "TransactionReference", (event) {
      setState(() {
        if (event["status"] == "success") {
          // Handle transaction details here.
          var transactionDetails = event["data"];
          print(transactionDetails);
          
          if (transactionDetails["isSuccess"]) {
            print("successful transaction");
          } else {
            print("failed transaction");
          }
        } else if (event["status"] == "error") {
          // Handle error here.
        } else if (event["status"] == "event") {
          // Handle cancel events here.
        }
      });
    });
     

3-Pay with 3ds secure Token

Start payment by calling start3DSecureTokenizedCardPayment method and handle the transaction details

var savedCardInfo = PaymentSDKSavedCardInfo("Card Mask", "card type");
FlutterPaytabsBridge.start3DSecureTokenizedCardPayment(configuration, savedCardInfo, "Token", (event) {
      setState(() {
        if (event["status"] == "success") {
          // Handle transaction details here.
          var transactionDetails = event["data"];
          print(transactionDetails);
          
          if (transactionDetails["isSuccess"]) {
            print("successful transaction");
          } else {
            print("failed transaction");
          }
        } else if (event["status"] == "error") {
          // Handle error here.
        } else if (event["status"] == "event") {
          // Handle cancel events here.
        }
      });
    });
     
rec 3ds
Pay with Apple Pay
  1. Follow the guide Steps to configure Apple Pay to learn how to configure ApplePay with PayTabs.

  2. Do the steps 1 and 2 from Pay with Card although you can ignore Billing & Shipping details and Apple Pay will handle it, also you must pass the merchant name and merchant identifier.

//ignore this part if you want to use default networks
 List<PaymentSDKNetworks> networks = [];
    networks.add(PaymentSDKNetworks.visa);
    networks.add(PaymentSDKNetworks.amex);

 var configuration = PaymentSdkConfigurationDetails(
        profileId: "profile id",
        serverKey: "your server key",
        clientKey: "your client key",
        cartId: "cart id",
        cartDescription: "cart desc",
        merchantName: "merchant name",
        screentTitle: "Pay with Card",
        locale: PaymentSdkLocale.AR, //PaymentSdkLocale.EN or PaymentSdkLocale.DEFAULT 
        amount: "amount in double",
        currencyCode: "Currency code",
        merchantCountryCode: "2 chars iso country code",
        merchantApplePayIndentifier: "merchant.com.bundleID",
        linkBillingNameWithCardHolderName: true,
    paymentNetworks: networks);

  1. To simplify ApplePay validation on all user's billing info, pass simplifyApplePayValidation parameter in the configuration with true.

configuration.simplifyApplePayValidation = true;

  1. Call startApplePayPayment to start payment
FlutterPaytabsBridge.startApplePayPayment(configuration, (event) {
      setState(() {
        setState(() {
        if (event["status"] == "success") {
          // Handle transaction details here.
          var transactionDetails = event["data"];
          print(transactionDetails);
        } else if (event["status"] == "error") {
          // Handle error here.
        } else if (event["status"] == "event") {
          // Handle cancel events here.
        }
      });
      });
    });
Pay with Samsung Pay

Pass Samsung Pay token to the configuration and call startSamsungPayPayment

configuration.samsungToken = "{Json token returned from the samsung pay payment}"

Pay with Alternative Payment Methods

It becomes easy to integrate with other payment methods in your region like STCPay, OmanNet, KNet, Valu, Fawry, UnionPay, and Meeza, to serve a large sector of customers.

  1. Do the steps 1 and 2 from Pay with Card
  2. Choose one or more of the payment methods you want to support, check the available APMs in the enum section.
 List<PaymentSdkAPms> apms = [];
 apms.add(PaymentSdkAPms.STC_PAY);
 
 var configuration = PaymentSdkConfigurationDetails(
     * Your configuration *
     alternativePaymentMethods: apms); // add the Payment Methods here
  1. Call startAlternativePaymentMethod to start payment

FlutterPaytabsBridge.startAlternativePaymentMethod(await generateConfig(),

        (event) {

      setState(() {

        if (event["status"] == "success") {

          // Handle transaction details here.

          var transactionDetails = event["data"];

          print(transactionDetails);

        } else if (event["status"] == "error") {

          // Handle error here.

        } else if (event["status"] == "event") {

          // Handle cancel events here.

        }

      });

    });
    

Discounts

You can add discounts to the payment by passing the discount amount and the discount type to the configuration.

 configuration.cardDiscounts = [
      PaymentSDKCardDiscount(
          discountCards: ["4111"],
          discountValue: 50,
          discountTitle: "50% discount on cards starting with 4111",
          isPercentage: true),
      PaymentSDKCardDiscount(
          discountCards: ["4000", "41111"],
          discountValue: 2,
          discountTitle: "2 EGP discount on cards starting with 4000 and 41111",
          isPercentage: false)
    ];

Card Approval

You can customize BIN-based discounts through the PaymentSDKCardApproval class, which collects approval details via an API.

final cardApproval = PaymentSDKCardApproval(
  validationUrl: "https://webhook.site/f80622ae-a0c0-4664-861e-b71ab1b72d90",
  binLength: 8,
  blockIfNoResponse: false
);

final configuration = PaymentSdkConfigurationDetails(
  ...,
  cardApproval: cardApproval
);
  • validationUrl: The endpoint provided by the business to validate the transaction.
  • binLength: BIN length (default is 6, can be set to 8).
  • blockIfNoResponse: Determines if the transaction should proceed in case of no response from the validation endpoint.

Query transaction

You can check the status of a transaction

1- first create PaymentSDKQueryConfiguration

var queryConfig = PaymentSDKQueryConfiguration(
    "ServerKey",
    "ClientKey",
    "Country Iso 2",
    "Profile Id",
    "Transaction Reference"
);

2- Call QuerySdkActivity.queryTransaction and pass the needed arguments

FlutterPaytabsBridge.queryTransaction(
    generateConfig(), queryConfig,
    (event) {
        setState(() {
            if (event["status"] == "success") {
                // Handle transaction details here.
                var transactionDetails = event["data"];
                print(transactionDetails);
            } else if (event["status"] == "error") {
                // Handle error here.
            } else if (event["status"] == "event") {
                // Handle cancel events here.
            }
        });
    });
Handling Transaction response

you can use event["data"]["isSuccess"] to ensure a successful transaction ..

if the transaction is not successful you should check for the corresponding failure code you will receive the code in responseCode .. all codes can be found in Payment Response Codes

Link billing name with card holder name

By default, the billing name is linked with card holder name, if you set its flag to false the billing name and the card holder name will be seperated

 var configuration = PaymentSdkConfigurationDetails(
        ...
        ...
        linkBillingNameWithCardHolderName: true
        );

Customize the Theme:

UI guide

iOS Theme

Use the following guide to cusomize the colors, font, and logo by configuring the theme and pass it to the payment configuration.

	var theme = IOSThemeConfigurations();
	theme.backgroundColor = "e0556e"; // Color hex value
	theme.backgroundColorDark = "520f3a"; // Dark Mode Color hex value
	configuration.iOSThemeConfigurations = theme;
Android Theme

Use the following guide to customize the colors, font, and logo by configuring the theme and pass it to the payment configuration.

# edit file
android/src/main/res/values/colors.xml

<resources>
    <!-- Override colors -->
    <color name="payment_sdk_primary_color">#ffffff</color>
    <color name="payment_sdk_secondary_color">#0073bc</color>
    <color name="payment_sdk_status_bar_color">#444647</color>
    <color name="payment_sdk_primary_font_color">#4c4c4c</color>
    <color name="payment_sdk_secondary_font_color">#0073bc</color>
    <color name="payment_sdk_hint_font_color">#a5a5a5</color>
    <color name="payment_sdk_stroke_color">#e1e1e1</color>
    <color name="payment_sdk_button_text_color">#FFF</color>
    <color name="payment_sdk_title_text_color">#1e1e1e</color>
    <color name="payment_sdk_button_background_color">#0073bc</color>
    <color name="payment_sdk_background_color">#F9FAFD</color>
    <color name="payment_sdk_blue_F2FAFD">#F2FAFD</color>
    <color name="payment_sdk_error_text_color">#EC2213</color>
    <color name="payment_sdk_back_black_dim">#4D6E6E6E</color>
    <color name="payment_sdk_input_field_background_color">#FFFFFFFF</color>
    <color name="payment_sdk_enabled_switch_track_color">#00000000</color>
    <color name="payment_sdk_enabled_switch_handle_color">#3db39e</color>
    <color name="payment_sdk_disabled_switch_track_color">#00000000</color>
    <color name="payment_sdk_disabled_switch_handle_color">#c7c7c7</color>
    <color name="payment_sdk_switch_stroke_color">#4c4c4c</color>
    <color name="payment_sdk_amount_font_color">#4c4c4c</color>
    <color name="payment_sdk_original_amount_font_color">#a5a5a5</color>
    <color name="payment_sdk_billing_header_background_color">#0073bc</color>
    <color name="payment_sdk_billing_text_color">#FFF</color>

    <!-- Override dimens -->
    <dimen name="payment_sdk_title_font_size">18sp</dimen>
    <dimen name="payment_sdk_title_margin">24dp</dimen>
    <dimen name="payment_sdk_primary_font_size">16sp</dimen>
    <dimen name="payment_sdk_secondary_font_size">16sp</dimen>
    <dimen name="payment_sdk_button_font_size">16sp</dimen>
    <dimen name="payment_sdk_separator_thickness">1dp</dimen>
    <dimen name="payment_sdk_stroke_thickness">.5dp</dimen>
    <dimen name="payment_sdk_input_corner_radius">8dp</dimen>
    <dimen name="payment_sdk_card_corner_radius">8dp</dimen>
    <dimen name="payment_sdk_card_margin">16dp</dimen>
    <dimen name="payment_sdk_billing_header_corner_radius">0dp</dimen>
    <dimen name="payment_sdk_billing_header_margin">0dp</dimen>
    <dimen name="payment_sdk_button_corner_radius">8dp</dimen>
    <dimen name="payment_sdk_error_font_size">12sp</dimen>
    <dimen name="payment_sdk_amount_font_size">16sp</dimen>

    <!-- Override styles -->
    <style name="PaymentSdkTheme" parent="Theme.MaterialComponents.NoActionBar">
        <!-- Hides the payment screen title background -->
        <item name="payment_sdk_hideScreenTitleBackground">true</item>
        <!-- Sets the alignment of the payment screen title [start-end-center] -->
        <item name="payment_sdk_screenTitleAlignment">start</item>
        <!-- Hides the card and button shadows -->
        <item name="payment_sdk_hideViewsShadow">true</item>
    </style>

</resources>

-- Override strings To override string you can find the keys with the default values here English, Arabic.

Enums

Those enums will help you in customizing your configuration.

  • Tokenise types

The default type is none

enum PaymentSdkTokeniseType {
  NONE,
  USER_OPTIONAL,
  USER_MANDATORY,
  MERCHANT_MANDATORY,
  USER_OPTIONAL_DEFAULT_ON
}

configuration.tokeniseType = PaymentSdkTokeniseType.USER_OPTIONAL;
  • Token formats

The default format is hex32

enum PaymentSdkTokenFormat {
  Hex32Format,
  NoneFormat,
  AlphaNum20Format,
  Digit22Format,
  Digit16Format,
  AlphaNum32Format
}

  • Transaction Type

The default type is PaymentSdkTransactionType.SALE

enum PaymentSdkTransactionType {
  SALE,
  AUTH
}
configuration.tokenFormat = PaymentSdkTokenFormat.Hex32Format
  • Alternative Payment Methods
enum PaymentSdkAPms {
  UNION_PAY,
  STC_PAY,
  VALU,
  MEEZA_QR,
  OMAN_NET,
  KNET_CREDIT,
  FAWRY,
  KNET_DEBIT,
  URPAY,
  AMAN,
  SAMSUNG_PAY,
  APPLE_PAY,
  SOUHOOLA,
  TABBY,
  HALAN,
  TRU,
  FORSA,
  TAMARA
}

Demo application

Check our complete example here https://github.com/paytabscom/flutter-sdk-bridge/tree/master/example.

License

See LICENSE.

Paytabs

Support | Terms of Use | Privacy Policy

카테고리

의존성

의존성 목록 1 개

소스 저장소

이 패키지를 사용하는 프로젝트

아직 데이터가 없습니다.