패키지, 저장소 및 앱 카테고리 검색

uic 표지
패키지 상세v0.11.0

uic

앱을 구축하는 데 도움이 되는 고수준의 Flutter UI 컴포넌트 및 독립형 위젯 세트입니다.

30일 다운로드
53
좋아요
76
Pub 점수
60

패키지 설치

flutter pub add uic

패키지 개요

공개 정보를 바탕으로 생성한 선택 가이드입니다.

uic는 앱 개발을 간소화하기 위해 고수준의 UI 컴포넌트와 독립적인 위젯 모음을 제공하는 Flutter 패키지입니다. 재사용 가능하고 잘 구조화된 요소를 제공하여 일관성을 높이고 보일러플레이트 코드를 줄입니다. 개발자 경험을 중심으로 설계되어 빠른 UI 구현을 지원하면서도 사용자 맞춤 설정에 유연성을 유지합니다. 레이아웃이나 스타일링에 대한 통제력을 잃지 않고 디자인 및 개발 워크플로우를 가속화하고자 하는 팀에게 이상적입니다.

사용 사례

  • 빠른 프로토타이핑
  • 화면 간에 일관된 UI 구축하기
  • 재사용 가능한 컴포넌트 라이브러리 만들기
  • 기능 개발 가속화
  • 복잡한 레이아웃 간소화

주요 기능

  • 고급 수준의 사용 준비 완료 위젯
  • 스탠드얼론 컴포넌트 설계
  • 일관된 스타일링 패턴
  • 최소한의 보일러플레이트
  • 개발자 중심의 API

적합한 대상

  • Flutter 초보자가 구조를 찾고 있습니다
  • 더 빠른 UI 구축을 원하는 경험이 풍부한 개발자
  • UI 일관성을 우선시하는 팀
  • 개발 일정이 까다로운 프로젝트

고려 사항

  • 제한된 플랫폼 고유 최적화
  • 내장된 테마 시스템 없음
  • 고급 사용자 정의를 위해 수동 통합에 의존
  • 새로운 구성 요소 규약을 배워야 할 수 있습니다

원본 README

연결된 소스 저장소의 README 원문 스냅샷입니다. 최신 내용은 저장소에서 확인하세요.

UIC (UI Components)

A set of high-level Flutter UI components and stand-alone widgets for easier implementation of most used UI features.

Components:
  • StatefulData - A listenable data model and accompanying widgets to display the data according to its state.
  • ResponsiveLayout - Allows easily build layouts that fits the current form factor.
  • CheckboxUic - Enhanced Checkbox that maintain its state, has a title and can show additional description in each state.
  • ListUic - Wrapper of ListView, which implements related data loading and state management logic.
  • LoginUic - A Login form, that hides most of the UI logic under the hood, but still customizable to fit your app design.
  • ProgressUic - Wrapper of ProgressIndicator with additional text.
Widgets:
  • ActionButton - Wrapper of Material button, that manages a state of an action which is performed on the button click, and shows progress while the action is performed.
  • Deck - Shows stacked cards, that can be expanded and collapsed.
  • InlineTextField - Text view with ability to inline edit its content.
  • StepIndicator - Simple, but customizable step/page indicator.

StatefulData

A common case of displaying a piece of data in your UI is that you also would like to display some accompanying views while the data is loading, or if an error occurred.
StatefulData model

StatefulData is a wrapper of your data that handles data loading and notifies its listeners on data state changes.

In a simple case of one-time loaded data you define it like this:

final yourStatefulData = StatefulData<YourDataType>(
  loader: () => loadData(),
);

Once you've created the StatefulData object it starts loading data asynchronously using provided loader function and notifies listeners on data loading state.

There is an option to not start data loading immediately, use startLoading parameter to control this behavior:

final yourStatefulData = StatefulData<YourDataType>(
  loader: () => loadData(),
  startLoading = false,
);

In this case you can load data by calling loadData() method:

yourStatefulData.loadData();

This method also can be used to refresh the data at any time.

If you have a stream of data use the StatefulData.watch constructor as following:

final yourStatefulData = StatefulData<YourDataType>.watch(
  source: () => yourDataStream,
);

In this case your data will be automatically updated.

The following data states are supported by the StatefulData:

State Description
initialLoading Data is loading at the first time (current data is empty).
initialLoadingError An error occurred on initial data loading.
empty Data loading is successfully finished, but the empty data was received.
ready Data was successfully loaded and its value is available.
loading Data loading is in progress.
error An error occurred during data loading.
StatefulDataView widget

Typically StatefulData is used with StatefulDataView. This is a widget that listens to provided StatefulData object and updates the UI according to the current data state.

  @override
  Widget build(BuildContext context) {
    return StatefulDataView<YourDataType>(
      statefulData: yourStatefulData,
      builder: (context, data) {
        return YourDataView(data: data);
      }
    );
  }

In the builder parameter you specify a function that returns your data view. It is called when state is changed to ready.

The following optional parameters are supported:

Parameter Description
initialLoadingView A widget to display during initial data loading.
initialLoadingErrorView A widget to display in case of initial data loading failed.
emptyView A widget to display in case of empty data.
loadingView A widget to display during data loading.
errorBuilder A function that build a widget in case of error.

StatefulDataView rebuilds on data state changes and displays either the data view or one of these views according to the current state.

If some of these parameters are missed, the built-in default views will be displayed.

See the demo app for example of using StatefulData model and StatefulDataView widget.

CheckboxUic

Enhanced, but still simple, checkbox widget. Unlike original Checkbox widget, CheckboxUic maintain its state. Also it has a title and can show an additional description.

  • Supports all original parameters of Checkbox Flutter widget
  • Has initial value
  • Shows a title, which can be individual for checked and unchecked state
  • Optionally shows additional text description, which can be individual for checked and unchecked state
  • Supports custom widgets instead of text description

CheckboxUic Demo

Usage

Import the package

import 'package:uic/checkbox_uic.dart';

Simple usage of CheckboxUic:


  @override
  Widget build(BuildContext context) {
    return Scaffold(
      appBar: AppBar(
        title: Text(widget.title),
      ),
      body: CheckboxUic(
          initialState: true,
          title: 'Show additional description',
          description: 'This is description for checked state.',
          descriptionUnchecked: 'CheckboxUic can show description text, which can be '
              'individual for each state (checked and unchecked).',
          onChanged: (value) {
            print('$value');
          },
      ),
    );
  }

See more examples in demo app.

ListUic

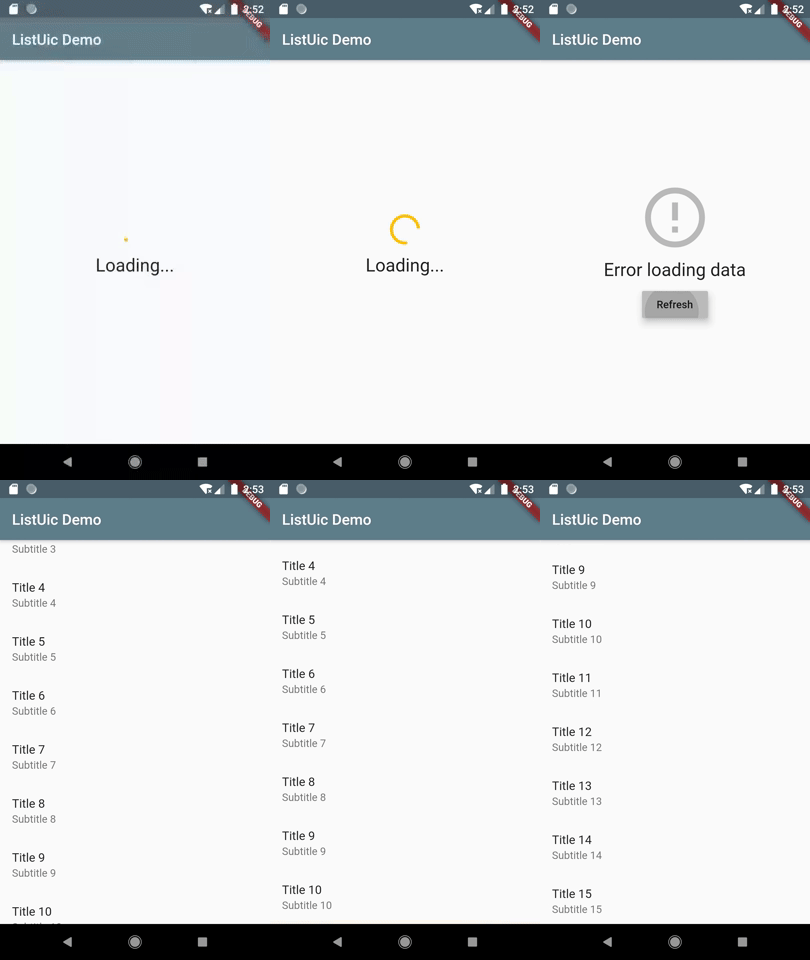
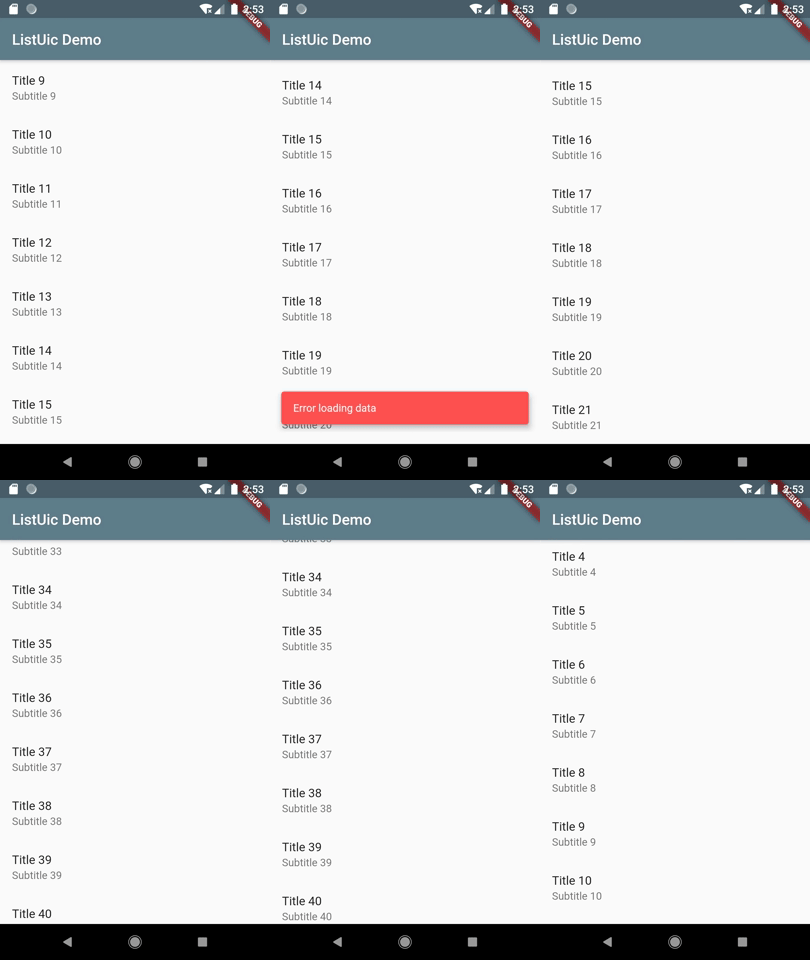
Almost each app has screens that display a list of items. Simple task at first look, it often requires much related staff to be implemented. All that boilerplate can be simplified with ListUic widget.

Features:
  • Pull to Refresh gesture to reload list data
  • Pagination (infinite scroll) to load next part of data on scroll to the end of the list
  • Progress indicator for initial data loading
  • Individual view for empty data
  • Individual error view
  • Progress indicator at the end of list when next page of items is loading
  • Showing snack bar on failing loading data

ListUic Demo ListUic Demo ListUic Demo

Usage

Import the package

import 'package:uic/list_uic.dart';

Add ListUicController to your page's state:


class _MyHomePageState extends State<MyHomePage> {

  ListUicController<int> _controller;
  ...

  @override
  void initState() {
    super.initState();
    _controller = ListUicController<int>(
      onGetItems: (int page) => _getItems(page),
    );
    ...
  }
  ...
}

Add ListUic widget to your widget tree:


  @override
  Widget build(BuildContext context) {
    return Scaffold(
      appBar: AppBar(
        title: Text(widget.title),
      ),
      body: ListUic<int>(
        controller: _controller,
        itemBuilder: (item) {
          return ListTile(
            title: Text('Title ${item}'),
            subtitle: Text('Subtitle ${item}'),
          );
        },
      ),
    );
  }

Implement a function that will return a list of items:


  Future<List<int>> _getItems(int page) async {
    ...
  }

Read the docs for available customization options.

Also you can check demo app for details of using ListUic widget.

LoginUic

A Login form, that encapsulates most of UI logic for 'Sign in' feature, but still highly customizable to fit your app design.

Features:
  • Displays a standard sign in form with username and password fields, and 'Sign In' button
  • Implements basic username and password validation logic
  • Provides a callback to perform the signing in action
  • Handles signing in errors
  • Allows to customize the form UI according to your app design

LoginUic Demo

Usage

Import the package

import 'package:uic/login_uic.dart';

Add LoginUic widget to your widget tree:


  @override
  Widget build(BuildContext context) {
    return Scaffold(
      appBar: AppBar(
        title: Text(widget.title),
      ),
      body: Center(
        child: LoginUic(
          onSignIn: (username, password) => _signIn(username, password),
          onSignInCompleted: (context) => Navigator.push(
            context,
            MaterialPageRoute(
                builder: (context) =>
                    LoginUicSignedInScreen(title: 'LoginUic Demo')),
          ),
        ),
      ),
    );
  }

Implement a function that performs sign in action according to your business logic:


  Future<void> _signIn(String username, String password) async {
    ...
  }

LoginUic required parameters:

Name Description
onSignIn A callback that perform sign in action. It is called when users clicks 'Sign In' button.
onSignInCompleted Called when a user successfully signed in. Can be used to navigate to another screen.

See full example of LoginUic usage in the demo app and package docs.

ActionButton

A wrapper of Material buttons, that incapsulates managing of the local state of an action which is performed on the button click, and updates the button content to display the progress view when the action is performed.

  • Uses TextButton, ElevatedButton or OutlineButton as an underlying button widget.
  • Supports all attributes of standard buttons.
  • Allows to display a simple progress indicator or a custom view when the action is performed.
  • Provides callbacks on action state changes.

ActionButton Example

Usage

Import the package

import 'package:uic/widgets.dart';

You can use ActionButton the same way you are using normal button widgets. But instead of 'onPressed', you provide action function in the action attribute.


  @override
  Widget build(BuildContext context) {
    return Scaffold(
      appBar: AppBar(
        title: Text(widget.title),
      ),
      body: Center(
        child: ActionButton(
          action: () async {
            return Future.delayed(Duration(seconds: 5));
          },
          child: Text('Button title'),
        ),
      ),
    );
  }

Additional parameters of ActionButton widget:

Name Description
buttonType Defines the underlying Material button widget - TextButton, ElevatedButton or OutlineButton.
onActionCompleted Called when the action successfully completed.
onActionError Called when the action finished with error.
onActionStarted Called immediately after the button pressed.
progressView Custom view that is shown as a button child during the action.

See full example of ActionButton usage in the demo app and package docs.

Deck

Displays stacked child widgets (typically cards), so the only headers are visible initially. Each Deck item can be expanded and collapsed.

This is an alternative to a BottomSheet widget, if you need to display multiple bottom sheets, which are coordinated.

  • Supports separate views for collapsed and expanded state for each item.
  • Animates expanding and collapsing.

Deck Example

Usage

Import the package

import 'package:uic/widgets.dart';

Typically you will use Deck in a Stack, where the first layer is your main content and a Deck will overlap the conten. The usage might look like this:


  @override
  Widget build(BuildContext context) {
    return Scaffold(
      appBar: AppBar(
        title: Text(widget.title),
      ),
      body: Stack(
        children: [
          YourMainWidget(),
          Align(
            alignment: Alignment.bottomCenter,
            child: Deck(
                items: [
                  DeckItem(
                    child: YourFirstItemCollapsedView(),
                    childExpanded: YourFirstItemExpandedView(),
                  ),
                  DeckItem(
                    child: YourSecondItemCollapsedView(),
                    childExpanded: YourSecondItemExpandedView(),
                  ),
                ],
            ),
          ),
        ]),
    );
  }

You must provide the list of DeckItem objects, which defines both the collapsed and expanded appearance of your Deck items.

Additional parameters of Deck widget:

Name Description
collapsedSize The size of child widget in the collapsed state.
expandedSize The size of child widget in the expanded state.
mainAxisSize The maximum Deck size.

See full example of Deck usage in demo app and package docs.

InlineTextField

Makes Text view editable. In the view mode is shows a normal Text widget (or your custom view). On double tap it is switching to editing mode, and allow user to inline edit the text.

  • Supports text styling in both view and editing mode.
  • Supports text field decoration in the editing mode.
  • Uses minimalistic appearance of text field in editing mode by default.
  • Notifies when user done editing text.
  • Supports custom widget to show in view mode instead of normal Text widget.

InlineTextField Demo

Usage

Import the package

import 'package:uic/widgets.dart';

Simple usage of InlineTextWidget:


  @override
  Widget build(BuildContext context) {
    return Scaffold(
      appBar: AppBar(
        title: Text(widget.title),
      ),
      body: Row(
          children: <Widget>[
            Text('You can '),
            InlineTextField(
              text: 'edit me',
              style: Theme.of(context).textTheme.bodyText1.copyWith(
                color: Colors.lightBlueAccent,
              ),
              onEditingComplete: (value) {
                _scaffoldKey.currentState.showSnackBar(SnackBar(
                  backgroundColor: Theme.of(context).accentColor,
                  content: Text(value),
                ));
              },
            ),
            Text(' right here'),
          ],
        ),
    );
  }

See more available options of InlineTextField examples in demo app and package docs.

StepIndicator

Simple, but customizable step (page) indicator. It can be useful to show a current item in sliders and carousels, or a current page in a flow where user has to pass through a sequence of screens.

  • Supports custom colors for completed, selected and incomplete steps.
  • Optionally shows lines connecting step items.
  • Supports custom line colors, width and length.
  • Can be expanded, to fit parent size.
  • Horizontal or vertical orientation (NOT IMPLEMENTED YET)
  • Notifies when user select a step. (NOT IMPLEMENTED YET)
  • Supports custom widgets for complete, selected and incomplete steps.
  • Builder function that allow to define individual view for each step. (NOT IMPLEMENTED YET)

StepIndicator Examples

Usage

Import the package

import 'package:uic/widgets.dart';

Simple usage of StepIndicator:


  @override
  Widget build(BuildContext context) {
    return Scaffold(
      appBar: AppBar(
        title: Text(widget.title),
      ),
      body: Padding(
        padding: const EdgeInsets.all(16.0),
          child: StepIndicator(
            selectedStepIndex: 2,
            totalSteps: 5,
          ),
        ),
    );
  }

You must provide the current step index and total number of steps.

See more available options of StepIndicator in demo app and package docs.

카테고리

의존성

의존성 목록 2 개

소스 저장소

이 패키지를 사용하는 프로젝트

아직 데이터가 없습니다.