feature_discovery
This Flutter package implements Feature Discovery following the Material Design guidelines.
With Feature Discovery, you can add context to any UI element, i.e. any Widget in your Flutter app.
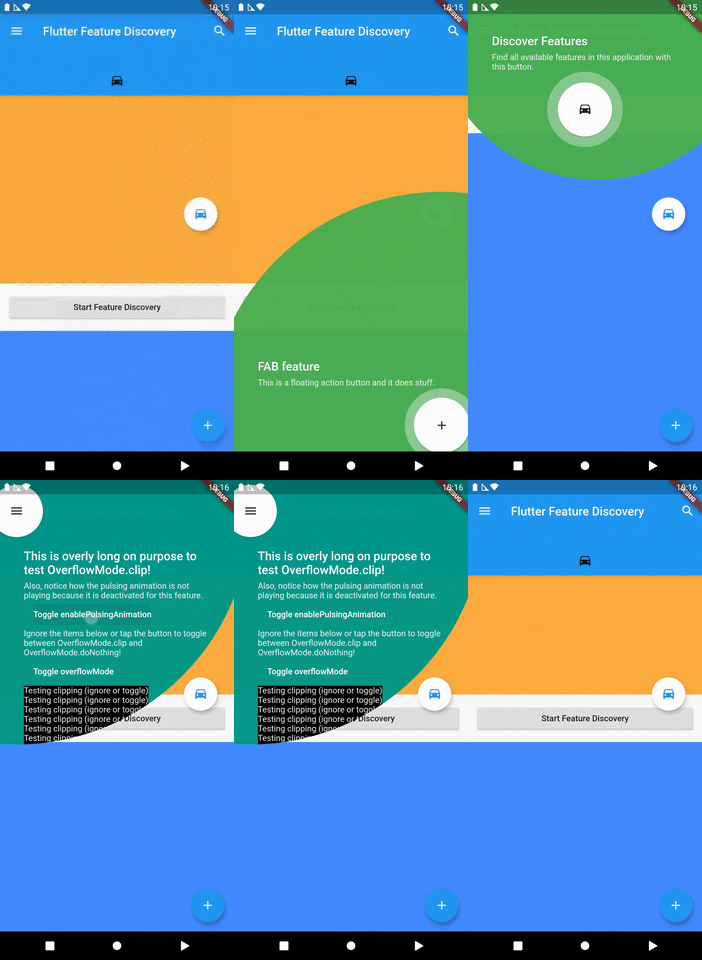
Here is a small demo of the example app:
Installing
To use this package, follow the installing guide.
Usage
FeatureDiscovery
To be able to work with any of the global functions provided by the feature_discovery package, you will have to wrap your widget tree in a FeatureDiscovery widget.
There are many places where you can add FeatureDiscovery in your build tree, but the easiest to assure that it sits on top is to wrap your MaterialApp with it:
const FeatureDiscovery(
  child: MaterialApp(
   ...
  )
)
DescribedFeatureOverlay
For every UI element ( Widget ) that you want to describe using Feature Discovery, you will need to add a DescribedFeatureOverlay .
This widget takes all the parameters for the overlay that will be displayed during Feature Discovery and takes the Widget you want to display the overlay about as its child .
Feature ids
Every feature you describe should have a unique identifier, which is a String passed to the featureId parameter. You will also need to provide these ids when starting the discovery.
And library will use this ids to save flag internally to indicate which feature is showed to user and completed by user.
And if this feature is completed by user library will not show it again.
DescribedFeatureOverlay(
featureId: 'add_item_feature_id',
tapTarget: const Icon(Icons.add),
title: Text('Add item'),
description: Text('Tap the plus icon to add an item to your list.'),
backgroundColor: Theme.of(context).primaryColor,
targetColor: Colors.white,
textColor: Colors.white,
child: IconButton(
icon: cons Icon(Icons.add),
onPressed: addItem,
),
);
Additional parameters
contentLocation
This is ContentLocation.trivial by default, however, the package cannot always determine the correct placement for the overlay. In those cases, you can provide either of these two:
onComplete
onComplete: () async {
print('Target tapped.');
return true;
},
onDismiss
onDismiss: () async {
print('Overlay dismissed.');
return true;
},
onOpen
onOpen: () async {
print('The overlay is about to be displayed.');
return true;
},
enablePulsingAnimation
This is set to true by default, but you can disable the pulsing animation about the tap target by setting this to false .
allowShowingDuplicate
If multiple DescribedFeatureOverlay s have the same featureId , they will interfere with each other during discovery and if you want to display multiple overlays at the same time, you will have to set allowShowingDuplicate to true for all of them.
barrierDismissible
This is set to true by default, but you can disable "dissmiss overlay on touch outside" by setting this to false .
overflowMode
This is OverflowMode.ignore by default, which will simply render the content you pass to title and description , even if it overflows the background area, i.e. the circle of the overlay. Alternatively, you can specify any of the following if you desire different behavior:
-
OverflowMode.clipContent will clip any content that is outside of the inner area (the background's circle).
-
OverflowMode.extendBackground will expand the background circle if necessary.
-
OverflowMode.wrapBackground will expand the background circle if necessary, but also shrink it if the content is smaller than the default background size.
FeatureDiscovery.discoverFeatures
When you want to showcase your features, you can call FeatureDiscovery.discoverFeatures with the applicable feature ids. The features will be displayed as steps in order if the user does not dismiss them.
By tapping the tap target, the user will be sent on to the next step and by tapping outside of the overlay, the user will dismiss all queued steps.
FeatureDiscovery.discoverFeatures(
context,
const <String>{
'add_item_feature_id',
},
);
If you want to display Feature Discovery for a page right after it has been opened, you can use SchedulerBinding.addPostFrameCallback in the initState method of your StatefulWidget :
@override
void initState() {
SchedulerBinding.instance.addPostFrameCallback((Duration duration) {
FeatureDiscovery.discoverFeatures(
context,
const <String>{
'add_item_feature_id',
},
);
});
super.initState();
}
FeatureDiscovery.clearPreferences
If you want to clear feature discovery flag use this command like that
FeatureDiscovery.clearPreferences(context, <String>{ 'add_item_feature_id', });
FeatureDiscovery.hasPreviouslyCompleted
If you want to findout feature discovery is Displayed or not ? use this command like that
FeatureDiscovery.hasPreviouslyCompleted (context,'desired_feature_id');
Other methods
You can view the API reference for FeatureDiscovery to find other useful methods for controlling the Feature Discovery process programmatically.
EnsureVisible
You can use the EnsureVisible widget to automatically scroll to widgets that are inside of scrollable viewports when they are described during Feature Discovery:
GlobalKey<EnsureVisibleState> ensureVisibleGlobalKey = GlobalKey<EnsureVisibleState>();
DescribedFeatureOverlay(
featureId: 'list_item_feature_id',
tapTarget: const Icon(Icons.cake),
onOpen: () async {
WidgetsBinding.instance.addPostFrameCallback((Duration duration) {
ensureVisibleGlobalKey.currentState.ensureVisible();
return true;
});
},
title: Text('Cake'),
description: Text('This is your reward for making it this far.'),
child: EnsureVisible(
key: ensureVisibleGlobalKey,
child: const Icon(Icons.cake),
),
)
Notes
In DescribedFeatureOverlay , tapTarget , title , and description can take any widget, but it is recommended to use an Icon for the tap target and simple Text widgets for the title and description. The package takes care of styling these widgets and having these as Widget s allows you to pass Key s, Semantics , etc.
Contributing
If you want to start contributing to this package, it is recommended to refer to the contributing guide.
Gratitude
Thanks to mattcarroll for their Flutter challenge about Feature Discovery on Fluttery.


