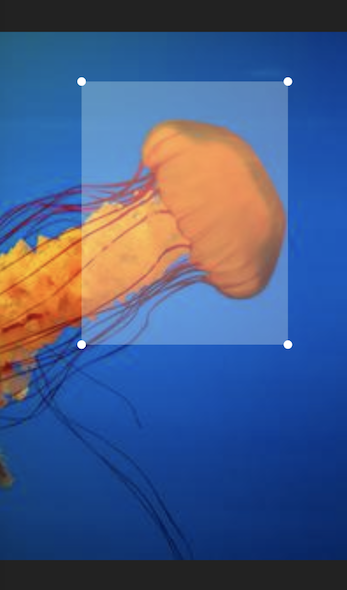
A Flutter widget to crop images. The widget is completely written in Dart and has minimal dependencies.
The widget displays the image within the given layout space. On top of the image a transparent rectangular overlay, with handles on each corner, is drawn. The overlay handles can be dragged by touch to adjust the cropping area.
By calling the cropImage() method on the widget's state object, the image area that is marked by the overlay is returned as a new image object.
To acquire the widget's state you can use a GlobalKey object.
Example:
import'dart:ui'; // This imports the 'Image' class.final key = GlobalKey<ImageCropState>();
Image imageObject = ...
...
ImageCrop(key: key, image: imageObject) // This could be used inside a build method.
...
await key.currentState.rotateImage(); // Rotate the image be 90° clockwise.final cropedImage = await key.currentState.cropImage(); // This could be used inside a 'onPress' handler method.
How to create an image object
The Image class from dart:ui is typically not instantiated directly. Instead, you could convert your image data into a Uint8List and instantiate the image like this:
Uint8List bytes = ...
final codec = awaitinstantiateImageCodec(bytes);
final frame = await codec.getNextFrame();
final image = frame.image;
How to display an image object
The Image object can be displayed with the Flutter Image widget. One way to do this, is by converting the image into a Uint8List and pass it into the widget's memory constructor. Please note, that the widget is not the same Image class as the image object itself.
final cropedImage = await key.currentState.cropImage();
final byte = await cropedImage.toByteData(format: ui.ImageByteFormat.png);
final byteList = byte.buffer.asUint8List();

Image.memory(byteList)
How to persist an image object
The Image object can be persisted into a file or a database. To do this, you can convert the image object into a Uint8List and write it into a File or your database object.
final cropedImage = await key.currentState.cropImage();
final byte = await cropedImage.toByteData(format: ui.ImageByteFormat.png);
final byteList = byte.buffer.asUint8List();
final imageFile = File("Some path and filename"); // You can use the path_provider package to locate the right path.final result = await imageFile.writeAsBytes(byteList);