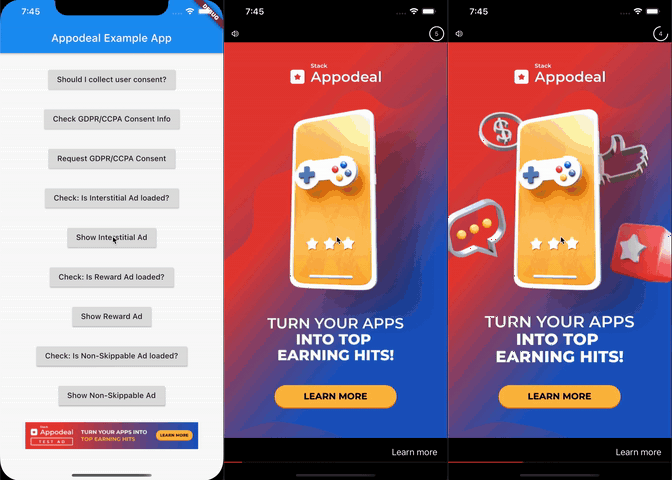
Appodeal Flutter는 Android 및 iOS용 Flutter 애플리케이션에 Appodeal 광고 네트워크를 통합할 수 있도록 해주는 플러그인입니다. 배너, 인터스티셜, 리워드 비디오와 같은 다양한 광고 형식을 지원합니다. 개인정보 보호 규정(GDPR, CCPA) 준수를 위해 내장된 동의 관리 기능을 포함하고 있어 사용자 추적을 책임감 있게 처리합니다. 개발자는 간단한 API를 통해 광고를 쉽게 초기화하고 관리할 수 있습니다. 글로벌 데이터 보호 기준을 준수하면서 광고 수익화를 간소화합니다.
사용 사례
앱 내 광고를 통한 모바일 앱 수익화
다중 플랫폼에서 준수 가능한 광고 서빙 통합
사용자 참여를 위한 보상 영상 광고 표시
앱 화면 사이에 인터스티셜 광고 표시
추적에 대한 사용자 동의 관리
하나의 솔루션에서 여러 광고 형식 지원
주요 기능
GDPR 및 CCPA 준수 동의 대화 상자
배너, 인터스티셜 및 보상 광고 지원
간편한 초기화 및 통합
크로스 플랫폼 지원 (Android 및 iOS)
내장된 사용자 동의 관리
광고 제어를 위한 간단한 API
적합한 대상
광고 수익화를 찾는 플러터 개발자
개인정보 보호 준수 필요성이 있는 글로벌 대상 앱
여러 광고 형식이 필요한 프로젝트
Appodeal을 주요 광고 네트워크로 사용하는 개발자
자동 동의 처리가 필요한 앱
고려 사항
Appodeal 계정 및 광고 유닛 설정이 필요합니다
AndroidManifest.xml 및 Info.plist에 올바른 구성이 필요합니다
Appodeal SDK 버전 호환성에 따라 다릅니다
동의 대화 상자는 지역에 따라 올바르게 표시되어야 합니다
준수를 위해 추가 테스트가 필요할 수 있습니다
네이티브 SDK에 비해 사용자 맞춤 설정이 제한적
원본 README
연결된 소스 저장소의 README 원문 스냅샷입니다. 최신 내용은 저장소에서 확인하세요.
appodeal_flutter
A Flutter plugin to display ads from Appodeal. It currently supports Banner, MREC, Interstitial, Reward and Non-Skippable ads.
⚠ Package Archived ⚠ - Please use the official Appodeal package from now on
This project was created by me when there was no official support for Appodeal on Flutter. But now that the Appodeal team created their own official package I don't see a reason to keep maintaining this one.
I thank everybody that downloaded, contributed with PRs an supported this package.
📽 Demo
⚙️ Installation
Add the dependency to the pubspec.yaml file in your project:
dependencies:appodeal_flutter:# use the latest version
Install the plugin by running the command below in the terminal, in your project's root directory:
$ flutter pub get
Follow the Appodeal installation instructions available for iOS and Android. However, ignore the steps to include the Appodeal SDK dependencies in Gradle (Android) and Cocoapods (iOS) since these steps will be done by this package.
Extra steps for Android only
The Appodeal framework includes mutiple libraries from different ad providers, so it's very likely that the inclusion of this plugin in your project will make it exceed to 64K limit method count of Android. To solve this problem you need to enable multidex in your project; follow the instructions here to learn how to do that.
Your Android project must use Gradle 4.0.1 or greater. If you are using an older version, please upgrade it by editing the file android/build.gradle.
Extra step for iOS 14+ only
Follow the instructions available here to learn how to implement the permission request to track users, but ignore the part to include some code in the AppDelegate file. This code is already included in this plugin and it will be executed when you call the function Appodeal.requestIOSTrackingAuthorization(), before the initialization of Appodeal (see below).
If you don't use AdMob
This plugin comes with all possible ad networks supported by Appodeal enabled by default. I made this decision to give more flexibility to the developers using this project, but this comes with a drawback: if you don't intend to use Google AdMob in your app, then you are still forced to add a fake application ID in your project otherwise AdMob will make the app crash if it doesn't find an ID 😬
To add this fake AdMob ID (again, only if you don't intend to use AdMob, otherwise you should use your real AdMob identifier) you must:
Android
Edit the file android/app/src/main/AndroidManifest.xml and add this into the <application> tag:
Import the plugin as early as possible somewhere in your project (ideally in the file main.dart), then initialize the plugin by calling the functions Appodeal.setAppKeys() and Appodeal.initialize():
Initialization
First you need to set the app keys:
// Set the Appodeal app keysAppodeal.setAppKeys(
androidAppKey: '<your-appodeal-android-key>',
iosAppKey: '<your-appodeal-ios-key>',
);
Where androidAppKey and iosAppKey are the keys associated with your app in your Appodeal account. At least one of these keys must be set before the initialization (either Android or iOS), otherwise you will get an error.
Afterwards you can initialize Appodeal with the function:
// Initialize AppodealawaitAppodeal.initialize(
hasConsent: true,
adTypes: [AdType.banner, AdType.mrec, AdType.interstitial, AdType.reward, AdType.nonSkippable],
testMode: true,
verbose: true,
);
// At this point you are ready to display ads
hasConsent (mandatory) you must set either true or false, depending if the user granted access to be tracked in order to received better ads. See section about collecting user consent for more information.
adTypes (optional) you must set a list (of type AdType) with all the ad types that you would like to display in your app. If this parameter is undefined or an empty list then no ads will be loaded.
testMode (optional) you must set either true or false (default) depending if you are running the ads during development/test or production.
verbose (optional) you must set either true or false (default) if you want Appodeal's verbose logs to be visible amongst the Flutter logs.
👮🏾♂️ Consent to track the user
Before you initialize the plugin and start displaying ads, you might need to collect the user's consent to be tracked online, depending on his location or the operating system that he is using.
For iOS 14+ only
Since iOS 14+ you are required to request a specific permission before you can have access to Apple's IDFA (a sort of proprietary cookie used by Apple to track users among multiple advertisers... ah Apple, always Apple 🙄). To request this permission call the function Appodeal.requestIOSTrackingAuthorization():
// iOS 14+: request permission to track users// on iOS <= 13 and Android this function does nothing; it just returns trueawaitAppodeal.requestIOSTrackingAuthorization();
For iOS versions before 14 and for Android devices this function won't do anything, so it's safe to call it on any device OS or version.
For users protected by GDPR/CCPA privacy laws
Depending on the location of your users, they might be protected by the privacy laws GDPR or CCPA. These laws require, among other things, that app developers must collect user consent before the advertisers can track them online. You can check if the user is protected by any privacy laws, by calling the function Appodeal.shouldShowConsent():
bool shouldShow = awaitAppodeal.shouldShowConsent();
if (shouldShow) { /* Request user consent */ }
Keep in mind that the function above will also return false if the user previously accepted or declined the request to be tracked online. So it's important to always call this function in advance to avoid annoying the user with permission requests that he already answered.
After you determine if you need to request user consent, you have two options to collect this consent:
You can design the UI with all the legal information and multiple options to let the user decline, accept or partially accept the options to be tracked. After you collect this information yourself, you then need to pass the value true or false to the parameter hasConsent during the Appodeal initialization.
or:
You can use the UI provided by the Consent Manager framework. With this option you can't customize the UI used to collect the user consent, however it does the heavy lifting for you of creating and displaying a window with all the legal wording, permission options and everything that is necessary to get the user's permission to be tracked. If you decide to go with option # 2 then you must call two functions:
2.1. Call the function Appodeal.requestConsentAuthorization() to display a window requesting the user consent to be tracked:
awaitAppodeal.requestConsentAuthorization();
2.2. After the user grants or decline consent, you can call the function Appodeal.fetchConsentInfo() to fetch the consent info:
var consent = awaitAppodeal.fetchConsentInfo();
var hasConsent = consent.status == ConsentStatus.personalized || consent.status == ConsentStatus.partlyPersonalized;
awaitAppodeal.initialize(hasConsent: hasConsent, ...)
💵 Showing ads
After you collect all the permissions and the plugin properly initialized, you are ready to display the ads:
Banner & MREC
To display a banner or MREC ad in your app, just include the widgets AppodealBanner() or AppodealMrec() somewhere in your widget tree. For example:
...
// Add a banner adCenter(
child: AppodealBanner()
),
// or a MREC adCenter(
child: AppodealMrec()
),
...
Interstitial, Reward & Non-Skippable
To show an interstitial, reward or non-skippable ad, call the function Appodeal.show() passing the type of ad that you would like to show as a paremeter (mandatory) and the placement name (optional):
Appodeal.show(AdType.interstitial, placementName: "placement-name"); // Show an interstitial adAppodeal.show(AdType.reward, placementName: "placement-name"); // Show a reward adAppodeal.show(AdType.nonSkippable); // Show a non-skippable ad without placement name
♻️ Callbacks
You can define callbacks to your ads and track when an event occurs; it can be done by calling the callback functions below:
Appodeal.setBannerCallback((event) {})
Appodeal.setMrecCallback((event) {})
Appodeal.setInterstitialCallback((event) {})
Appodeal.setRewardCallback((event) {})
Appodeal.setNonSkippableCallback((event) {})
Every callback carries the parameter event of type String and you can use it to determine what event has been triggered. For example, if I wanted to know when the user watched a reward ad until the end, I could use the following callback code:
Appodeal.setRewardCallback((event) {
  if (event == 'onRewardedVideoFinished') {
    print('The user watched the reward ad until the end');
  }
})
and if later I don't want to track reward events anymore, I just need to pass the value null to the same callback function:
Appodeal.setRewardCallback(null);
The full list of events that you can track is below:
If you like this project then please consider becoming a sponsor. Your contribution will help me dedicate more time working on bugs and new features for this and other projects.
📝 License
appodeal_flutter is released under the MIT License. See LICENSE for details.