Easy EventBus는 Flutter 애플리케이션을 위한 가볍고 직관적인 이벤트 버스 라이브러리로, 이벤트를 통해 컴포넌트 간의 간단하고 효율적인 통신을 가능하게 합니다. 강한 결합 없이 이벤트를 게시하고 구독할 수 있는 우아한 API를 제공하여 상태 관리 및 컴포넌트 간 메시징에 이상적입니다. Android, iOS, Web, macOS, Windows, Linux 등 모든 주요 플랫폼을 지원하며 크로스플랫폼 일관성을 보장합니다. 최소한의 설정과 깔끔한 문법으로 복잡한 앱에서 코드의 유지보수성과 확장성을 향상시킵니다.
사용 사례
실시간 알림
위젯 간 통신
UI와 비즈니스 로직의 분리
이벤트 기반 아키텍처
화면 간 상태 동기화
플러그인 또는 모듈 통합
주요 기능
간단한 발행/구독 패턴
크로스 플랫폼 지원
최소한의 보일러플레이트
형 안전한 이벤트 처리
경량 종속성
깨끗하고 읽기 쉬운 API
적합한 대상
경량 상태 관리가 필요한 개발자
자주 컴포넌트 간 통신을 하는 앱
분리된 아키텍처를 필요로 하는 프로젝트
코드 간결성을 우선시하는 팀
Flutter 초보자들이 이벤트 기반 설계 탐색 중
고려 사항
대규모 상태 관리에 적합하지 않음
제한된 내장 오류 처리
내장된 지속성 없음
충돌을 피하기 위해 이벤트 이름을 신중하게 지정해야 합니다
다른 상태 관리 솔루션과 함께 사용하는 것이 가장 좋습니다
원본 README
연결된 소스 저장소의 README 원문 스냅샷입니다. 최신 내용은 저장소에서 확인하세요.
EasyEventBus
It's an easy-to-use and elegant library based on event bus. It was greatly inspired by EventBus and made much simpler.
About Event Bus
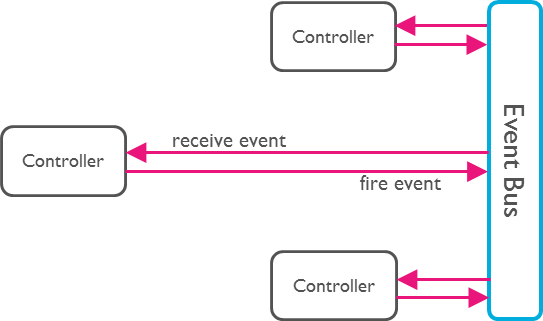
An Event Bus follows the publish/subscribe pattern. It allows listeners to
subscribe for events and publishers to fire events. This enables objects to
interact without requiring to explicitly define listeners and keeping track of
them.
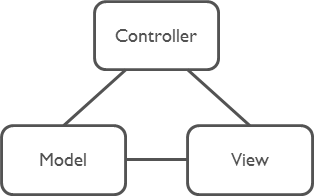
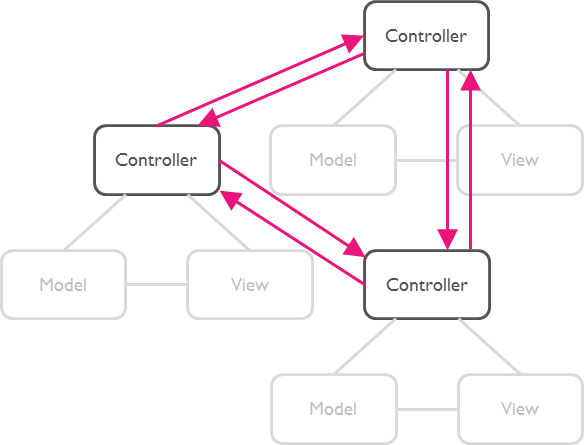
The Event Bus pattern is especially helpful for decoupling MVC
(or MVP) applications.
One group of MVC is not a problem.
But as soon as there are multiple groups of MVCs, those groups will have to talk
to each other. This creates a tight coupling between the controllers.
By communication through an Event Bus, the coupling is reduced.
Usage
Step 1: Subscribe to an Event
First, set up a subscription for the desired event. This allows you to listen for and react to the event whenever it is triggered.
EasyEventBus.on('sayHello', (event) {
  print(event); // write your code here.
});
Step 2: Trigger the Event
Next, trigger the event at the appropriate time in your application. This will notify all subscribers of the event.
EasyEventBus.fire('sayHello', 'hello world'); // Triggers the event with a any data.
Note: The event data can be of any type, giving you flexibility in what information you pass to the subscribers.
That's All!
Advance
1. Cancel Subscription
To cancel a subscription, you call the cancel method. This example shows how to cancel all subscriptions for the 'sayHello' event, both anonymous and with identifiers.
// Cancel all subscriptions to the 'sayHello' event.EasyEventBus.cancel('sayHello');
2. Cancel Specific Subscription
Before canceling a specific subscription, you first need to create a subscription with an identifier (id). Here is how to subscribe to an event with an id and then cancel that specific subscription by calling the cancel method with the same id.
First, subscribe to an event with an id:
// Subscribe to the 'sayHello' event with an identifier.EasyEventBus.on('sayHello', (event) {
print('Received: $event');
}, id: 'uniqueId123');
Then, cancel the subscription using the same id:
// Cancel the subscription to the 'sayHello' event using the identifier 'uniqueId123'.EasyEventBus.cancel('sayHello', id: 'uniqueId123');
3. Cancel All Subscriptions
You can cancel all subscriptions by calling the cancelAll method. This method cancels all subscriptions for all events and closes all event controllers.
// Cancel all subscriptions and close all event controllers.EasyEventBus.cancelAll();