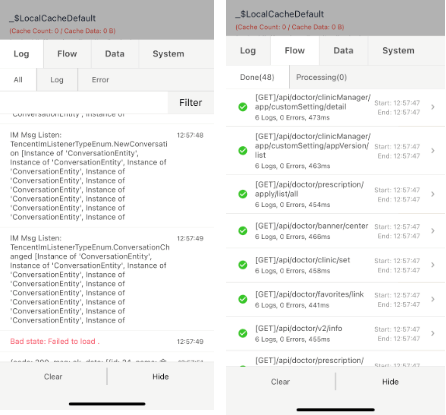
연결된 소스 저장소의 README 원문 스냅샷입니다. 최신 내용은 저장소에서 확인하세요.
fconsole
一个用于调试的面板组件,类似微信小程序的 v-console:在页面上创建一个可拖拽的悬浮窗,点击悬浮窗可启用 log 列表面板。
主要功能:
显示悬浮窗,随时打开 Log 页面
可自定义页面插入,项目专属调试页不用藏
使用 FlowLog 可记录流程事件,网络 Log 清晰可见(支持json树状展示)
分享完整 FlowLog 网络请求,一键反馈(甩锅)后端报错
截图
使用
void main () => runAppWithFConsole (
MyApp (),
delegate: MyCardDelegate (),
beforeRun: () async {
WidgetsFlutterBinding .ensureInitialized ();
}
);
然后才可以使用下列方法:
启动悬浮窗
只需要调用顶层方法就可以打开悬浮窗
showConsole ();
hideConsole ();
自定义页面
很多时候我们都需要插入自定义页面,可以这样做:
void main () => runAppWithFConsole (
MyApp (),
delegate: MyCardDelegate (),
);
class MyCardDelegate extends FConsoleCardDelegate @override
List <FConsoleCard > cardsBuilder (DefaultCards defaultCards) {
return [
defaultCards.logCard,
defaultCards.flowCard,
FConsoleCard (
name: "my" ,
builder: (ctx) => CustomLogPage (),
),
defaultCards.sysInfoCard,
];
}
}
class CustomLogPage extends StatelessWidget const CustomLogPage ({Key key}) : super (key: key);
@override
Widget build (BuildContext context) {
return Container (
alignment: Alignment .center,
child: Text ('custom page content' ),
);
}
}
卡片内无法使用OKToast,若要显示 toast 信息,FConsole提供了一个showMessage方法:
FConsole .showMessage ("Copy Success" );
拦截原生 print 函数和未捕获的异常
fconsole可以拦截原先的print函数,包括其他库中的print语句和未捕获的throw同样可以被拦截。
拦截后,print将等效于FConsole.log,未捕获的错误将等效于FConsole.error。
要使用此功能,请将runApp替换为runFConsoleApp:
void main () => runFConsoleApp (MyApp ());
然后,原生print和throw将被拦截:
SettingRow (
icon: Icons .warning,
text: '原生Print' ,
right: Container (),
onTap: () {
print ('${DateTime.now().toIso8601String()} ' );
},
),
SettingRow (
icon: Icons .warning,
text: '原生Throw' ,
right: Container (),
onTap: () {
throw '${DateTime.now().toIso8601String()} ' ;
},
),
添加 log
使用 FConsole 添加 log 非常简单:
FConsole .log ("打印了一行log" );
FConsole .log ("打印了一行log" );
FConsole .log ("打印了一行log" );
FConsole .log ("打印了一行log" );
FConsole .error ("打印了一行error" );
FConsole .error ("打印了一行error" );
FConsole .error ("打印了一行error" );
FConsole .error ("打印了一行error" );
然后就可以在 FConsole 内查看 log 记录。
创建 FlowLog(支持JSON)
可以使用FlowLog的形式记录 Log:
FlowLog .of ('分享启动' ).log ('用户进入页面 $id ' );
FlowLog .of ('分享启动' ).log ('获取到分享值1 $shareId ' );
FlowLog .of ('分享启动' ).log ('查询分享信息1 成功' );
FlowLog .of ('分享启动' ).log ('获取到分享值2 $shareId ' );
FlowLog .of ('分享启动' ).log ('查询分享信息2 成功' );
FlowLog .of ('分享启动' ).log ('获取到分享值3 $shareId ' );
FlowLog .of ('分享启动' ).log ('查询分享信息3 成功' );
FlowLog .of ('分享启动' ).log ('获取到分享值4 $shareId ' );
FlowLog .of ('分享启动' ).log (map);
FlowLog .of ('分享启动' ).error ('查询分享信息4错误: $map ' );
FlowLog .of ('分享启动' ).end ();
也可以使用变量来记录
var logger = FlowLog .of ('分享启动' );
logger.log ('用户进入页面 $id ' );
logger.log ('获取到分享值 $shareId ' );
logger.error ('查询分享信息错误: $map ' );
logger.end ();
FlowLog 可以记录用户的一系列行为,在用户出现问题时,通过 Console 信息即可快速定位问题。
FlowLog 的优势在于,在同一页面上的操作可以分开记录,不会互相干扰,例如同时处理两张图片,一张成功而另一张失败,会按 id 形成两个不同的 FlowLog。
FlowLog with Dio
一个很好的实践:使用 FlowLog 记录每一次网络请求
Tips: 使用“Share”可分享完整网络请求,一键反馈(甩锅)后端报错。
extension _GetLogID on RequestOptions {
String get logId {
return '[$method ]${uri.path} ' ;
}
}
_http = Dio ();
_http!.interceptors.add (InterceptorsWrapper (
onRequest: (RequestOptions options, handler) {
var _logger = FlowLog .ofNameAndId (
options.logId,
id: '${options.hashCode} ' ,
);
_logger.log ('开始请求 ${options.method} ' );
_logger.log ('data:${options.data} ' );
_logger.log ('params:${options.queryParameters} ' );
_logger.log ('header:${options.headers.toString()} ' );
handler.next (options);
},
onResponse: (e, handler) {
var _logger = FlowLog .ofNameAndId (
e.requestOptions.logId,
id: '${e.requestOptions.hashCode} ' ,
);
_logger.log ('请求结束' );
_logger.log ('Http Status Code:${e.statusCode} ' );
_logger.log ('Response Data:\n${e.data} ' );
_logger.end ();
handler.next (e);
},
onError: (e, handler) {
var _logger = FlowLog .ofNameAndId (
e.requestOptions.logId,
id: '${e.requestOptions.hashCode} ' ,
);
_logger.error ('请求错误:$e ' );
_logger.end ('请求错误结束' );
handler.next (e);
},
));