패키지, 저장소 및 앱 카테고리 검색

floating_view 표지
패키지 상세v1.0.4

floating_view

YouTube 접을 수 있는 창 동작을 달성하기 위한 플러그인입니다.

AndroidiOSWebmacOSWindowsLinux
30일 다운로드
63
좋아요
18
Pub 점수
160

패키지 설치

flutter pub add floating_view

패키지 개요

공개 정보를 바탕으로 생성한 선택 가이드입니다.

Floating View는 YouTube의 축소된 창과 유사한 피처를 제공하는 플러터 플러그인입니다. 위젯을 다른 콘텐츠 위에 띄울 수 있게 해주며, 안드로이드, iOS, 웹, macOS, Windows, 리눅스 등 다양한 플랫폼을 지원합니다. 개발자는 드래그 가능하고 크기 조절이 가능한 상호작용형 부유 창을 만들 수 있어, 지속적인 UI 요소가 필요한 앱에서 사용자 경험을 향상시킬 수 있습니다. 간단한 명령줄 설치를 통해 기존 플러터 프로젝트에 원활하게 통합할 수 있습니다.

사용 사례

  • 지속적인 채팅 위젯 구현
  • 미디어 재생을 위한 플로팅 컨트롤 생성
  • 작은 오버레이 패널을 사용한 멀티태스킹 활성화
  • 항상 표시되는 탐색 도구
  • 인터랙티브 플로팅 메뉴 설계

주요 기능

  • 드래그 및 크기 조절이 가능한 플로팅 창
  • 크로스 플랫폼 지원 (Android, iOS, Web, macOS, Windows, Linux)
  • Flutter 위젯 시스템과의 간단한 통합
  • 사용자 정의 가능한 외관 및 동작
  • 터치 및 포인터 상호작용을 지원합니다

적합한 대상

  • 미디어 앱을 개발하는 개발자
  • 지속적인 UI 오버레이가 필요한 앱
  • 다중 작업 또는 생산성 중심 애플리케이션
  • 혁신적인 상호작용 패턴을 찾는 UI 디자이너
  • 화면 내 화면 기능이 필요한 프로젝트

고려 사항

  • 일부 운영 체제에서는 플랫폼별 권한이 필요할 수 있습니다
  • 복잡한 중첩 위젯으로 인한 성능 영향
  • 일부 플랫폼에서 원본 애니메이션 지원이 제한됨
  • 전체 화면 레이아웃과의 잠재적인 UI 충돌
  • 라이프사이클 이벤트를 신중하게 처리해야 합니다

원본 README

연결된 소스 저장소의 README 원문 스냅샷입니다. 최신 내용은 저장소에서 확인하세요.

FloatingView Package

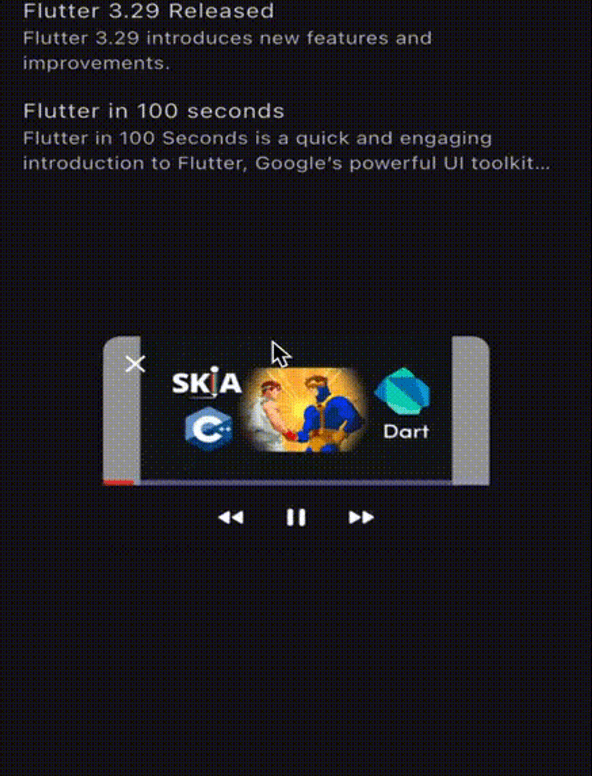
The FloatingView package enables you to create a floating window similar to YouTube's floating video feature. This allows the window to float on the screen and be draggable while scrolling.

The example app running in iOS

Table of Contents

Integration Steps

To integrate the package into your Flutter application, follow these steps:

  1. Wrap the Screen:

    Wrap the screen where you want to display the FloatingView:

    late final FloatingController _controller = FloatingController(
        context,
        initialPosition: FloatingPosition.bottomLeft,
    );
    
    @override
    void dispose() {
        super.dispose();
        _controller.dispose();
    }
    
    @override
    Widget build(BuildContext context) {
        return FloatingView(
            controller: _controller,
            childBuilder: () => Scaffold(
                body: ItemBuilder(list: dummyList, controller: _controller),
            ),
        );
    }
    

    Note: FloatingView will disappear when changing routes. To display it across routes, wrap your desired route screen with the FloatingView and use the same controller. The controller can be passed down in the widget tree or stored in state management solutions such as BLoC, Provider, etc. The FloatingView will be passed down across the screen using the Hero widget, which is currently the only option available.

    Navigator.push(
        context,
        MaterialPageRoute(
            builder: (context) => FloatingView(
                controller: _controller,
                childBuilder: () => NavigationTestScreen(),
            ),
        ),
    );
    
  2. Initialize the FloatingView:

    Initialize the controller and store the widget you want to display, such as a video, screen, or text. Here is an example of using FloatingView with a Video Player or a simple screen:

    void onTap(dynamic data) {
        switch (data) {
            case Video _:
                VideoPlayerController? videoController;
                videoController = VideoPlayerController.asset(data.url)
                    ..initialize().then((_) {
                        videoController?.play();
                    });
    
                widget.controller.initialize(
                    maxChild: MaximizedVideo(
                        videoController: videoController,
                        floatingController: widget.controller,
                        video: data,
                    ),
                    minChild: MinimizedVideo(
                        videoController: videoController,
                        floatingController: widget.controller,
                        video: data,
                    ),
                    onDispose: () {
                        videoController?.dispose();
                    },
                );
                break;
    
            case News _:
                widget.controller.initialize(
                    maxChild: MaximizedNewsScreen(
                        news: data,
                        controller: widget.controller,
                    ),
                    minChild: MinimizedNewsScreen(
                        news: data,
                        controller: widget.controller,
                    ),
                    onDispose: () {},
                );
                break;
    
            default:
                break;
        }
    }
    

    Note: controller.initialize() will run the previous onDispose() method to clear the previous controller data if you initialize another FloatingView while having an active one.

  3. Using the APIs:

    You can use the passed-down controller to control the FloatingView state like this:

    Padding(
        padding: const EdgeInsets.fromLTRB(15, 15, 15, 0),
        child: Row(
            children: [
                GestureDetector(
                    onTap: () {
                        widget.controller.close();
                    },
                    child: Icon(Icons.close, size: 24),
                ),
                const SizedBox(width: 20),
                GestureDetector(
                    onTap: () {
                        widget.controller.toggleSize();
                    },
                    child: Icon(Icons.aspect_ratio, size: 24),
                ),
            ],
        ),
    );
    
Available API Methods in FloatingController
  1. Initialize the Floating View:

    controller.initialize({
        required Widget maxChild,
        required Widget minChild,
        required VoidCallback onDispose,
    })
    
  2. Close an Active Floating View:

    controller.close()
    
  3. Toggle the Floating View Size:

    controller.toggleSize()
    
  4. #Dispose the controller:

    controller.dispose()
    

Contributing

Contributions are welcome! Please open an issue or submit a pull request if you have any improvements or bug fixes.

License

This project is licensed under the MIT License. See the LICENSE file for details.

Support Me

If you find this package helpful and want to support its development, consider making a donation. Thank you for your support!

Support via PayPal

카테고리

소스 저장소

이 패키지를 사용하는 프로젝트

아직 데이터가 없습니다.