패키지, 저장소 및 앱 카테고리 검색

패키지 상세v0.1.3

flutter_dialogflow

Dialogflow과의 통합을 쉽게 하고 Dialogflow v2를 지원하는 Flutter 패키지

30일 다운로드
154
좋아요
50
Pub 점수
40

패키지 설치

flutter pub add flutter_dialogflow

패키지 개요

공개 정보를 바탕으로 생성한 선택 가이드입니다.

Dialogflow v2를 지원하는 Flutter 패키지로 Dialogflow과의 통합을 간소화합니다. 개발자들이 Flutter 앱을 Dialogflow 에이전트에 연결하여 자연어 이해 및 의도 인식을 통해 대화형 인터페이스를 구축할 수 있도록 합니다. 이 패키지는 Dialogflow API와의 통신을 처리하여 Dialogflow 기반 챗봇과 실시간으로 상호작용할 수 있게 해줍니다. 다양한 플랫폼에서 Flutter 애플리케이션에 원활하게 사용되도록 설계되었으며, 깊은 백엔드 설정 없이 AI 기반 대화를 쉽게 구현할 수 있는 방법을 제공합니다. 모바일 앱의 챗봇 기능에 이상적입니다.

사용 사례

  • 모바일 앱에 챗봇 통합하기
  • 실시간 사용자 의도 탐지
  • 고객 지원 봇 구축
  • 음성 또는 텍스트 기반 상호작용 활성화
  • 인공지능 기반 가상 비서 만들기

주요 기능

  • Dialogflow v2를 지원합니다
  • Flutter용 간단한 API
  • 실시간 대화 처리
  • 크로스 플랫폼 호환성
  • Dialogflow 에이전트와의 간편한 통합

적합한 대상

  • 채팅봇 기능을 구축하는 개발자
  • 자연어 처리가 필요한 앱
  • AI 기반 상호작용을 갖춘 모바일 앱
  • NLP에 Dialogflow를 사용하는 팀
  • 빠른 봇 통합이 필요한 프로젝트

고려 사항

  • Dialogflow 에이전트 설정이 필요합니다
  • 인터넷 연결에 따라 다릅니다
  • Dialogflow v2로 제한
  • 내장된 번역 지원 없음
  • 서비스 계정 키를 통한 인증

원본 README

연결된 소스 저장소의 README 원문 스냅샷입니다. 최신 내용은 저장소에서 확인하세요.

Dialogflow v1 & v2 for Flutter apps.

Dialogflow

:heart: Star :heart: the repo to support the project. Thanks!

A new Flutter package.

Awesome Tutorials

Thanks for the tutorials!

Installation

  • Add this to your package's pubspec.yaml file:
dependencies:
  flutter_dialogflow: ^0.1.0
  • You can install packages from the command line: with Flutter:
$ flutter packages get
  • Dialogflow v1 Import it Now in your Dart code, you can use:
 import 'package:flutter_dialogflow/flutter_dialogflow.dart';
  • Or Dialogflow v2 Import it Now in your Dart code, you can use:
 import 'package:flutter_dialogflow/dialogflow_v2.dart';

Usage

Dialogflow v1
  • Dialogflow register and create new Agent
  • Copy Api key (Token)
  • Code
  Dialogflow dialogflow = Dialogflow(token: "Your Token");
  AIResponse response = await dialogflow.sendQuery("Your Query");
  • Example
  void Response(query) async {
    Dialogflow dialogflow = Dialogflow(token: "10178f9cb6cf12321asdf4aae75c87cd");
    AIResponse response = await dialogflow.sendQuery(query);
    print(response.getMessageResponse());
  }
Dialogflow v2
  • Dialogflow](https://dialogflow.com/) register and create new Agent
  • Project Setup and Authentication
    • First of all, we need to create a Google Cloud Platform Project using Console Google Cloud
    • Create or select an existing GCP project.
    • From the GCP console, go to APIs and Services and click on credentials.
    • Click on Create credentials and choose Service account key.
    • Select your service account from the dropdown, choose JSON and click Create. This will download the JSON key to your computer. Save it securely.
    • We downloaded a JSON file with all our data.
  • In your project create folder assets(folder name recommended optional)
  • Move file json in your project in folder created
  • open file pubspec.yaml
flutter:
  uses-material-design: true
  assets:
    - assets/your_file_downloaded_google_cloud.json
  • Import dialogflow_v2
import 'package:flutter_dialogflow/dialogflow_v2.dart';
  • Code
  AuthGoogle authGoogle = await AuthGoogle(fileJson: "Asset Your File Json").build();
  // Select Language.ENGLISH or Language.SPANISH or others...
  Dialogflow dialogflow =Dialogflow(authGoogle: authGoogle,language: Language.ENGLISH); 
  AIResponse response = await dialogflow.detectIntent("Your Query");
  • Example
  AuthGoogle authGoogle = await AuthGoogle(fileJson: "assets/your_file_downloaded_google_cloud.json").build();
  Dialogflow dialogflow = Dialogflow(authGoogle: authGoogle,language: Language.ENGLISH);
  AIResponse response = await dialogflow.detectIntent("Hi!!!");
  print(response.getMessage())
  • Or Get List Message type Card
Call function response.getListMessage() 
response List<dynamic>
example 
new CardDialogflow(response.getListMessage()[0]).title
Convert first item in CardDialogflow for worked easy
CardDialogflow have
- title
- subtitle
- imageUri
- List buttonss
    - each button have text and postback
  • Or Setup custom authentication (session)
Get a session id from your backend server after authentication.(Eg: OAuth Token)
Pass the session id a named parameter 'sessionId' to AuthGoogle function.
On the dialogflow fulfillment, access it inside `agent.session` (WebhookClient.session)
and apply your session logic

Example:
  AuthGoogle authGoogle = await AuthGoogle(fileJson: "assets/your_file_downloaded_google_cloud.json", sessionId: "YOUR_CUSTOM_SESSION_ID").build();
  Dialogflow dialogflow = Dialogflow(authGoogle: authGoogle,language: Language.ENGLISH);
  AIResponse response = await dialogflow.detectIntent("Hi!!!");
  print(response.getMessage())

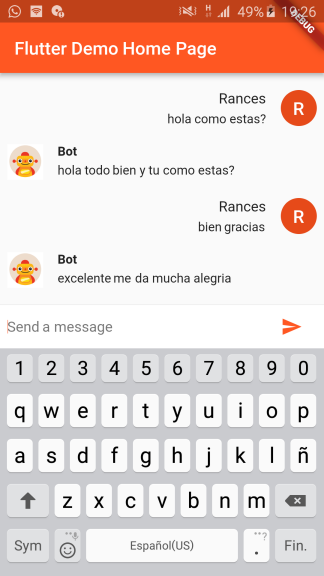
Demo

Dialogflow For Flutter Web

Visit the repository: Flutter Dialogflow Web 🚀

카테고리

의존성

의존성 목록 2 개

소스 저장소

이 패키지를 사용하는 프로젝트

아직 데이터가 없습니다.