FlutterFire CLI는 Flutter 애플리케이션에 Firebase를 통합하는 것을 간소화하는 명령줄 도구입니다. Firebase 프로젝트 설정, 필요한 구성 파일 생성 및 종속성 관리와 같은 구성 작업을 자동화합니다. Invertase.io에서 개발했으며 Android, iOS, Web, macOS, Windows, Linux 등 모든 주요 플랫폼을 지원합니다. CLI는 설정 프로세스를 간소화하여 수동 오류를 줄이고 개발 시간을 절약합니다. Flutter 생태계와 원활하게 작동하며 Firebase 서비스를 사용할 때 개발자의 생산성을 향상시킵니다.
A CLI to help with using Firebase in your Flutter applications.
Local development setup
To set up and use this CLI repo locally for the purposes of contributing, clone it and run the following commands from the root of the repository:
# Activate CLI from path:
dart pub global activate --source="path" . --executable="flutterfire" --overwrite
# Confirm you now using a local development version:
flutterfire --help# You should now see a banner printed at the top of the help output similar to:# ------------------------------------------------------------------# | You are running a local development version of FlutterFire CLI. |# ------------------------------------------------------------------
important: You may need to delete the cached snapshot of the FlutterFire CLI with each update to code
(and subsequent dart pub global activate --source="path" . --executable="flutterfire" --overwrite). You can delete the cached snapshot
on this path: .dart_tool/pub/bin/flutterfire_cli_monorepo/*.snapshot. This will ensure your code changes are reflected when developing.
Install
Global Installation
To install, run the following command:
dart pub global activate flutterfire_cli
Dev Dependency (Beta)
It is now possible to install as a dev dependency:
dart pub add --dev flutterfire_cli
important - remember to deactivate your current global installation of flutterfire_cli.
To run flutterfire commands from your dev dependency:
dart run flutterfire_cli:flutterfire [COMMAND]
It might be worth creating an alias in your shell of choice, if you're using zsh shell, it might look like:
echo'alias flutterfire="dart run flutterfire_cli:flutterfire"' >> ~/.zshrc
This will allow you to run commands like previously from within your Flutter app:
flutterfire configure
Remember to update or open a new terminal window so alias change is applied.
This feature is in Beta, if you find any bugs, please file a new issue on the repo.
Installation Requirements for Global and Dev Dependency
FlutterFire CLI requires the Firebase CLI (firebase-tools) to be installed on your local machine, follow these instructions for installation.
If you're running on a windows machine, we highly recommend you install via npm (i.e. npm install -g firebase-tools). The standalone
firebase-tools version can cause problems which you can read about here.
Documentation for >= v1.0.1
Default setup
You may run the following command to configure your Flutter application with Firebase.
flutterfire configure
This method, at a minimum, will invoke two prompts of the user. A request to specify your Firebase project and
the platforms you wish to configure (i.e. android, iOS, macOS, web & windows).
If you don't want any prompts, you can use the following command:
FlutterFire CLI will auto detect the bundle ID for apple platforms via the project.pbxproj file, if there is no existing app associated with the bundle ID in your Firebase console, it will create one, and subsequently write the relevant GoogleService-Info.plist file to your project in the default location ios/Runner/GoogleService-Info.plist or macos/Runner/GoogleService-Info.plist. A similar process occurs on android, FlutterFire CLI uses the application ID in your app/build.gradle file and will generate a service file at the default location android/app/google-services.json.
Web is slightly different. It will create a web app in your Firebase console if one is not already present, otherwise, it will select the first one available from your Firebase console. If you prefer a specific web app, you can use the --web-app-id flag:
FlutterFire CLI now supports Windows applications. The Firebase console does not allow you to create an application for Windows, FlutterFire CLI will create a web app if you specify windows as a platform you want to configure:
auto-detects the platforms from the project directory.
prevents a prompt for rewriting the Dart Firebase configuration file (default name - firebase_options.dart) should you already have one in your project. It will auto rewrite the specific parts of your Firebase app configuration that you have requested (e.g. choosing --platforms=web,android will update web and android configurations in the firebase_options.dart file and leave the other app configurations within the file intact).
--project flag
selects the Firebase project and negates the command prompt to choose which Firebase project you wish to use.
Multi build configuration setup
For a deeper dive into multiple flavor setup, you may wish to read this comprehensive overview provided by @bizz84.
important: You need to run flutterfire configure for every configuration type. E.g. if you have Debug & Release configurations, you need to run flutterfire configure twice with the relevant arguments documented below.
Android
Android Firebase setup is fairly straight forward. It requires the application ID and the file path where you want to place your google-services.json file. Imagine you want to setup you Flutter project's android release build configuration with its own Firebase app. Here is how it would look:
As we are using the google-services gradle plugin to package the google-services.json file with your app, you can create as many build types & build flavors you require by following this documentation on adding the JSON file. It is simply a case of matching the correct application ID you've associated with a Firebase app in your Firebase console with the correct file path.
important: Use the '--android-package-name' flag otherwise the FlutterFire CLI will auto-detect from your build.gradle file.
Apple (iOS & macOS)
Apple has a couple of different options depending on your project setup. You can configure your Firebase app with Apple platform using either a target or build configuration.
important: Use the --ios-bundle-id and/or --macos-bundle-id flag otherwise the FlutterFire CLI will auto-detect from your project.pbxproj file.
build configuration
Most developers will likely configure with build configuration. As default, a Flutter app comes with three different build configurations: Debug, Profile & Release (important: FlutterFire CLI does not yet support renaming the target from Runner for build configuration which was a feature released in Flutter 3.13.0). Unlike android, it does not matter where you write the GoogleService-Info.plist file. Here is how to setup your Flutter Apple platform with build configuration:
A more advanced configuration for developers more experienced with Xcode development would be to utilize multiple targets for their Flutter Apple platform setup. By default, a Flutter app comes with only one target - Runner. You would have to set up multiple targets yourself for your different build variations. Once again, it does not matter where you write the GoogleService-Info.plist for target configuration. Let's imagine you have created a target for release and called it ReleaseRunner. Here is how to setup your Flutter Apple platform with target configuration:
Configuration for your Flutter web app occurs via the Dart Firebase configuration file. It is different in the sense that it requires the user to implement the relevant conditions (e.g, debug, release, etc) upon app start up to determine what type of build should use which Firebase app configuration. For example, if you wish to create a Firebase app for your production app, you might do the following:
IMPORTANT: The FlutterFire CLI will create only one Firebase web app. If you wish to create more (e.g. For different build environments), you will have to manually create a web app on the Firebase console, and use the Firebase web app ID created to associate with that build type (e.g. debug, release, etc).
In your application code, you might set it up as the following:
import'package:flutter/foundation.dart'show kDebugMode;
// Assuming you've previously generated another `firebase_options.dart` file import'firebase_options.dart';
import'firebase_release.dart'as firebase_release;
Future<void> main() async {
WidgetsFlutterBinding.ensureInitialized();
if (kDebugMode) {
awaitFirebase.initializeApp(
options: DefaultFirebaseOptions.currentPlatform,
);
} else {
// Use the Firebase app options from the generated `firebase_release.dart` fileawaitFirebase.initializeApp(
options: firebase_release.DefaultFirebaseOptions.currentPlatform,
);
}
runApp(App());
}
Default Flutter app
A default Flutter app out of the box has three different build modes; debug, profile and release. If you wish, you can create a Firebase app for each one.
Imagine you want a debug Firebase app configured for iOS, macOS, android & web, you could run the following:
Important things to note with multi-environment set up
Android
The android gradle plugin will try to match the path google-services.json to the correct build type. For instance, debug build will find the service file in the following locations: android/app/src/debug/google-services.json or android/app/google-services.json.
Required to configure the application ID for release build in your android build.gradle. This might look like the following:
buildTypes {
    release {
        signingConfig signingConfigs.debug
        // This will effectively add the suffix to your applicationId. e.g. "com.example.myapp.release"
        applicationIdSuffix ".release"
    }
}
Apple
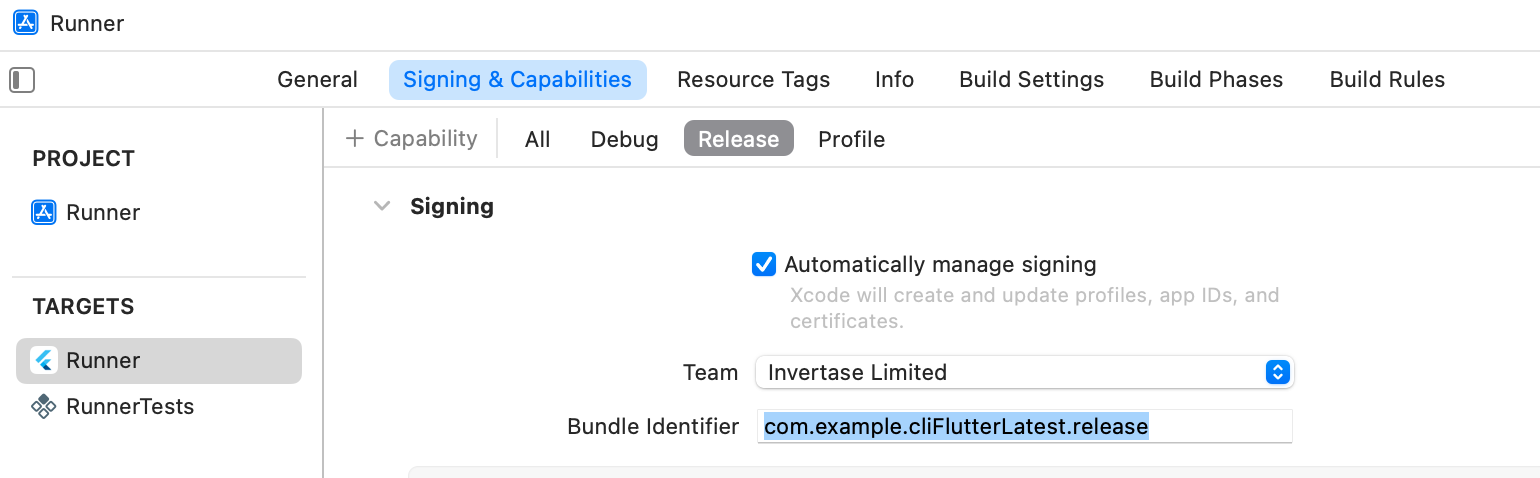
Required to configure the bundle ID for release build configuration in Xcode for macOS & iOS under "Signings and Capabilities" tab. Below is an image of where you can update the release build configuration bundle ID:
Web
Required to manually create a Firebase web app for release and use the Firebase web App ID as an argument for --web-app-id.
Required to implement your own logic for configuring build types for your Flutter web app as mentioned above.
If you require further granular builds i.e. build flavors, you can refer to this article which demonstrates how to configure different build flavors using VGV CLI to create a Flutter app that has build flavors out of the box.
Flutterfire reconfigure
There is another command that you might want to run each time you configure your project with another Firebase product. For example, if you configure Real time database for your Firebase project, you will be required to reinstall every service file for each platform. By running:
flutterfire reconfigure
It will rewrite all your service files in place and your Dart initialization file. It does this by using the firebase.json to track each of your configurations to update the service file at the correct location.
important: This command will also add the debug symbol upload script for Apple projects if you have updated your project to use Firebase Crashlytics. It will also update your build.gradle files as appropriate depending on what Firebase products your project requires (e.g. The command will write the required Firebase Performance and Crashlytics dependencies in your android build.gradle files if your Flutter project has firebase_performance & firebase_crashlytics dependencies).
Caveats
Use the Firebase service files for android (google-services.json), iOS & macOS (GoogleService-Info.plist). See this comment for further information why we don't recommend Dart initialization for these platforms.
Do not update your Runner target name for Apple platform when using build configuration set up. We do not currently support it.
Apple configuration will only apply if you're configuring from a macOS environment. For example, configuring an iOS app on a Windows machine will not work.