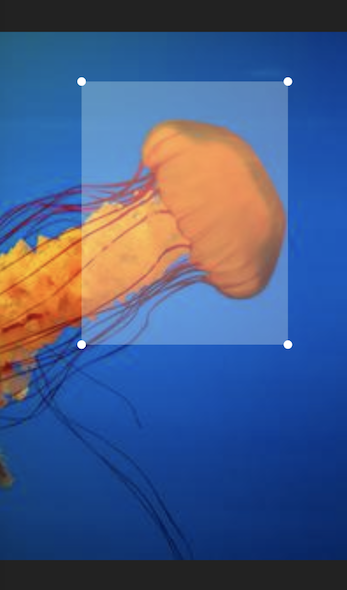
앱 내에서 이미지를 직접 자르기 위해 설계된 플러터 위젯입니다. Dart로 완전히 구현되었으며 최소한의 종속성으로 가볍고 효율적인 이미지 조작 솔루션을 제공합니다. 캡처 영역 선택 및 조정을 위한 직관적인 컨트롤을 제공하여 프로필 사진 편집이나 이미지 전처리에 적합합니다. 플러터 프로젝트에 원활하게 통합되며 다양한 화면 크기에 대응하는 반응형 디자인을 지원합니다.
사용 사례
프로필 사진 자르기
업로드 전 이미지 전처리
사용자 생성 콘텐츠 편집
앱 내 사진 편집 도구
사용자 지정 이미지 선택 워크플로
주요 기능
순수한 다트 구현
최소 종속성
반응형 UI
직관적인 드래그 앤 드롭 자르기 컨트롤
Flutter 프로젝트와의 간편한 통합
적합한 대상
이미지가 많은 앱을 개발하는 개발자
사용자 이미지 자르기 필요 앱
경량 종속성 우선 고려 프로젝트
간단한 솔루션을 찾는 프론트엔드 개발자
이미지 편집이 필요한 모바일 앱 기능
고려 사항
기본적인 자르기 기능에 제한됨
내장된 이미지 필터나 향상 기능 없음
자르기 이미지 출력을 수동으로 처리해야 함
매우 큰 이미지에 최적화되지 않음
동시에 여러 개의 자르기 영역을 지원하지 않습니다
원본 README
연결된 소스 저장소의 README 원문 스냅샷입니다. 최신 내용은 저장소에서 확인하세요.
image_crop_widget
A Flutter widget to crop images. The widget is completely written in Dart and has minimal dependencies.
The widget displays the image within the given layout space. On top of the image a transparent rectangular overlay, with handles on each corner, is drawn. The overlay handles can be dragged by touch to adjust the cropping area.
By calling the cropImage() method on the widget's state object, the image area that is marked by the overlay is returned as a new image object.
To acquire the widget's state you can use a GlobalKey object.
Example:
import'dart:ui'; // This imports the 'Image' class.final key = GlobalKey<ImageCropState>();
Image imageObject = ...
...
ImageCrop(key: key, image: imageObject) // This could be used inside a build method.
...
await key.currentState.rotateImage(); // Rotate the image be 90° clockwise.final cropedImage = await key.currentState.cropImage(); // This could be used inside a 'onPress' handler method.
How to create an image object
The Image class from dart:ui is typically not instantiated directly. Instead, you could convert your image data into a Uint8List and instantiate the image like this:
Uint8List bytes = ...
final codec = awaitinstantiateImageCodec(bytes);
final frame = await codec.getNextFrame();
final image = frame.image;
How to display an image object
The Image object can be displayed with the Flutter Image widget. One way to do this, is by converting the image into a Uint8List and pass it into the widget's memory constructor. Please note, that the widget is not the same Image class as the image object itself.
final cropedImage = await key.currentState.cropImage();
final byte = await cropedImage.toByteData(format: ui.ImageByteFormat.png);
final byteList = byte.buffer.asUint8List();

Image.memory(byteList)
How to persist an image object
The Image object can be persisted into a file or a database. To do this, you can convert the image object into a Uint8List and write it into a File or your database object.
final cropedImage = await key.currentState.cropImage();
final byte = await cropedImage.toByteData(format: ui.ImageByteFormat.png);
final byteList = byte.buffer.asUint8List();
final imageFile = File("Some path and filename"); // You can use the path_provider package to locate the right path.final result = await imageFile.writeAsBytes(byteList);