Aus öffentlichen Paketdaten erstellte Orientierung.
Ein flexibles Flutter-Paket zum Erstellen von Onboarding-Überlagerungen, die Benutzer durch App-Funktionen führen können, entweder gezielt auf bestimmte UI-Elemente ausgerichtet oder frei ohne Zielposition. Als Fork von onboard_overlay entwickelt, verbessert es die Anpassungsmöglichkeiten und Kontrolle über Erscheinungsbild und Verhalten der Überlagerung. Ideal für die einführende Darstellung wichtiger Funktionen mit fließenden, interaktiven Tutorials auf mehreren Plattformen.
Anwendungsfälle
Neue Benutzer durch App-Funktionen führen
Hervorhebung bestimmter Benutzeroberflächenelemente während des Onboardings
Erstellen anpassbarer Tutorial-Flows
Unterstützung von Multiplattform-Onboarding-Erlebnissen
Integration von Schritt-für-Schritt-Anleitungen
Hauptmerkmale
Zielgerichtete oder frei schwebende Overlay-Positionierung
Anpassbare Overlay-Erscheinung und Animationen
Unterstützung für die Bereitstellung auf mehreren Plattformen
Flexible Callback-Verarbeitung für Schritte
Einfache Integration mit bestehenden Flutter-Widgets
Geeignet für
App-Onboarding-Bildschirme
Benutzerbildungsabläufe
Multiplattform-Anwendungen
Entwickler, die leichtgewichtige Onboarding-Lösungen suchen
Projekte, die nicht-zielgerichtige Overlay-Anleitung erfordern
Hinweise
Erfordert sorgfältige Layout-Verwaltung für überlappenden Inhalt
Möglicherweise sind zusätzliche Stile erforderlich, um ein konsistentes Erscheinungsbild über verschiedene Plattformen hinweg zu gewährleisten
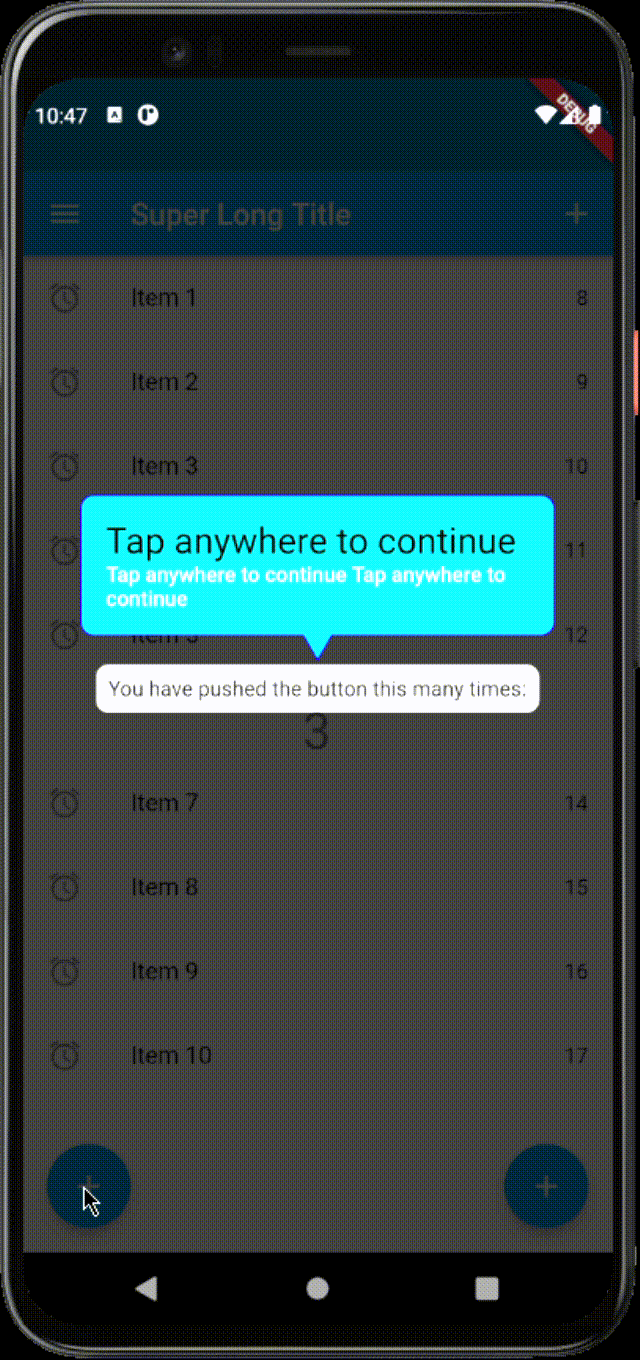
The text can be wrapped in a box, than support all kind of decorations and
only shape: BoxShape.rectangle For this to happen, you have to set
hasLabelBox equal to true, labelBoxDecoration, which supports only
BoxDecoration
The Label box also supports having an arrow. This is controlled by
hasArrow. The position is not calculated automatically. The default
position is top. You will have to specify the position via arrowPosition by
using the enum ArrowPosition. The ArrowPosition.top and
ArrowPosition.bottom calculates the horizontal position automatically
according to the widget of interest (the focused one which is visible through
the overlay), the other arrow positions are centered in the label box e.g.
ArrowPosition.topCenter, ArrowPosition.bottomCenter. In addition there
are 2 new settings from v3.0.0 - ArrowPosition.autoVertical and
ArrowPosition.autoVerticalCenter, which will take care of positioning the
arrow automatically relative to the label box and widget position.
The onboarding also supports forwarding the onTap event to the widget of
interest. You can control the behavior for each step using the
overlayBehavior. It accepts the Flutter enum HitTestBehavior. By default, the
value used is HitTestBehavior.opaque.
HitTestBehavior.opaque ignores the clicks on the focused widget and always
will navigate to next step
HitTestBehavior.translucent forwards clicks on the focused widget and on the
overlay in the same time
HitTestBehavior.deferToChild the clicks on the hole are forwarded to the
focused widget, clicks on the overlay navigates to next step.
Sometimes the titleText and the bodyText might not fit well in the
constrained label box, because of the long texts, longer translations or
smaller screens. There are 2 behaviors for this scenario. The default one
will limit the title to 2 lines and the bodyText to 5 lines and will overflow
both with ellipsis, the second one is to automatically resize the texts. This
is controlled by the Onboarding property autoSizeTexts, which default value
is false.
The onboarding can show only a portion of the defined steps with a specific
start index. Use showWithSteps method. Remember that the steps indexes are
0-based (starting from zero)
The onboarding can start from a specific index and play until the end step
is reached. Use showFromIndex method. Remember that the steps indexes are
0-based (starting from zero)
From v.3.0.0 if you want to show something else, different from just
title and explanation text, then stepBuilder is for you. With
stepBuilder, you can change the layout, add images or something else.
Important: If you want to inherit your App Theme from your app instead of
using the style properties. You need to wrap your stepBuilder code with a
Scaffold or Material widgets.
Important: Clicks on the overlay are ignored if stepBuilder is set. Clicks
on the hole or on the widget depend on the HitTestBehavior.
using HitTestBehavior.translucent and HitTestBehavior.deferToChild will
forward clicks on the hole to the focused widget
using HitTestBehavior.opaque ignores clicks on the hole and on the overlay
are ignored. Call callbacks provided by the stepBuilder
From v.3.0.0 Combining onTapCallback with the overlayBehavior gives
more control.
If you want to capture any clicks and decide what to do depending on the area
that was clicked - use HitTestBehavior.opaque
if you want to be able to click on the focused widget and control when to go
to next step or close - use HitTestBehavior.translucent
If you want to capture clicks only on the overlay, the clicks on the hole will
not be controlled by the callback - use HitTestBehavior.deferToChild
Using the TapArea you can specify what happens when the user clicked on
certain area. The possible options are hole, label and overlay
OnboardingStep(
focusNode: focusNodes[4],
titleText: 'Menu',
bodyText: 'You can open menu from here',
overlayColor: Colors.green.withOpacity(0.9),
shape: constCircleBorder(),
overlayBehavior: HitTestBehavior.translucent,
onTapCallback:
(TapArea area, VoidCallback next, VoidCallback close) {
if (area == TapArea.hole) {
next();
}
},
),
From v.3.0.0 It is possible to combine onTapCallback and
stepBuilder. No navigation will be executed except if you call next()
method from onTapCallback or the stepBuilder. You can customize the
behavior using the TapArea enum to get the area where the user clicked. By
using the HitTestBehavior you can again customize if the clicks on the
hole are ignored or forwarded to the focused widget. Again if you define the
overlayBehavior with HitTestBehavior.deferToChild the click on the hole
or the widget in focus will not be controlled by the onTapCallback
From v3.0.0 there is an additional OverlayController (ChangeNotifier)
attached to the OverlayState that provides the currentIndex,
currentStep and isVisible.
finalOnboardingState? onboarding = Onboarding.of(context);
if( onboarding?.controller.isVisible ?? false) {
// do some logic here
}
From v.3.0.0 you can also add a pulsing animation around the focused
widget. Pulse animation will be displayed showPulseAnimation on an
OnboardingStep is set to true. In addition you can change the inner and
outer colors of the pulse animation. Thanks to the author
Gautier of the
pal package for the inspiration.
From v.3.0.0 you can show a red border around the label box for
debugging purposes by using an Onboarding parameter debugBoundaries
which is false by default.
From v.3.1.0 The package can be used with
ResponsiveFramework. For
this to work as expected you need to perform these changes to your code:
move Onboarding widget under the ResponsiveWrapper.builder
wrap with a Builder to be able to access the inherited widget for
ResponsiveWrapperData
manually calculate scale for width and height
pass the calculated values to the Onboarding widget.
From 3.2.1 [stepPainterBuilder] is a callback function that passes the
context, the title String, the hole Rect nd if the arrow position isTop
bool. By default it is null and it will use the LabelPainter. You can
use this to draw custom shapes around the hole. You can use the
LabelPainter as a reference
From 3.2.3
[animateOverlayHole] is a property that can be set to false to disable the animation of the overlay hole.
[labelBoxMargin] property to the OnboardingStep so that the user can
control the space around the label box. Especially useful for limiting maximum width of the label box.
Example:
OnboardingStep(
focusNode: focusNodes[0],
titleText: 'Tap anywhere to continue ',
labelBoxMargin: constEdgeInsets.symmetric(horizontal: 16.0), // <--This ensures that there will be always padding around the label box on the left and right sides
labelBoxDecoration: BoxDecoration(
shape: BoxShape.rectangle,
borderRadius: constBorderRadius.all(Radius.circular(8.0)),
color: constColor(0xFF00E1FF),
),
),
From 3.2.4
[labelBoxVerticalDistance] property to the OnboardingStep so that the user can customize the space between the label box and the overlay hole.
Example:
OnboardingStep(
  focusNode: focusNodes[0],
  titleText: 'Tap anywhere to continue',
  labelBoxVerticalDistance: 16.0, // default is kSpace = 4.0
),