AutoRoute는 주석이 달린 클래스를 기반으로 라우트 구성, 네비게이터 및 라우트 가드를 자동으로 생성하는 Flutter용 선언형 라우팅 라이브러리입니다. 봄보일러플레이트 코드를 제거함으로써 타입 안전하고 컴파일 시 검증되는 라우트를 가능하게 하여 네비게이션을 간소화합니다. 개발자는 주석을 사용하여 라우트를 정의하고 패키지가 해당 코드를 자동 생성하므로 런타임 오류를 줄이고 개발 속도를 향상시킵니다. 복잡한 네비게이션 구조를 가진 앱에 적합하며 Android, iOS, Web, macOS, Windows, Linux 등 모든 주요 플랫폼을 지원합니다.
It’s a Flutter navigation package, it allows for strongly-typed arguments passing, effortless deep-linking and it uses code generation to simplify routes setup. With that being said, it requires a minimal amount of code to generate everything needed for navigation inside of your App.
Why AutoRoute?
If your App requires deep-linking or guarded routes or just a clean routing setup, you'll need to use named/generated routes and you’ll end up writing a lot of boilerplate code for mediator argument classes, checking for required arguments, extracting arguments and a bunch of other stuff. AutoRoute does all that for you and much more.
Installation
Add the following dependencies to your pubspec.yaml file:
Use the [watch] flag to watch the files' system for edits and rebuild as necessary.
dart run build_runner watch
If you want the generator to run one time and exit, use
dart run build_runner build
Add the generated route to your routes list
@AutoRouterConfig(replaceInRouteName: 'Screen|Page,Route')
classAppRouterextendsRootStackRouter{
@overrideRouteTypeget defaultRouteType => RouteType.material(); //.cupertino, .adaptive ..etc@overrideList<AutoRoute> get routes => [
// HomeScreen is generated as HomeRoute because// of the replaceInRouteName propertyAutoRoute(page: HomeRoute.page),
];
@overrideList<AutoRouteGuard> get guards => [
// optionally add root guards here
];
}
Finalize the setup
After you run the generator, your router class will be generated. Then simply hook it up with your MaterialApp.
// assuming this is the root widget of your AppclassAppextendsStatelessWidget{
// make sure you don't initiate your router// inside of the build function.final _appRouter = AppRouter();
@overrideWidgetbuild(BuildContext context){
returnMaterialApp.router(
routerConfig: _appRouter.config(),
);
}
}
Usage without code generation
You can use auto_route without code generation by providing an inline NamedRouteDef with a page builder function, as name suggests, you must provide a name for the route so you can navigate to it later by name or path.
NamedRouteDef is a wrapper around AutoRoute that allows you to provide a page builder function instead of a generated page, it has the same properties as AutoRoute except for page properties.
Tip: use the shorthand version of NamedRouteRef for a cleaner look
You can either navigate to a named route by using the dynamic NamedRoute class to match by name or by using the pushPath method to match by path.
 /// match by name
    router.push(NamedRoute('BookDetailsRoute', params: {'id': 1}));
    router.replace(NamedRoute('BookDetailsRoute', params: {'id': 1}));
    router.navigate(NamedRoute('BookDetailsRoute', params: {'id': 1}));
 /// or use the shorthand version
    router.push(.named('BookDetailsRoute',) params: {'id': 1}));

/// match by path
     router.pushPath('/books/1');
     router.replacePath('/books/1');
     router.navigatePath('/books/1');
Note: You can mix and match between named and generated routes.
Building a router without code generation
You can either extend RootStackRouter like you would normally do or use the RootStackRouter.build constructor to build a router without code generation.
A PageRouteInfo object will be generated for every declared AutoRoute. These objects hold strongly-typed page arguments which are extracted from the page's default constructor. Think of them as string path segments on steroids.
AutoRouter offers the same known push, pop and friends methods to manipulate the pages stack using both the generated PageRouteInfo objects and paths.
// get the scoped router by callingAutoRouter.of(context);
// or using the extension
context.router;
// adds a new entry to the pages stack
router.push(constBooksListRoute());
// or by using paths
router.pushPath('/books');
// removes last entry in stack and pushes provided route// if last entry == provided route page will just be updated
router.replace(constBooksListRoute());
// or by using paths
router.replacePath('/books');
// pops until provided route, if it already exists in stack// else adds it to the stack (good for web Apps).
router.navigate(constBooksListRoute());
// or by using paths
router.navigatePath('/books');
// on Web it calls window.history.back();// on Native it navigates you back// to the previous location
router.back();
// adds a list of routes to the pages stack at once
router.pushAll([
BooksListRoute(),
BookDetailsRoute(id: 1),
]);
// This is like providing a completely new stack as it rebuilds the stack// with the list of passed routes// entries might just update if already exist
router.replaceAll([
LoginRoute(),
]);
// pops the top page even if it's the last entry in stack
context.router.pop()
// pops the most top page of the most top router even if it's the last entry in stack
context.router.popTop();
// pops the last page unless blocked or stack has only 1 entry
context.router.maybePop();
// pops the most top page of the most top router unless blocked// or stack has only 1 entry
context.router.maybePopTop();
// keeps popping routes until predicate is satisfied
context.router.popUntil((route) => route.settings.name == 'HomeRoute');
// a simplified version of the above line
context.router.popUntilRouteWithName('HomeRoute');
// keeps popping routes until route with provided path is found
context.router.popUntilRouteWithPath('/some-path');
// pops all routes down to the root
context.router.popUntilRoot();
// removes the top most page in stack even if it's the last// remove != pop, it doesn't respect WillPopScopes it just// removes the entry.
context.router.removeLast();
// removes any route in stack that satisfies the predicate// this works exactly like removing items from a regular List// <PageRouteInfo>[...].removeWhere((r)=>)
context.router.removeWhere((route) => );
// you can also use the common helper methods from context extension to navigate
context.pushRoute(constBooksListRoute());
context.replaceRoute(constBooksListRoute());
context.navigateTo(constBooksListRoute());
context.navigateToPath('/books');
context.back();
context.maybePop();
context.pop();
Passing Arguments
That's the fun part! AutoRoute automatically detects and handles your page arguments for you, the generated route object will deliver all the arguments your page needs including path/query params.
e.g. The following page widget will take an argument of type Book.
If you're finishing with results, make sure you call the callback function as you pop the page
onRateBook(RESULT);
context.maybePop();
Note: Default values are respected. Required fields are also respected and handled properly.
Nested Navigation
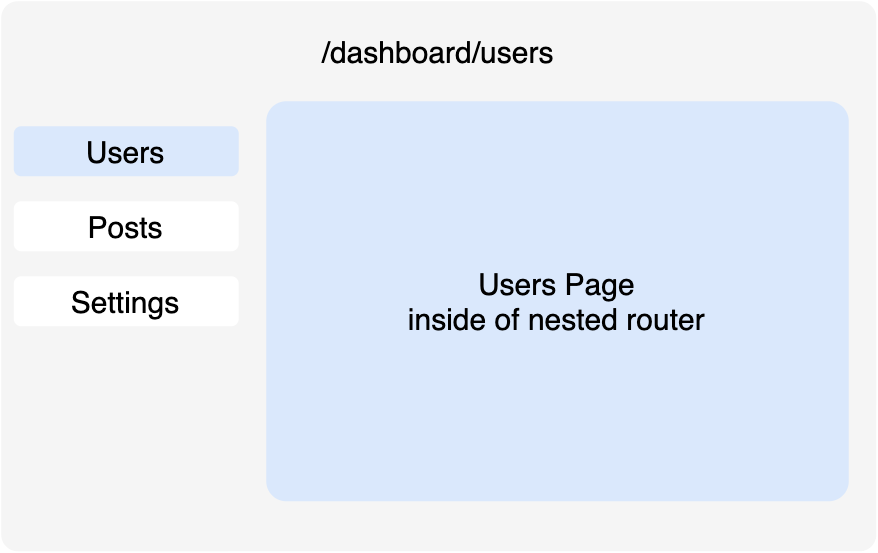
Nested navigation means building an inner router inside of a page of another router, for example in the below diagram users page is built inside of dashboard page.
Defining nested routes is as easy as populating the children field of the parent route. In the following example UsersPage, PostsPage and SettingsPage are nested children of DashboardPage.
To render/build nested routes we need an AutoRouter widget that works as an outlet or a nested router-view inside of our dashboard page.
classDashboardPageextendsStatelessWidget{
@overrideWidgetbuild(BuildContext context) {
returnRow(
children: [
Column(
children: [
NavLink(label: 'Users', destination: constUsersRoute()),
NavLink(label: 'Posts', destination: constPostsRoute()),
NavLink(label: 'Settings', destination: constSettingsRoute()),
],
),
Expanded(
// nested routes will be rendered here
child: AutoRouter(), // this is important
),
],
);
}
}
Note NavLink is just a button that calls router.push(destination). Now if we navigate to /dashboard/users, we will be taken to the DashboardPage and the UsersPage will be shown inside of it.
What if want to show one of the child pages at /dashboard? We can simply do that by giving the child routes an empty path '' to make initial or by setting initial to true.
Empty shell routes build a screen that contain the AutoRouter widget, which is used to render nested routes.
So you can build the widget your self like follows:
@RoutePage()
classMyShellPageextendsStatelessWidget{
constMyShellPage({Key? key}) : super(key: key);
@overrideWidgetbuild(BuildContext context) {
/// you can wrap the AutoRouter with any widget you wantreturnAutoRouter();
}
}
You can shorten the code above a bit by directly extending the AutoRouter Widget.
Things to keep in mind when implementing nested navigation
Each router manages its own pages stack.
Navigation actions like push, pop and friends are handled by the topmost router and bubble up if it couldn't be handled.
Tab Navigation
If you're working with flutter mobile, you're most likely to implement tabs navigation, that's why auto_route makes tabs navigation as easy and straightforward as possible.
In the previous example we used an AutoRouter widget to render nested child routes, AutoRouter is just a shortcut for AutoStackRouter. StackRouters manage a stack of pages inside of them, where the active/visible page is always the one on top and you'd need to pop it to see the page beneath it.
Now we can try to implement our tabs using an AutoRouter (StackRouter) by pushing or replacing a nested route every time the tab changes and that might work, but our tabs state will be lost, not to mention the transition between tabs issue, luckily auto_route comes equipped with an AutoTabsRouter, which is especially made to handle tab navigation.
AutoTabsRouter lets you switch between different routes while preserving offstage-routes state, tab routes are lazily loaded by default (can be disabled) and it finally allows to create whatever transition animation you want.
Let's change the previous example to use tab navigation.
Notice that we're not going to change anything in our routes declaration map, we still have a dashboard page that has three nested children: users, posts and settings.
classDashboardPageextendsStatelessWidget{
@overrideWidgetbuild(BuildContext context) {
returnAutoTabsRouter(
// list of your tab routes// routes used here must be declared as children// routes of /dashboard
routes: const [
UsersRoute(),
PostsRoute(),
SettingsRoute(),
],
transitionBuilder: (context,child,animation) => FadeTransition(
opacity: animation,
// the passed child is technically our animated selected-tab page
child: child,
),
builder: (context, child) {
// obtain the scoped TabsRouter controller using contextfinal tabsRouter = AutoTabsRouter.of(context);
// Here we're building our Scaffold inside of AutoTabsRouter// to access the tabsRouter controller provided in this context//// alternatively, you could use a global keyreturnScaffold(
body: child,
bottomNavigationBar: BottomNavigationBar(
currentIndex: tabsRouter.activeIndex,
onTap: (index) {
// here we switch between tabs
tabsRouter.setActiveIndex(index);
},
items: [
BottomNavigationBarItem(label: 'Users', ...),
BottomNavigationBarItem(label: 'Posts', ...),
BottomNavigationBarItem(label: 'Settings', ...),
],
),
);
},
);
}
}
If you think the above setup is a bit messy you could use the shipped-in AutoTabsScaffold that makes things much cleaner.
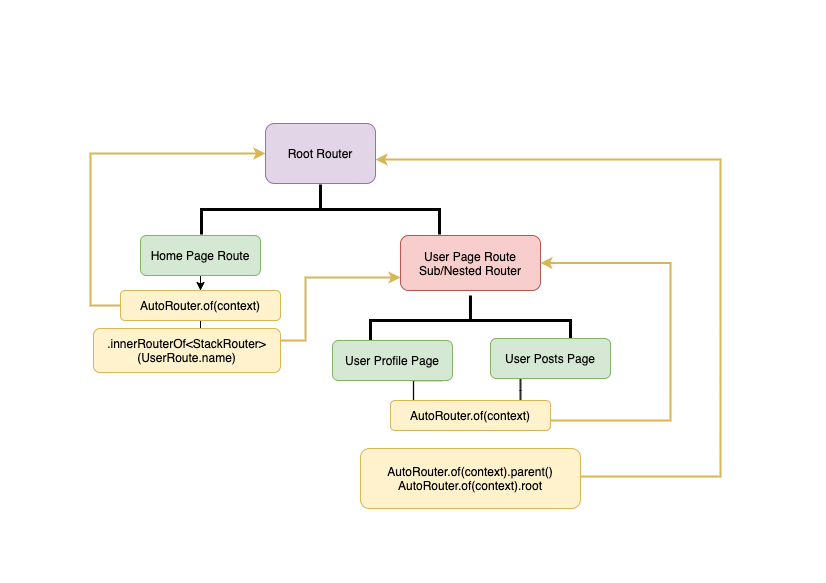
Every nested AutoRouter has its own routing controller to manage the stack inside of it and the easiest way to obtain a scoped controller is by using the BuildContext.
In the previous example, DashboardPage is a root level stack entry so calling AutoRouter.of(context) anywhere inside of it will get us the root routing controller.
AutoRouter widgets that are used to render nested routes, insert a new router scope into the widgets tree, so when a nested route calls for the scoped controller, they will get the closest parent controller in the widgets tree; not the root controller.
classDashboardextendsStatelessWidget{
@overrideWidgetbuild(BuildContext context) {
// this will get us the root routing controllerAutoRouter.of(context);
returnScaffold(
appBar: AppBar(title: Text('Dashboard page')),
// this inserts a new router scope into the widgets tree
body: AutoRouter()
);
}
}
Here's a simple diagram to help visualize this
As you can tell from the above diagram it's possible to access parent routing controllers by calling router.parent<T>(), we're using a generic function because we have two different routing controllers: StackRouter and TabsRouter, one of them could be the parent controller of the current router and that's why we need to specify a type.
router.parent<StackRouter>() // this returns  the parent router as a Stack Routing controller
router.parent<TabsRouter>() // this returns the parent router as a Tabs Routing controller
On the other hand, obtaining the root controller does not require type casting because it's always a StackRouter.
router.root // this returns the root router as a Stack Routing controller
You can obtain access to inner-routers from outside their scope using a global key
You could also obtain access to inner-routers from outside their scope without a global key, as long as they're initiated.
// assuming this is the root router
context.innerRouterOf<StackRouter>(UserRoute.name);
// or if we're using an AutoTabsRouter inside of DashboardPage
context.innerRouterOf<TabsRouter>(UserRoute.name);
Accessing the DashboardPage inner router from the previous example.
classDashboardextendsStatelessWidget{
@overrideWidgetbuild(BuildContext context) {
returnScaffold(
appBar: AppBar(
title: Text('Dashboard'),
actions: [
IconButton(
icon: Icon(Icons.person),
onPressed: () {
// accessing the inner router from// outside the scopefinal router = context.innerRouterOf<StackRouter>(DashboardRoute.name)
router?.push(constUsersRoute());
},
),
],
),
body: AutoRouter(), // we're trying to get access to this
);
}
}
Navigating Without Context
To navigate without context you can simply assign your generated router to a global variable
// declare your route as a global variablefinal appRouter = AppRouter();
classMyAppextendsStatefulWidget{
@overrideWidgetbuild(BuildContext context) {
returnMaterialApp.router(
routerConfig: appRouter.config(),
);
}
}
Note: Using global variable is not recommended and is considered bad practice and most of the times you should use dependency injection instead.
Here's an example using get_it (which is just a personal favorite). You can use any dependency injection package you like.
voidmain(){
// make sure you register it as a Singleton or a lazySingleton
getIt.registerSingleton<AppRouter>(AppRouter());
runApp(MyApp());
}
classMyAppextendsStatefulWidget{
@overrideWidgetbuild(BuildContext context) {
final appRouter = getIt<AppRouter>();
returnMaterialApp.router(
routerConfig: appRouter.config(),
);
}
}
Now you can access your router anywhere inside of your app without using context.
getIt<AppRouter>().push(...);
Note: Navigating without context is not recommended in nested navigation unless you use navigate instead of push and you provide a full hierarchy, e.g router.navigate(SecondRoute(children: [SubChild2Route()]))
Deep Linking
AutoRoute will automatically handle deep-links coming from the platform, but native platforms require some setup, see Deep linking topic in flutter documentation.
Using Deep-link Transformer
Deep link transformer intercepts deep-links before they're processed by the matcher, it's useful for stripping or modifying deep-links before they're matched.
In the following example we will strip a prefix from the deep-link before it's matched.
Deep link builder is an interceptor for deep-links where you can validate or override deep-links coming from the platform.
In the following example we will only allow deep-links starting with /products
MaterialApp.router(
routerConfig: _appRouter.config(
deepLinkBuilder: (deepLink) {
if (deepLink.path.startsWith('/products')) {
// continue with the platform linkreturn deepLink;
} else {
returnDeepLink.defaultPath;
// or DeepLink.path('/')// or DeepLink([HomeRoute()])
}
}
),
);
Deep Linking to non-nested Routes
AutoRoute can build a stack from a linear route list as long as they're ordered properly and can be matched as prefix, e.g / is a prefix match of /products, and /products is prefix match of /products/:id. Then we have a setup that looks something like this:
/
/products
/products/:id
Now, receiving this deep-link /products/123 will add all above routes to the stack. This of course requires includePrefixMatches to be true in the root config (default is !kWeb) or when using pushNamed, navigateNamed and replaceNamed.
Things to keep in mind:
If a full match can not finally be found, no prefix matches will be included.
Paths that require a full path match => AutoRoute(path:'path', fullMatch: true) will not be
included as prefix matches.
In the above example, if /products/:id comes before /products, /products will not be
included.
Declarative Navigation
To use declarative navigation with auto_route, you simply use the AutoRouter.declarative constructor and return a list of routes based on state.
Note: The handler contains a temp-list of pending initial routes which can be read only once.
Working with Paths
Working with paths in AutoRoute is optional because PageRouteInfo objects are matched by name unless pushed as a string using the deepLinkBuilder property in root delegate or pushNamed, replaceNamednavigateNamed methods.
If you don’t specify a path it’s going to be generated from the page name e.g. BookListPage will have ‘book-list-page’ as a path, if initial arg is set to true the path will be /, unless it's relative then it will be an empty string ''.
When developing a web application or a native app that requires deep-linking, you'd probably need to define paths with clear memorable names, and that's done using the path argument in AutoRoute.
AutoRoute(path: '/books', page: BookListPage),
Path Parameters (dynamic segments)
You can define a dynamic segment by prefixing it with a colon
The simplest way to extract path parameters from path and gain access to them is by annotating constructor params with @PathParam('optional-alias') with the same alias/name of the segment.
Now writing /books/1 in the browser will navigate you to BookDetailsPage and automatically extract the bookId argument from path and inject it to your widget.
Inherited Path Parameters
To inherit a path-parameter from a parent route's path, we need to use @PathParam.inherit annotation in the child route's constructor. Let's say we have the following setup:
Now ProductReviewScreen expects a path-param named id but, from the above snippet we know that the path corresponding with it. review has no path parameters, but we can inherit 'id' from the parent /product/:id like follows:
@RoutePage()
classProductReviewScreenextendsStatelessWidget{
// the path-param 'id' will be inherited and it can not be passed// as a route arg by userconstProductReviewScreen({super.key, @PathParam.inherit('id') requiredString id});
}
Query Parameters
Query parameters are accessed the same way, simply annotate the constructor parameter to hold the value of the query param with @QueryParam('optional-alias') and let AutoRoute do the rest.
You could also access path/query parameters using the scoped RouteData object.
RouteData.of(context).pathParams;
// or using the extension
context.routeData.queryParams;
Tip: if your parameter name is the same as the path/query parameter, you could use the const @pathParam or @queryParam and not pass a slug/alias.
When redirecting initial routes the above setup can be simplified by setting the /books path as initial and AutoRoute will automatically generate the required redirect code for you.
AutoRoute supports wildcard matching to handle invalid or undefined paths.
AutoRoute(
path: '*',
page: UnknownRoute.page,
)
// it could be used with defined prefixesAutoRoute(
path: '/profile/*',
page: ProfileRoute.page,
)
// or it could be used with RedirectRouteRedirectRoute(
path: '*',
redirectTo: '/',
)
Note: Be sure to always add your wildcards at the end of your route list because routes are matched in order.
Route Guards
Think of route guards as middleware or interceptors, routes can not be added to the stack without going through their assigned guards. Guards are useful for restricting access to certain routes.
We create a route guard by extending AutoRouteGuard from the AutoRoute package and implementing our logic inside of the onNavigation method.
classAuthGuardextendsAutoRouteGuard{
@overridevoidonNavigation(NavigationResolver resolver, StackRouter router) {
// the navigation is paused until resolver.next() is called with either// true to resume/continue navigation or false to abort navigationif(authenticated) {
// if user is authenticated we continue
resolver.next(true);
} else {
// we redirect the user to our login page// tip: use resolver.redirectUntil to have the redirected route// automatically removed from the stack when the resolver is completed
resolver.redirectUntil(
LoginRoute(onResult: (success) {
// if success == true the navigation will be resumed// else it will be aborted
resolver.next(success);
},
);
);
}
}
}
Important: resolver.next() should only be called once.
The NavigationResolver object contains the guarded route which you can access by calling the property resolver.route and a list of pending routes (if there are any) accessed by calling resolver.pendingRoutes.
Now we assign our guard to the routes we want to protect.
You can have all your stack-routes (non-tab-routes) go through a list of global guards by overriding the guards property inside your router class. Lets say you have an app with no public screens, we'd have a global guard that only allows navigation if the user is authenticated or if we're navigating to the LoginRoute.
@AutoRouterConfig()
classAppRouterextendsRootStackRouter{
@overridelatefinalList<AutoRouteGuard> guards = [
AutoRouteGuard.simple((resolver, router) {
if(isAuthenticated || resolver.routeName == LoginRoute.name) {
// we continue navigation
resolver.next();
} else {
// else we navigate to the Login page so we get authenticated// tip: use resolver.redirectUntil to have the redirected route// automatically removed from the stack when the resolver is completed
resolver.redirectUntil(LoginRoute(onResult: (didLogin) => resolver.next(didLogin)));
}
},
),
// add more guards here
];
// ..routes[]
}
Using a Reevaluate Listenable
Route guards can prevent users from accessing private pages until they're logged in, but auth state may change when the user is already navigated to the private page, to make sure private pages are only accessed by logged-in users all the time, we need a listenable that tells the router that the auth state has changed and you need to re-evaluate your stack.
The following auth provider mock will act as our re-valuate listenable
Now, every time AuthProvider notifies listeners, the stack will be re-evaluated and AutoRouteGuard.onNavigation(). Methods will be re-called on all guards
In the above example, we assigned our AuthProvider to reevaluateListenable directly, that's because reevaluateListenable takes a Listenable and AuthProvider extends ChangeNotifier which is a Listenable, if your auth provider is a stream you can use reevaluateListenable: ReevaluateListenable.stream(YOUR-STREAM)
Note: When the Stack is re-evaluated, the whole existing hierarchy will be re-pushed, so if you want to stop re-evaluating routes at some point, use resolver.resolveNext(<options>) which is like resolver.next() but with more options.
@overridevoidonNavigation(NavigationResolver resolver, StackRouter router) async {
if (authProvider.isAuthenticated) {
resolver.next();
} else {
resolver.redirectUntil(
WebLoginRoute(
/// this part is optional if you're not using reevaluateListenable as this method will /// be called again and if the condition is satisfied the resolver will be completed
onResult: (didLogin) {
/// stop re-pushing any pending routes after current
resolver.resolveNext(didLogin, reevaluateNext: false);
},
),
);
}
}
Wrapping Routes
In some cases we want to wrap our screen with a parent widget, usually to provide some values through context, e.g wrapping your route with a custom Theme or a Provider. To do that, simply implement AutoRouteWrapper, and have wrappedRoute(context) method return (this) as the child of your wrapper widget.
Then we pass our observer to the <routerName>.config().Important: Notice that navigatorObservers property is a builder function that returns a list of observers and the reason for that is a navigator observer instance can only be used by a single router, so unless you're using a single router or you don't want your nested routers to inherit observers, make sure navigatorObservers builder always returns fresh observer instances.
The following approach won't work if you have nested routers unless they don't inherit the observers.
final _observer = MyObserver();
returnMaterialApp.router(
routerConfig: _appRouter.config(
// this should always return new instances
navigatorObservers: () => [_observer],
),
);
Every nested router can have it's own observers and inherit it's parent's.
AutoRouter(
  inheritNavigatorObservers: true, // true by default
  navigatorObservers:() => [list of observers],
);

AutoTabsRouter(
  inheritNavigatorObservers: true, // true by default
  navigatorObservers:() => [list of observers],
);
We can also make a certain screen route aware by subscribing to an AutoRouteObserver (route not router).
Next, we use an AutoRouteAware mixin which is a RouteAware mixin with tab support to provide the needed listeners, then subscribe to our AutoRouteObserver.
classBooksListPageextendsState<BookListPage> withAutoRouteAware{
AutoRouteObserver? _observer;
@overridevoiddidChangeDependencies() {
super.didChangeDependencies();
// RouterScope exposes the list of provided observers// including inherited observers
_observer = RouterScope.of(context).firstObserverOfType<AutoRouteObserver>();
if (_observer != null) {
// we subscribe to the observer by passing our// AutoRouteAware state and the scoped routeData
_observer.subscribe(this, context.routeData);
}
}
@overridevoiddispose() {
super.dispose();
// don't forget to unsubscribe from the// observer on dispose
_observer.unsubscribe(this);
}
// only override if this is a tab page@overridevoiddidInitTabRoute(TabPageRoute? previousRoute) {}
// only override if this is a tab page@overridevoiddidChangeTabRoute(TabPageRoute previousRoute) {}
@overridevoiddidPopNext() {}
@overridevoiddidPushNext() {}
@overridevoiddidPush() {}
@overridevoiddidPop() {}
}
AutoRouteAwareStateMixin
The above code can be simplified using AutoRouteAwareStateMixin
classBooksListPageextendsState<BookListPage> withAutoRouteAwareStateMixin<BookListPage> {
// only override if this is a tab page@overridevoiddidInitTabRoute(TabPageRoute? previousRoute) {}
// only override if this is a tab page@overridevoiddidChangeTabRoute(TabPageRoute previousRoute) {}
// only override if this is a stack page@overridevoiddidPopNext() {}
// only override if this is a stack page@overridevoiddidPushNext() {}
}
Used to replace conventional words in generated route name (pattern, replacement)
Custom Route Transitions
To use custom route transitions use a CustomRoute and pass in your preferences. The TransitionsBuilder function needs to be passed as a static/const reference that has the same signature as the TransitionsBuilder function of the PageRouteBuilder class.
CustomRoute(
  page: LoginRoute.page,
  // TransitionsBuilders class contains a preset of common transitions builders.
  transitionsBuilder: TransitionsBuilders.slideBottom,
  duration: Duration(milliseconds: 400),
)
Tip: Override defaultRouteType in generated router to define global custom route transitions.
You can of course use your own transitionsBuilder function, as long as it has the same function signature. The function has to take in exactly one BuildContext, Animation<Double>, Animation<Double> and a child Widget and it needs to return a Widget. Typically, you would wrap your child with one of Flutter's transition widgets as follows:
CustomRoute(
page: ZoomInScreen,
transitionsBuilder:
(BuildContext context, Animation<double> animation, Animation<double> secondaryAnimation, Widget child) {
// you get an animation object and a widget// make your own transitionreturnScaleTransition(scale: animation, child: child);
},
)
Custom Route Builder
You can use your own custom route by passing a CustomRouteBuilder function to `CustomRoute' and implement the builder function the same way we did with the TransitionsBuilder function, the most important part here is passing the page argument to our custom route.
make sure you pass the return type to your custom route builder function.
CustomRoute(
page: CustomPage,
customRouteBuilder: <T>(BuildContext context, Widget child, AutoRoutePage<T> page) {
returnPageRouteBuilder<T>(
fullscreenDialog: page.fullscreenDialog,
// this is important
settings: page,
pageBuilder: (_,__,___) => child,
);
},
)
Others
Including Micro/External Packages
To include routes inside of a depended-on package, we generated the routes inside the micro package like normal, then either use the generated routes inside your main router individually,
or declare them inside your micro router and merge them with the main router.
final myMicroRouter = MyMicroRouter();
@overrideList<AutoRoute> get routes => [
AutoRoute(page: HomeRoute.page, initial: true),
/// use micro routes individuallyAutoRoute(page: RouteFromMicroPackage.page),
/// or merge all routes from micro router
...myMicroRouter.routes,
];
Tip: You can add export MyMicroRouter to app_router.dart, so you only import app_router.dart inside of your code.
The first thing you want to do to reduce generation time, is specifying the files build_runner should process and we do that by using globs. Globs are kind of regex patterns with little differences that's used to match file names. Note: for this to work on file level you need to follow a naming convention
let's say we have the following files tree
├── lib
│ ├── none_widget_file.dart
│ ├── none_widget_file2.dart
│ └── ui
│ ├── products_screen.dart
│ ├── products_details_screen.dart
By default, the builder will process all of these files to check for a page with @RoutePage()
annotation, we can help by letting it know what files we need processed, e.g only process the files
inside the ui folder:
Note (**) matches everything including '/';
Now only products_screen.dart, products_details_screen.dart will be processed
The same goes for @AutoRouterConfig builder
targets:$default:builders:auto_route_generator:auto_route_generator:# this for @RoutePagegenerate_for:-lib/ui/**_screen.dartauto_route_generator:auto_router_generator:# this for @AutoRouterConfiggenerate_for:-lib/ui/router.dart
Enabling cached builds
This is still experimental
When cached builds are enabled, AutoRoute will try to prevent redundant re-builds by analyzing whether the file changes has any effect on the extracted route info, e.g any changes inside of the build method should be ignored.
Note Enable cached builds on both generators
targets:$default:builders:auto_route_generator:auto_route_generator:# this for @RoutePageoptions:enable_cached_builds:truegenerate_for:-lib/ui/**_screen.dartauto_route_generator:auto_router_generator:# this for @AutoRouterConfigoptions:enable_cached_builds:truegenerate_for:-lib/ui/router.dart
AutoLeadingButton-BackButton
AutoLeadingButton is AutoRoute's replacement to the default BackButton to handle nested or parent stack popping. To use it, simply assign it to the leading property inside of AppBar
you can also use AutoBackButton.builder above your Scaffold for example to provide a nullable leading widget to prevent AppBar.leadingWidth when there's no leading to show
ActiveGuardObserver can notify you when a guard is being checked and what guard it is. This can be used to implement a loading indicator for example.
var isLoading = false;
voidinitState(){
final guardObserver = context.router.activeGuardObserver;
guardObserver.addListener(() {
setState((){
isLoading = guardObserver.guardInProgress;
});
});
}
Android Predictive Back
auto_routev10 supports Android predictive back, which is a feature that allows the user to take a peek at the previous route by swiping from the edge of the screen before committing to the back action.
For now this feature needs to be enabled in manifest file, it also has some flutter considerations, see Android Predictive Back for more information.
after you've enabled the feature in your manifest file, you can simply create predictive-back enabled routes by setting enablePredictiveBackGesture to true in your route type, you can also provide a custom predictiveBackPageTransitionsBuilder to customize the transitions.
  RouteType.material(
      enablePredictiveBackGesture: true,
       // optionally provide a custom transitions builder
      predictiveBackPageTransitionsBuilder: (context,animation,secondaryAnimation,child) {
       // return preferred transitions
      },
    )
you can enable predictive back for all routes by overriding defaultRouteType in your router, all route types that apply on android support this feature.
You can support auto_route by liking it on Pub and staring it on Github, sharing ideas on how we can enhance a certain functionality or by reporting any problems you encounter and of course buying a couple coffees will help speed up the development process