搜索插件、代码仓与 APP 分类

control_style 封面
插件详情v0.1.2

control_style

为基于 Flutter 的文本字段、按钮和其他控件应用额外的装饰。这使得界面自定义更加出色。

AndroidiOSWebmacOSWindowsLinux
近 30 天下载
1.7万
喜欢数
25
Pub 分数
160

安装插件

flutter pub add control_style

插件介绍

基于插件公开信息、社区数据与项目使用情况整理的选型参考。

ControlStyle 是一个 Flutter 包,通过应用可自定义的装饰来增强文本字段和按钮等 UI 控件的视觉外观。它使开发者能够轻松地定制标准控件的外观和感觉,而无需编写重复的样式代码。支持所有主要平台,可简化界面自定义,实现一致且精致的设计。该包可通过简单的 pub add 命令无缝集成到现有的 Flutter 项目中。

适合场景

  • 自定义文本字段边框
  • 增强按钮的美观性
  • 创建统一的UI主题
  • 改进表单输入的视觉效果
  • 简化设计一致性
  • 向控件添加装饰效果

主要特点

  • 与 Flutter 小部件的轻松集成
  • 跨平台兼容性
  • 可扩展的装饰系统
  • 所需的样板代码最少
  • 支持响应式设计
  • 主题感知样式

适合对象

  • 寻求视觉精致的UI设计师
  • 开发表单的开发者
  • 维护一致设计系统的团队
  • 需要自定义控件外观的应用
  • 具有严格UI截止日期的项目
  • Flutter 初学者探索 widget 样式

使用建议

  • 可能需要为复杂布局进行额外配置
  • 仅限视觉增强(无功能变更)
  • 依赖于 Flutter 的渲染管道
  • 许多装饰控件可能带来的性能影响
  • 不适用于非视觉定制需求
  • 需要理解 Flutter 的 widget 树

原始 README

以下为关联源码仓库的 README 原文快照,最新内容请访问源码仓库。

Applies additional appearance settings to Flutter text fields, buttons and other controls. Currently supports: outer shadow, inner shadow, border, inner gradient.

Try it out: example

Intro

The Flutter library provides limited opportunities to set up the appearance of controls. You usually make this customisation by wrapping the components into a Container widget and configuring it using the decoration parameter. Such an approach has limitations as it leads to increasing the volume of work and complicating the code. Especially time consuming in this case is creating animations for switching between different appearances depending on a state of a control.

In addition, this approach works incorrectly when you are adding shadows to text fields in combination with errorText and helperText:

Container issue

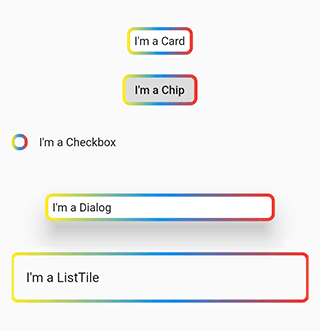
This package helps to solve the aforementioned problem. It provides the most common customisation features for control elements which have shape field such as buttons, text fields, Card, Chip, Checkbox, Dialog, Drawer, inks, ListTile, Material, NavigationBar.

The package provides the same customisation parameters to all controls, which allows for identically decorating any of the controls.

final outlinedShape = DecoratedOutlinedBorder(
  borderGradient: const GradientBorderSide(
    gradient: LinearGradient(colors: [Colors.yellow, Colors.blue, Colors.red]),
    width: 2,
  ),
  child: RoundedRectangleBorder(borderRadius: BorderRadius.circular(8)),
);

...
  Column(children: [
    const SizedBox(height: 16),
    Card(child: const Padding(padding: EdgeInsets.all(8.0), child: Text("I'm a Card")), shape: outlinedShape),
    const SizedBox(height: 16),
    Chip(label: const Text("I'm a Chip"), shape: outlinedShape),
    const SizedBox(height: 16),
    Row(children: [Checkbox(value: false, onChanged: (value) {}, shape: outlinedShape), const Text("I'm a Checkbox")]),
    const SizedBox(height: 16),
    Dialog(child: const Padding(padding: EdgeInsets.all(8.0), child: Text("I'm a Dialog")), shape: outlinedShape),
    const SizedBox(height: 16),
    ListTile(title: const Text("I'm a ListTile"), shape: outlinedShape),
    const SizedBox(height: 16),
  ]);
...

Control examples

Features

Demo

The package enables outer shadow, inner shadow, border and inner gradient styles for Flutter’s standard controls. These can be applied without using external control widgets.

Usage

You can customize all your controls at once via the theme setting of MaterialApp, or separate controls through changing their own styles.

To use the plugin with inputs, you need to wrap InputBorder with DecoratedInputBorder and configure its parameters.

For example, the code:

    MaterialApp(
      theme: ThemeData(
        inputDecorationTheme: InputDecorationTheme(
          border: OutlineInputBorder(
            borderRadius: BorderRadius.circular(8),
          ),
        ),
      ),
    );

should be updated to:

    MaterialApp(
      theme: ThemeData(
        inputDecorationTheme: InputDecorationTheme(
          border: DecoratedInputBorder(
            shadow: const [
              BoxShadow(
                color: Colors.blue,
                blurRadius: 12,
              )
            ],
            child: OutlineInputBorder(
              borderRadius: BorderRadius.circular(8),
            ),
          ),
        ),
      ),
    );

For buttons, you need to wrap OutlinedBorder with DecoratedOutlinedBorder and configure its parameters.

Hence, this code:

    MaterialApp(
      theme: ThemeData(
        primarySwatch: Colors.blue,
        outlinedButtonTheme: OutlinedButtonThemeData(
            style: ElevatedButton.styleFrom(
          shape: RoundedRectangleBorder(
            borderRadius: BorderRadius.circular(8),
          ),
        )),
      ),
    );

should be updated to:

    MaterialApp(
      theme: ThemeData(
        primarySwatch: Colors.blue,
        outlinedButtonTheme: OutlinedButtonThemeData(
            style: ElevatedButton.styleFrom(
          shape: DecoratedOutlinedBorder(
            shadow: const [
              BoxShadow(
                color: Colors.blue,
                blurRadius: 12,
              )
            ],
            child: RoundedRectangleBorder(
              borderRadius: BorderRadius.circular(8),
            ),
          ),
        )),
      ),
    );

The examples above show how to decorate all the controls at once.

In case you need to decorate separate element, you need to configure its styles:

    TextField(
      decoration: InputDecoration(
          border: DecoratedInputBorder(
        shadow: const [
          BoxShadow(
            color: Colors.blue,
            blurRadius: 12,
          )
        ],
        child: OutlineInputBorder(
          borderRadius: BorderRadius.circular(8),
        ),

      )),
    );

    ...

    ElevatedButton(
      onPressed: () {},
      child: const Text("Button"),
      style: ElevatedButton.styleFrom(
          shape: DecoratedOutlinedBorder(
        shadow: const [
          BoxShadow(
            color: Colors.blue,
            blurRadius: 12,
          )
        ],
        child: RoundedRectangleBorder(
          borderRadius: BorderRadius.circular(8),
        ),
      )),
    );
Animation

To configure element state change animations, use the usual Flutter’s approach.

TextButton(
  onPressed: () {},
  child: const Text("Text button"),
  style: ButtonStyle(
    shape: MaterialStateProperty.resolveWith((states) {
      return DecoratedOutlinedBorder(
        shadow: [
          GradientShadow(
            gradient: states.contains(MaterialState.pressed)
                ? const LinearGradient(colors: [Colors.red, Colors.green, Colors.cyan])
                : const LinearGradient(colors: [Colors.blue, Colors.blue]),
            blurRadius: 12,
          )
        ],
        child: RoundedRectangleBorder(borderRadius: BorderRadius.circular(8)),
      );
    }),
  ),
)

Animation

Outer shadow

Add the shadow parameter to DecoratedInputBorder or DecoratedOutlinedBorder.

For adding a single-colour shadow, use BoxShadow.

TextButton(
  onPressed: () {},
  child: const Text("Text button"),
  style: TextButton.styleFrom(
      shape: DecoratedOutlinedBorder(
    shadow: const [
      BoxShadow(
        color: Colors.blue,
        blurRadius: 12,
      )
    ],
    child: RoundedRectangleBorder(borderRadius: BorderRadius.circular(8)),
  )),
);

Color shadow

For applying a gradient-shadow, use GradientShadow. It is different from BoxShadow only in that instead of color it uses the gradient parameter.

TextButton(
  onPressed: () {},
  child: const Text("Text button"),
  style: TextButton.styleFrom(
      shape: DecoratedOutlinedBorder(
    shadow: const [
      GradientShadow(
        gradient: LinearGradient(colors: [Colors.red, Colors.green, Colors.cyan]),
        blurRadius: 12,
      )
    ],
    child: RoundedRectangleBorder(borderRadius: BorderRadius.circular(8)),
  )),
)

Gradient shadow

Inner shadow

Add innerShadow for DecoratedInputBorder or DecoratedOutlinedBorder.

For adding a single-colour shadow, use BoxShadow.

TextButton(
  onPressed: () {},
  child: const Text("Text button"),
  style: TextButton.styleFrom(
      shape: DecoratedOutlinedBorder(
    innerShadow: const [
      BoxShadow(
        color: Colors.blue,
        blurRadius: 12,
      )
    ],
    child: RoundedRectangleBorder(borderRadius: BorderRadius.circular(8)),
  )),
)

Inner shadow

For applying a gradient-shadow, use GradientShadow. It is different from BoxShadow only in that instead of color it uses the gradient parameter.

TextButton(
  onPressed: () {},
  child: const Text("Text button"),
  style: TextButton.styleFrom(
      shape: DecoratedOutlinedBorder(
    innerShadow: const [
      GradientShadow(
        gradient: LinearGradient(colors: [Colors.red, Colors.green, Colors.cyan]),
        blurRadius: 12,
      )
    ],
    child: RoundedRectangleBorder(borderRadius: BorderRadius.circular(8)),
  )),
)

Inner gradient shadow

Background

Add the backgroundGradient parameter of the Gradient type to DecoratedInputBorder or DecoratedOutlinedBorder.

TextButton(
  onPressed: () {},
  child: const Text("Text button"),
  style: ButtonStyle(
    shape: MaterialStateProperty.resolveWith((states) {
      return DecoratedOutlinedBorder(
        backgroundGradient: LinearGradient(colors: [Colors.blue.withOpacity(0.5), Colors.blue.withOpacity(0.2)]),
        child: RoundedRectangleBorder(borderRadius: BorderRadius.circular(8)),
      );
    }),
  ),
)

Background gradient

Border

Add the borderGradient or GradientBorderSide parameter to DecoratedInputBorder or DecoratedOutlinedBorder. This parameters differ from the Flutter’ BorderSide in that they use gradient parameter instead of color.

TextButton(
  onPressed: () {},
  child: const Text("Text button"),
  style: ButtonStyle(
    shape: MaterialStateProperty.resolveWith((states) {
      return DecoratedOutlinedBorder(
        borderGradient: const GradientBorderSide(
          gradient: LinearGradient(colors: [Colors.red, Colors.green, Colors.blue]),
          width: 3,
        ),
        child: RoundedRectangleBorder(borderRadius: BorderRadius.circular(8)),
      );
    }),
  ),
)

Gradient border

BorderShadow in Detail

The wrappers DecoratedInputBorder and DecoratedOutlinedBorder reach an element’s border through the child parameter and apply stylization above the default border of this element. In case of an outer shadow, the shadow’s part above the control then gets cut off in order to create an illusion of the shadow being located behind the control.

how it works

Decorative styles are applied above the layer that contains an element’s border. Hence, when it comes to buttons, such stylisation overlaps the inner area of an element. Using transparent colours hence used to address this issue. This limitation is due to Flutter itself.

Background overlap issue

Compatibility

The following borders have been tested.

Inputs:

  • UnderlineInputBorder
  • OutlineInputBorder

Buttons:

  • BeveledRectangleBorder
  • CircleBorder
  • ContinuousRectangleBorder
  • RoundedRectangleBorder
  • StadiumBorder

Issues

  • Shadows may overlap nearby elements.

Shadow overlap issue

  • The decoration of the inner area of the button overlaps the button itself.

Background overlap issue

所属分类

源码仓库

使用此插件的项目

暂无相关数据。