Add a route for the widget that will be displayed in the overlay window:
@overrideWidgetbuild(BuildContext context) {
returnMaterialApp(
debugShowCheckedModeBanner: false,
initialRoute: "/",
routes: {
"/": (_) => HomePage(),
// Add a route as the entry point for your overlay window"/my-overlay-window": (_) => MyOverlayWindow(),
},
);
}
Before starting the floating window, check and request permission, then initialize the flutter_floatwing plugin in initState or a button callback:
// Check and request the system alert window permissionFloatwingPlugin().checkPermission().then((granted) {
if (!granted) FloatwingPlugin().openPermissionSetting();
});
// Initialize the plugin firstFloatwingPlugin().initialize();
Now create and start your overlay window:
// Define window config and start the windowWindowConfig(route: "/my-overlay-window")
.to() // Create a window object
.create(start: true); // Create and start the overlay window
Notes:
route is one of 3 ways to define an entry point for the overlay window. See the Entry Point section for more details.
Before diving into how flutter_floatwing manages windows, here are some key concepts:
id is the unique identifier for each window. All operations on a window are based on this id — you must provide one before creating a window.
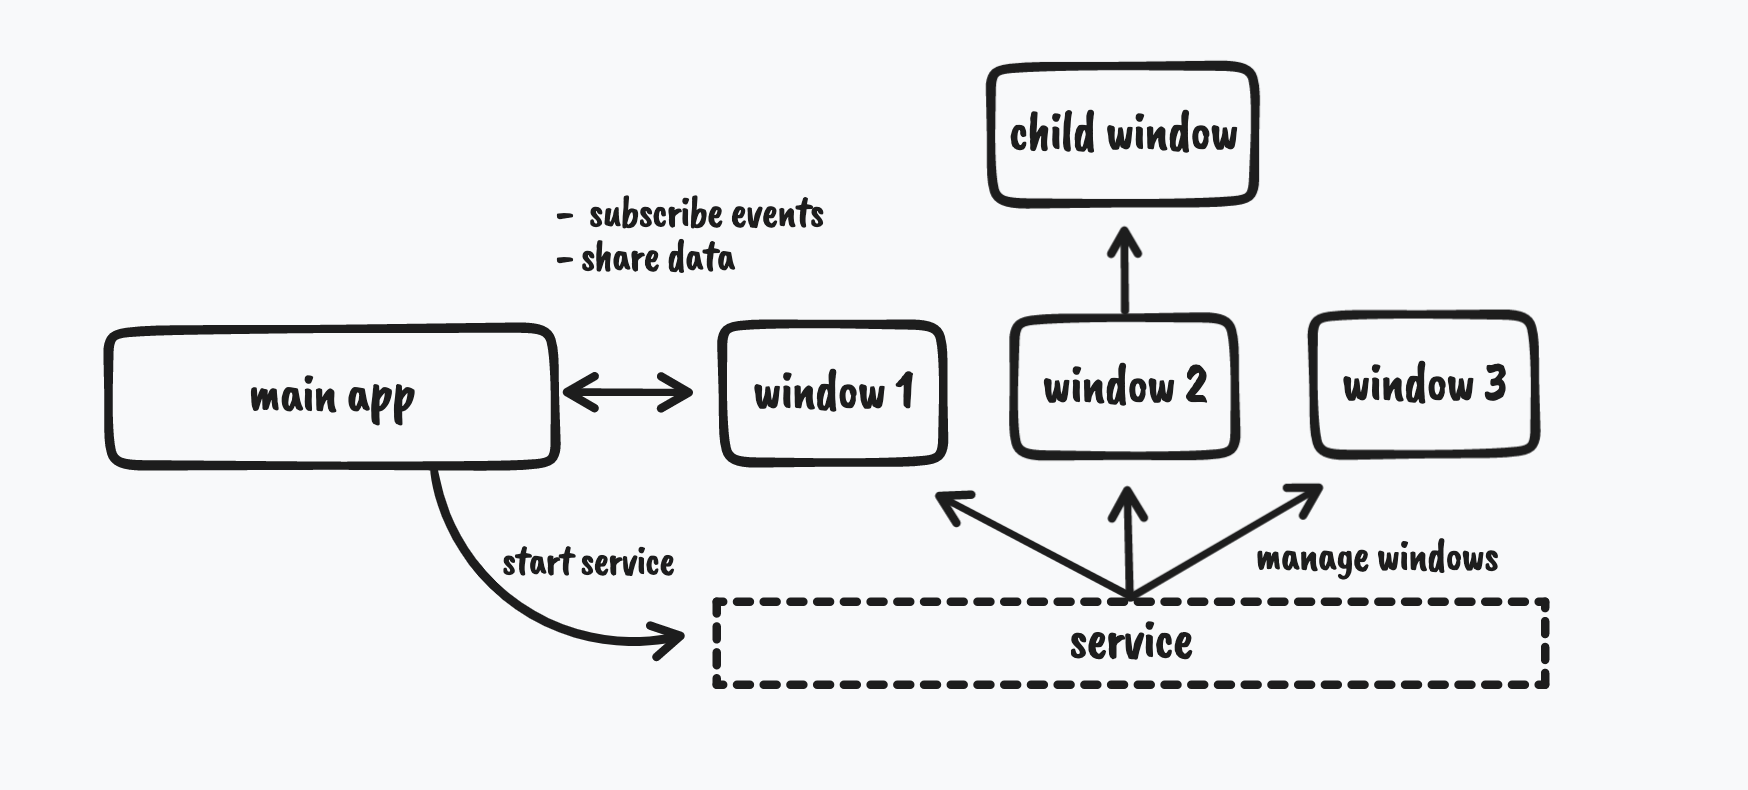
The first engine created when opening the main application is called the main engine (or plugin engine). Engines created by the service are called window engines.
Different engines run in different threads and cannot communicate directly.
You can subscribe to events from all windows in the main engine. In a window engine, you can subscribe to events from itself and its child windows, but not from sibling or parent windows.
share data is the only way to communicate between engines. The only restriction is that the data must be serializable — you can share data from anywhere to anywhere.
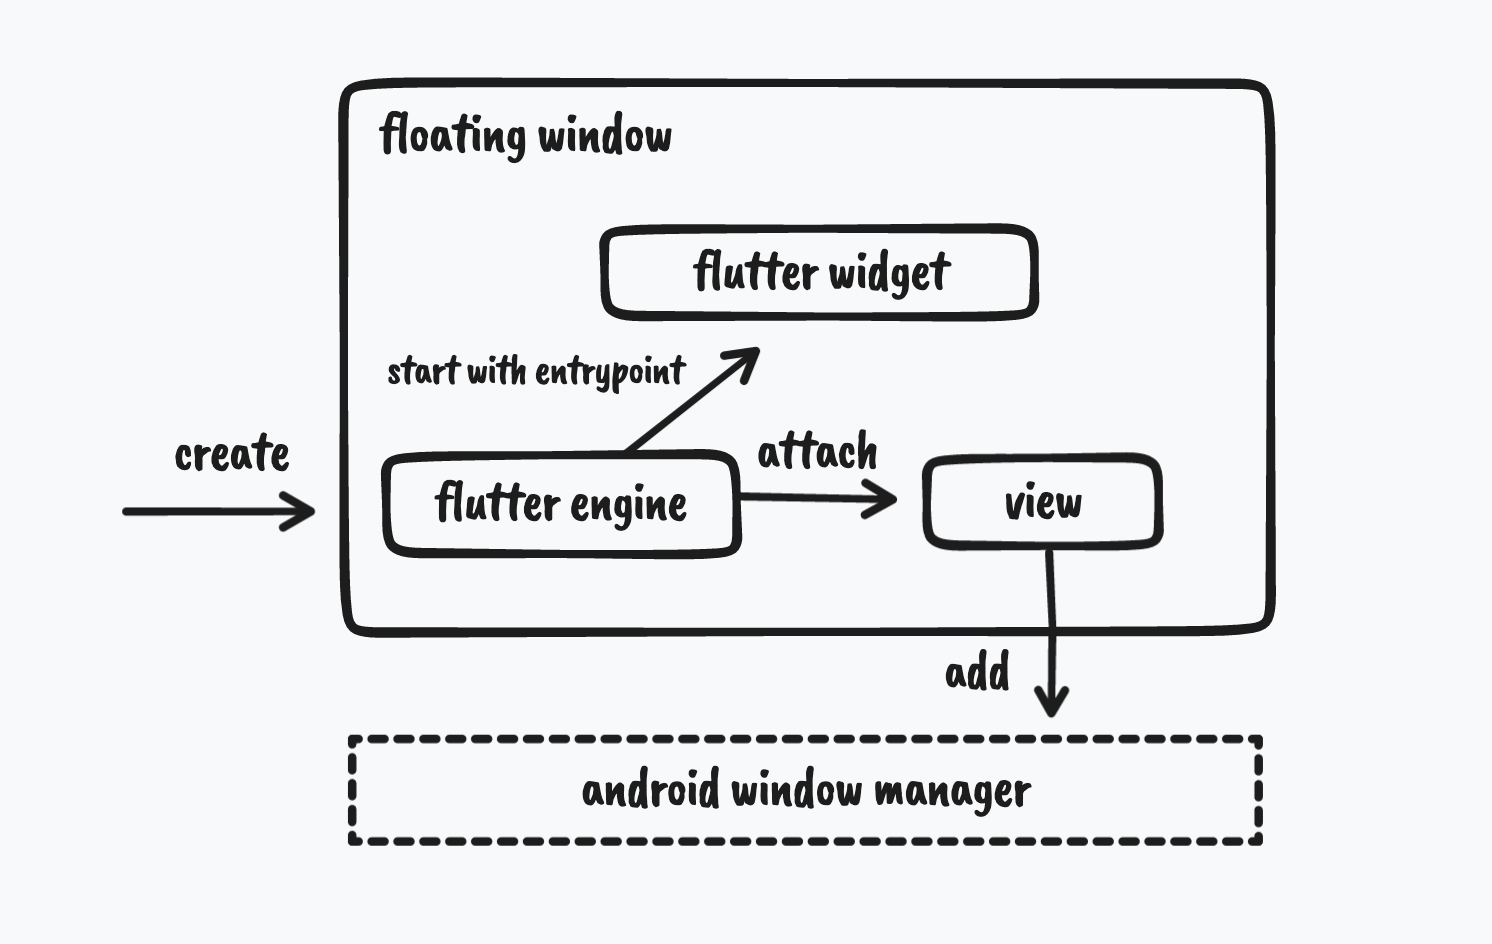
A floatwing window object consists of a Flutter engine that runs a widget via runApp and a view that is added to the Android window manager.
The overall view hierarchy looks like this:
📖 Usage
Here's how flutter_floatwing creates a new overlay window:
Start a background service as the window manager from the main app.
Send a create window request to the service.
In the service, start a Flutter engine with the specified entry point.
Create a new Flutter view and attach it to the Flutter engine.
Add the view to the Android window manager.
Window & Config
WindowConfig contains all configuration options for a window. You can create a window using configuration like this:
void_createWindow() {
var config = WindowConfig();
var w = Window(config, id: "my-window");
w.create();
}
If you don't need to register event or data handlers, you can create a window directly from the config:
The entry point determines where the engine starts execution. We support 3 configuration modes:
Name
Config
How to Use
route
WindowConfig(route: "/my-overlay")
Add a route for the overlay window in your main routes, then start with: WindowConfig(route: "/my-overlay")
static function
WindowConfig(callback: myOverlayMain)
Define a static void Function() that calls runApp to start a widget, then start with: WindowConfig(callback: myOverlayMain)
entry-point
WindowConfig(entry: "myOverlayMain")
Same as static function, but add @pragma("vm:entry-point") above the function and use the function name as a string: WindowConfig(entry: "myOverlayMain")
Example: Using route
Add a route for your overlay widget in the main application:
@overrideWidgetbuild(BuildContext context) {
returnMaterialApp(
debugShowCheckedModeBanner: false,
initialRoute: "/",
routes: {
"/": (_) => HomePage(),
// Add a route as the entry point for your overlay window"/my-overlay-window": (_) => MyOverlayWindow(),
},
);
}
voidmyOverlayMain() {
runApp(MaterialApp(
home: AssistivePanel(),
));
// Or use the floatwing helper to inject MaterialApp// runApp(AssistivePanel().floatwing(app: true));
}
Define a static function that calls runApp and add the pragma annotation:
@pragma("vm:entry-point")
voidmyOverlayMain() {
runApp(MaterialApp(
home: AssistivePanel(),
));
// Or use the floatwing helper to inject MaterialApp// runApp(AssistivePanel().floatwing(app: true));
}
You can wrap both Widget and WidgetBuilder. When wrapping a WidgetBuilder, you can access the window instance using Window.of(context). For wrapped Widget, use FloatwingPlugin().currentWindow instead.
To access the window via Window.of(context), use this pattern:
In your window engine, you can access the window object in two ways:
Directly access the plugin's cached field: FloatwingPlugin().currentWindow
If the widget is wrapped with .floatwing(), use Window.of(context)
FloatwingPlugin().currentWindow returns null until initialization is complete.
If you inject a WidgetBuilder with .floatwing(), you can access the current window. It will always return a non-null value, unless you enable debug mode with .floatwing(debug: true).
For example, to get the id of the current window:
import'package:flutter_floatwing/flutter_floatwing.dart';
class_ExampleViewStateextendsState<ExampleView> {
Window? w;
@overridevoidinitState() {
super.initState();
SchedulerBinding.instance?.addPostFrameCallback((_) {
w = Window.of(context);
print("My window ID is ${w?.id}");
});
}
}
Subscribing to Events
You can subscribe to window events and trigger actions when they fire. Window events are sent to the main engine, the window's own engine, and the parent window engine. This means you can subscribe to window events from the main application, the overlay window itself, or the parent overlay window.
Currently supported events include window lifecycle and drag actions:
More event types are coming — contributions are welcome!
For example, to perform an action when a window starts:
@overridevoidinitState() {
super.initState();
SchedulerBinding.instance?.addPostFrameCallback((_) {
w = Window.of(context);
w?.on(EventType.WindowStarted, (window, _) {
print("$w has started.");
}).on(EventType.WindowDestroy, (window, data) {
// data is a boolean indicating whether the window was force-closedprint("$w has been destroyed, force: $data");
});
});
}
Sharing Data with Windows
Sharing data is the only way to communicate with windows. Use window.share(data) for this purpose.
For example, to share data from the main application to an overlay window:
First, get the target window in the main application (either the one you created or from the windows cache by ID):
Window w;
void_startWindow() {
w = WindowConfig(route: "/my-overlay-window").to();
}
void_shareData(dynamic data) {
w.share(data).then((value) {
// The window can return a value
});
// Or get the window from cache// FloatwingPlugin().windows["default"]?.share(data);
}
To share data with a specific name, add the name parameter: w.share(data, name: "name-1").
Then register a data handler in the window to receive the data:
@overridevoidinitState() {
super.initState();
SchedulerBinding.instance?.addPostFrameCallback((_) {
w = Window.of(context);
w?.onData((source, name, data) async {
print("Received $name data from $source: $data");
});
});
}
The handler function signature is Future<dynamic> Function(String? source, String? name, dynamic data):
source: Where the data comes from. null if from the main application; otherwise, the id of the source window.
name: The data name, useful for sharing data for different purposes.
data: The actual data received.
Return a value if you want to respond.
You can send data to any window as long as you know its ID — the only restriction is that you cannot send data to yourself. Note: Sharing data to the main application is not yet implemented.
Important: The data you share must be serializable.
📚 API Reference
FloatwingPlugin
FloatwingPlugin()
// Permission
..checkPermission() // Check overlay permission → Future<bool>
..openPermissionSetting() // Open system settings → Future<bool>// Initialization
..initialize() // Initialize the plugin → Future<bool>// Service Management
..isServiceRunning() // Check if background service is running → Future<bool>
..startService() // Start the background service → Future<bool>
..syncWindows() // Sync windows from service → Future<bool>
..cleanCache() // Clean cached data → Future<bool>// Window Access
..currentWindow // Get current window (in overlay) → Window?
..windows // Map of all windows by ID → Map<String, Window>
..isWindow // Check if running in window engine → bool
FloatwingPlugin is a singleton class that returns the same instance every time you call the FloatwingPlugin() factory method.
WindowConfig
Complete configuration options for overlay windows:
Parameter
Type
Default
Description
id
String
"default"
Unique window identifier
entry
String
"main"
Entry point function name
route
String?
null
Flutter route for the window
callback
Function?
null
Static function to run (must be static)
width
int?
null
Window width in pixels
height
int?
null
Window height in pixels
x
int?
null
X position on screen
y
int?
null
Y position on screen
autosize
bool?
null
Auto-resize to fit content
gravity
GravityType?
null
Window position alignment
clickable
bool?
null
Allow click-through when false
draggable
bool?
null
Enable drag to move
focusable
bool?
null
Allow window to receive focus
immersion
bool?
null
Immersive status bar mode
visible
bool?
null
Initial visibility state
WindowSize Constants
WindowSize.MatchParent// -1: Fill entire screenWindowSize.WrapContent// -2: Fit to content size
GravityType Enum
GravityType.Center// Center of screenGravityType.CenterTop// Top centerGravityType.CenterBottom// Bottom centerGravityType.LeftTop// Top left cornerGravityType.LeftCenter// Left centerGravityType.LeftBottom// Bottom left cornerGravityType.RightTop// Top right cornerGravityType.RightCenter// Right centerGravityType.RightBottom// Bottom right corner
Example — Full-screen non-clickable overlay (night mode):
Did you find this plugin useful? Please consider making a donation to help improve it!
🔧 Troubleshooting
Release Mode Error: "No top-level getter declared"
If you see this error in release mode when using entry-point:
NoSuchMethodError: No top-level getter 'xxx' declared.
Could not resolve main entrypoint function.
Solution: Make sure your entry point function is:
Defined in main.dart or imported into main.dart
Marked with @pragma("vm:entry-point") to prevent tree-shaking
// In main.dart@pragma("vm:entry-point")
voidmyOverlayMain() {
runApp(MyOverlayWidget().floatwing(app: true));
}
If defined in another file, import it in main.dart:
// main.dartimport'package:myapp/overlay_entry.dart'; // Contains myOverlayMainvoidmain() {
runApp(MyApp());
}
// Re-export to ensure it's included in the buildexport'package:myapp/overlay_entry.dart';
Buttons Get Stuck Pressed When Dragging
If buttons inside a draggable overlay widget get stuck in pressed state when pressing and dragging simultaneously:
Workaround: Disable dragging while the button is pressed: