搜索插件、代码仓与 APP 分类

flutter_paytabs_bridge 封面
插件详情v2.7.15

flutter_paytabs_bridge

用于通过信用卡、电子钱包等处理支付的 Paytabs Flutter 插件。

AndroidiOS
近 30 天下载
1400
喜欢数
41
Pub 分数
120

安装插件

flutter pub add flutter_paytabs_bridge

插件介绍

基于插件公开信息、社区数据与项目使用情况整理的选型参考。

一个将 Paytabs 支付解决方案集成到移动应用中的 Flutter 插件,支持安全处理信用卡和替代支付方式(APMs)。该插件支持 Android 和 iOS 平台,为 Flutter 应用提供无缝的支付处理方式。该插件作为 Flutter 框架与 Paytabs 原生 SDK 之间的桥梁,确保兼容性和性能。开发者可以借助它以最少的配置实现结账流程。源代码在 GitHub 上公开,便于透明化和自定义。

适合场景

  • 应用内购买
  • 电子商务结账
  • 订阅计费
  • 移动钱包集成
  • 支付网关集成

主要特点

  • 支持卡片和APM支付
  • 跨平台(Android & iOS)
  • 官方 Paytabs SDK 桥接
  • 安全交易处理
  • 与 Flutter 的轻松集成

适合对象

  • 电子商务应用
  • 数字服务提供商
  • 移动钱包
  • 基于订阅的平台
  • 全局支付处理

使用建议

  • 需要 Paytabs 账户设置
  • 需要正确的 API 密钥和凭据
  • 可能需要为特定区域进行额外配置
  • 取决于Paytabs服务器的可用性
  • 仅限Paytabs支持的支付方式

原始 README

以下为关联源码仓库的 README 原文快照,最新内容请访问源码仓库。

Flutter PayTabs Bridge

Version

Flutter paytabs plugin is a wrapper for the native PayTabs Android and iOS SDKs, It helps you integrate with PayTabs payment gateway.

Plugin Support:

  • [x] iOS
  • [x] Android

Installation

dependencies:
   flutter_paytabs_bridge: ^2.7.15

Usage

import 'package:flutter_paytabs_bridge/BaseBillingShippingInfo.dart';
import 'package:flutter_paytabs_bridge/PaymentSdkConfigurationDetails.dart';
import 'package:flutter_paytabs_bridge/PaymentSdkLocale.dart';
import 'package:flutter_paytabs_bridge/PaymentSdkTokenFormat.dart';
import 'package:flutter_paytabs_bridge/PaymentSdkTokeniseType.dart';
import 'package:flutter_paytabs_bridge/flutter_paytabs_bridge.dart';
import 'package:flutter_paytabs_bridge/IOSThemeConfiguration.dart';
import 'package:flutter_paytabs_bridge/PaymentSDKSavedCardInfo.dart';
import 'package:flutter_paytabs_bridge/PaymentSdkTransactionClass.dart';
import 'package:flutter_paytabs_bridge/PaymentSDKQueryConfiguration.dart';
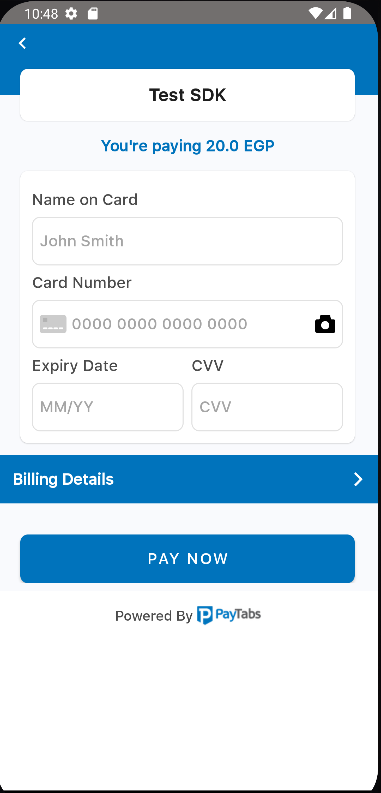
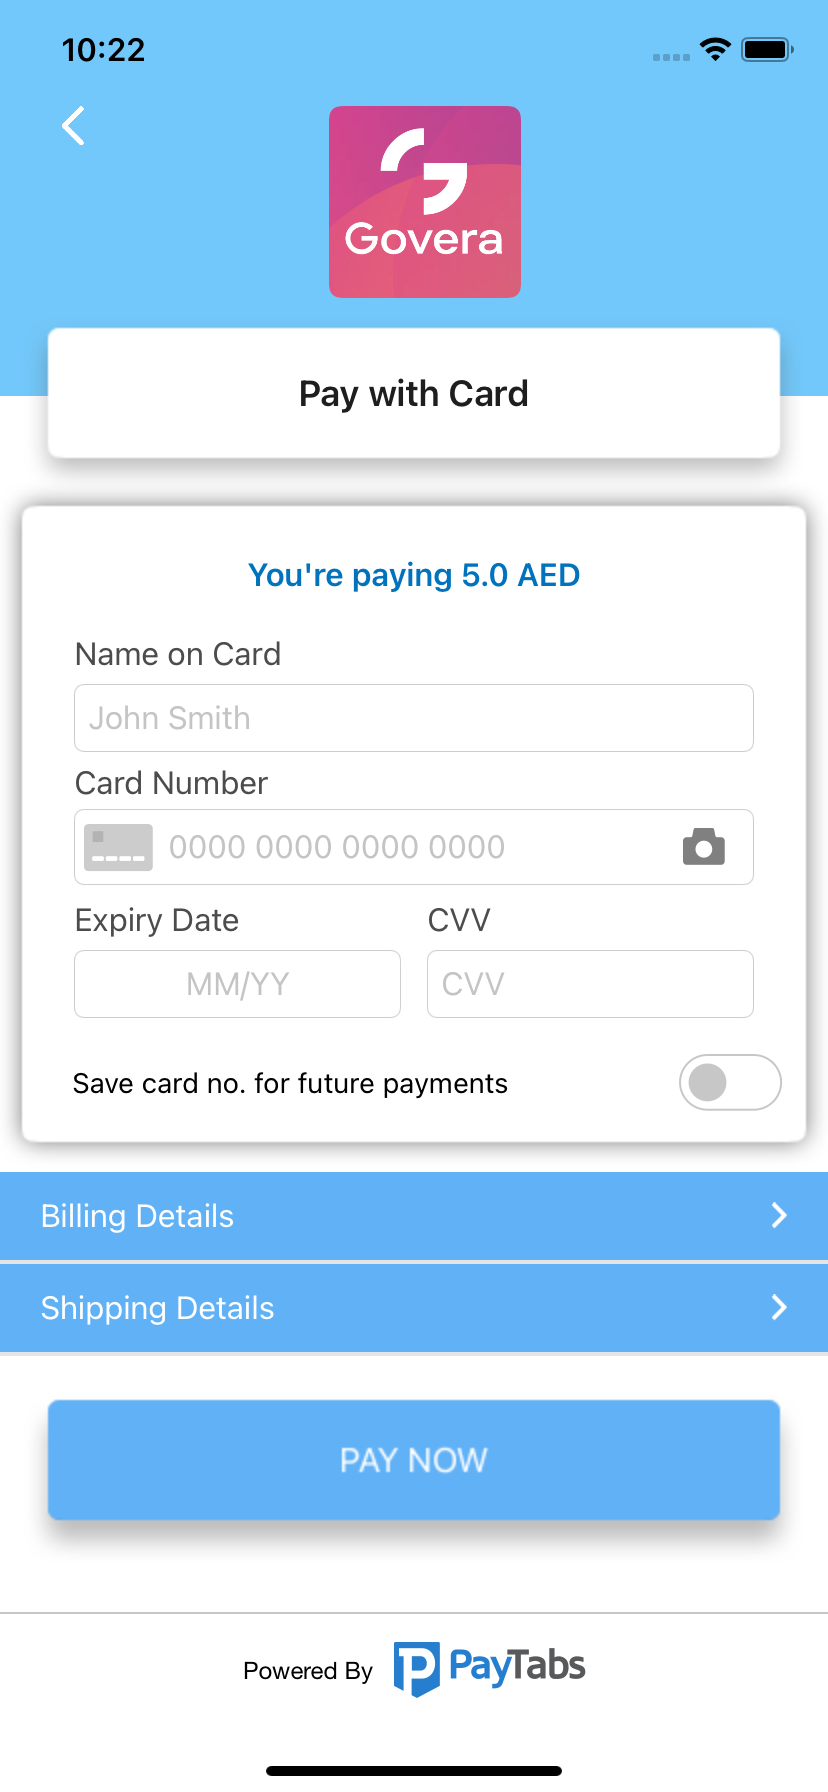
Pay with Card
  1. Configure the billing & shipping info, the shipping info is optional
  var billingDetails = new BillingDetails("billing name", 
    "billing email", 
    "billing phone",
        "address line", 
        "country", 
        "city", 
        "state", 
        "zip code");
        
var shippingDetails = new ShippingDetails("shipping name", 
     "shipping email", 
     "shipping phone",
     "address line", 
     "country", 
     "city", 
     "state", 
     "zip code");
                                              
  1. Create object of PaymentSDKConfiguration and fill it with your credentials and payment details.

 var configuration = PaymentSdkConfigurationDetails(
        profileId: "profile id",
        serverKey: "your server key",
        clientKey: "your client key",
        cartId: "cart id",
        cartDescription: "cart desc",
        merchantName: "merchant name",
        screentTitle: "Pay with Card",
        billingDetails: billingDetails,
        shippingDetails: shippingDetails,
        locale: PaymentSdkLocale.EN, //PaymentSdkLocale.AR, PaymentSdkLocale.FR, PaymentSdkLocale.TR, PaymentSdkLocale.UR or PaymentSdkLocale.DEFAULT. 
        amount: "amount in double",
        currencyCode: "Currency code",
        merchantCountryCode: "2 chars iso country code");

Options to show billing and shipping info

	configuration.showBillingInfo = true;
	configuration.showShippingInfo = true;

Options to set expiry timeout for the card payment screen

/** To establish a timeout of 2 minutes.
 * Set to zero to deactivate the timeout feature.
 * Note that the expiryTime cannot be set to less than 60 seconds.
 * */
PaymentSdkConfigurationDetails(...,expiryTime:120);

You have the option to close the payment screen if there are no ongoing transactions.

 FlutterPaytabsBridge.cancelPayment((_) {});
  1. Set merchant logo from the project assets:
  • create 'assets' directory and put the image inside it.
  • be sure you add in the Runner iOS Project in the infor.plist the image usage description. NSPhotoLibraryUsageDescription Get Logo From Assets
  • under flutter section in the pubspec.yaml declare your logo.
flutter:
  assets:
   - assets/logo.png
  • be sure you pass the image path like this:-
var configuration = PaymentSdkConfigurationDetails();
var theme = IOSThemeConfigurations();
theme.logoImage = "assets/logo.png";
configuration.iOSThemeConfigurations = theme;

1-Pay with Card

Start payment by calling startCardPayment method and handle the transaction details


FlutterPaytabsBridge.startCardPayment(configuration, (event) {
      setState(() {
        if (event["status"] == "success") {
          // Handle transaction details here.
          var transactionDetails = event["data"];
          print(transactionDetails);
          
          if (transactionDetails["isSuccess"]) {
            print("successful transaction");
          } else {
            print("failed transaction");
          }
        } else if (event["status"] == "error") {
          // Handle error here.
        } else if (event["status"] == "event") {
          // Handle cancel events here.
        }
      });
    });
     
card

2-Pay with Token

To enable tokenization please follow the below instructions.

 // to request token and transaction reference pass tokeniseType and Format
 tokeniseType: PaymentSdkTokeniseType.MERCHANT_MANDATORY,
 tokenFormat: PaymentSdkTokenFormat.AlphaNum20Format,

 // you will receive token and reference after the first transaction       
 // to pass the token and transaction reference returned from sdk 
 token: "token returned from the last trx",
 transactionReference: "last trx reference returned",

Then payment by calling startTokenizedCardPayment method and handle the transaction details


FlutterPaytabsBridge.startTokenizedCardPayment(configuration, "Token", "TransactionReference", (event) {
      setState(() {
        if (event["status"] == "success") {
          // Handle transaction details here.
          var transactionDetails = event["data"];
          print(transactionDetails);
          
          if (transactionDetails["isSuccess"]) {
            print("successful transaction");
          } else {
            print("failed transaction");
          }
        } else if (event["status"] == "error") {
          // Handle error here.
        } else if (event["status"] == "event") {
          // Handle cancel events here.
        }
      });
    });
     

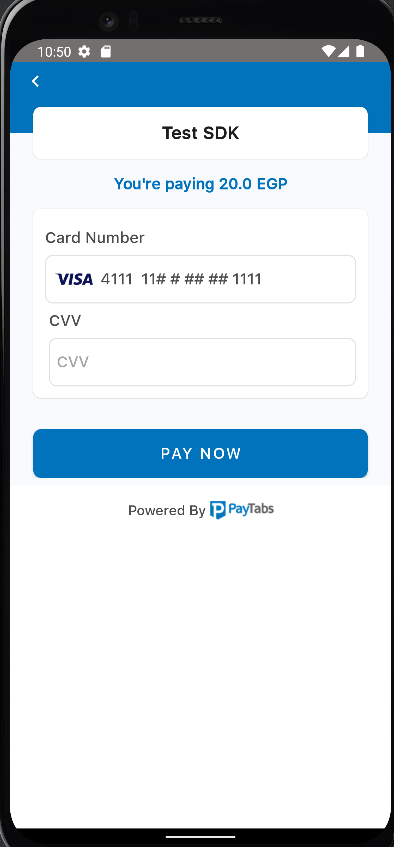
3-Pay with 3ds secure Token

Start payment by calling start3DSecureTokenizedCardPayment method and handle the transaction details

var savedCardInfo = PaymentSDKSavedCardInfo("Card Mask", "card type");
FlutterPaytabsBridge.start3DSecureTokenizedCardPayment(configuration, savedCardInfo, "Token", (event) {
      setState(() {
        if (event["status"] == "success") {
          // Handle transaction details here.
          var transactionDetails = event["data"];
          print(transactionDetails);
          
          if (transactionDetails["isSuccess"]) {
            print("successful transaction");
          } else {
            print("failed transaction");
          }
        } else if (event["status"] == "error") {
          // Handle error here.
        } else if (event["status"] == "event") {
          // Handle cancel events here.
        }
      });
    });
     
rec 3ds
Pay with Apple Pay
  1. Follow the guide Steps to configure Apple Pay to learn how to configure ApplePay with PayTabs.

  2. Do the steps 1 and 2 from Pay with Card although you can ignore Billing & Shipping details and Apple Pay will handle it, also you must pass the merchant name and merchant identifier.

//ignore this part if you want to use default networks
 List<PaymentSDKNetworks> networks = [];
    networks.add(PaymentSDKNetworks.visa);
    networks.add(PaymentSDKNetworks.amex);

 var configuration = PaymentSdkConfigurationDetails(
        profileId: "profile id",
        serverKey: "your server key",
        clientKey: "your client key",
        cartId: "cart id",
        cartDescription: "cart desc",
        merchantName: "merchant name",
        screentTitle: "Pay with Card",
        locale: PaymentSdkLocale.AR, //PaymentSdkLocale.EN or PaymentSdkLocale.DEFAULT 
        amount: "amount in double",
        currencyCode: "Currency code",
        merchantCountryCode: "2 chars iso country code",
        merchantApplePayIndentifier: "merchant.com.bundleID",
        linkBillingNameWithCardHolderName: true,
    paymentNetworks: networks);

  1. To simplify ApplePay validation on all user's billing info, pass simplifyApplePayValidation parameter in the configuration with true.

configuration.simplifyApplePayValidation = true;

  1. Call startApplePayPayment to start payment
FlutterPaytabsBridge.startApplePayPayment(configuration, (event) {
      setState(() {
        setState(() {
        if (event["status"] == "success") {
          // Handle transaction details here.
          var transactionDetails = event["data"];
          print(transactionDetails);
        } else if (event["status"] == "error") {
          // Handle error here.
        } else if (event["status"] == "event") {
          // Handle cancel events here.
        }
      });
      });
    });
Pay with Samsung Pay

Pass Samsung Pay token to the configuration and call startSamsungPayPayment

configuration.samsungToken = "{Json token returned from the samsung pay payment}"

Pay with Alternative Payment Methods

It becomes easy to integrate with other payment methods in your region like STCPay, OmanNet, KNet, Valu, Fawry, UnionPay, and Meeza, to serve a large sector of customers.

  1. Do the steps 1 and 2 from Pay with Card
  2. Choose one or more of the payment methods you want to support, check the available APMs in the enum section.
 List<PaymentSdkAPms> apms = [];
 apms.add(PaymentSdkAPms.STC_PAY);
 
 var configuration = PaymentSdkConfigurationDetails(
     * Your configuration *
     alternativePaymentMethods: apms); // add the Payment Methods here
  1. Call startAlternativePaymentMethod to start payment

FlutterPaytabsBridge.startAlternativePaymentMethod(await generateConfig(),

        (event) {

      setState(() {

        if (event["status"] == "success") {

          // Handle transaction details here.

          var transactionDetails = event["data"];

          print(transactionDetails);

        } else if (event["status"] == "error") {

          // Handle error here.

        } else if (event["status"] == "event") {

          // Handle cancel events here.

        }

      });

    });
    

Discounts

You can add discounts to the payment by passing the discount amount and the discount type to the configuration.

 configuration.cardDiscounts = [
      PaymentSDKCardDiscount(
          discountCards: ["4111"],
          discountValue: 50,
          discountTitle: "50% discount on cards starting with 4111",
          isPercentage: true),
      PaymentSDKCardDiscount(
          discountCards: ["4000", "41111"],
          discountValue: 2,
          discountTitle: "2 EGP discount on cards starting with 4000 and 41111",
          isPercentage: false)
    ];

Card Approval

You can customize BIN-based discounts through the PaymentSDKCardApproval class, which collects approval details via an API.

final cardApproval = PaymentSDKCardApproval(
  validationUrl: "https://webhook.site/f80622ae-a0c0-4664-861e-b71ab1b72d90",
  binLength: 8,
  blockIfNoResponse: false
);

final configuration = PaymentSdkConfigurationDetails(
  ...,
  cardApproval: cardApproval
);
  • validationUrl: The endpoint provided by the business to validate the transaction.
  • binLength: BIN length (default is 6, can be set to 8).
  • blockIfNoResponse: Determines if the transaction should proceed in case of no response from the validation endpoint.

Query transaction

You can check the status of a transaction

1- first create PaymentSDKQueryConfiguration

var queryConfig = PaymentSDKQueryConfiguration(
    "ServerKey",
    "ClientKey",
    "Country Iso 2",
    "Profile Id",
    "Transaction Reference"
);

2- Call QuerySdkActivity.queryTransaction and pass the needed arguments

FlutterPaytabsBridge.queryTransaction(
    generateConfig(), queryConfig,
    (event) {
        setState(() {
            if (event["status"] == "success") {
                // Handle transaction details here.
                var transactionDetails = event["data"];
                print(transactionDetails);
            } else if (event["status"] == "error") {
                // Handle error here.
            } else if (event["status"] == "event") {
                // Handle cancel events here.
            }
        });
    });
Handling Transaction response

you can use event["data"]["isSuccess"] to ensure a successful transaction ..

if the transaction is not successful you should check for the corresponding failure code you will receive the code in responseCode .. all codes can be found in Payment Response Codes

Link billing name with card holder name

By default, the billing name is linked with card holder name, if you set its flag to false the billing name and the card holder name will be seperated

 var configuration = PaymentSdkConfigurationDetails(
        ...
        ...
        linkBillingNameWithCardHolderName: true
        );

Customize the Theme:

UI guide

iOS Theme

Use the following guide to cusomize the colors, font, and logo by configuring the theme and pass it to the payment configuration.

	var theme = IOSThemeConfigurations();
	theme.backgroundColor = "e0556e"; // Color hex value
	theme.backgroundColorDark = "520f3a"; // Dark Mode Color hex value
	configuration.iOSThemeConfigurations = theme;
Android Theme

Use the following guide to customize the colors, font, and logo by configuring the theme and pass it to the payment configuration.

# edit file
android/src/main/res/values/colors.xml

<resources>
    <!-- Override colors -->
    <color name="payment_sdk_primary_color">#ffffff</color>
    <color name="payment_sdk_secondary_color">#0073bc</color>
    <color name="payment_sdk_status_bar_color">#444647</color>
    <color name="payment_sdk_primary_font_color">#4c4c4c</color>
    <color name="payment_sdk_secondary_font_color">#0073bc</color>
    <color name="payment_sdk_hint_font_color">#a5a5a5</color>
    <color name="payment_sdk_stroke_color">#e1e1e1</color>
    <color name="payment_sdk_button_text_color">#FFF</color>
    <color name="payment_sdk_title_text_color">#1e1e1e</color>
    <color name="payment_sdk_button_background_color">#0073bc</color>
    <color name="payment_sdk_background_color">#F9FAFD</color>
    <color name="payment_sdk_blue_F2FAFD">#F2FAFD</color>
    <color name="payment_sdk_error_text_color">#EC2213</color>
    <color name="payment_sdk_back_black_dim">#4D6E6E6E</color>
    <color name="payment_sdk_input_field_background_color">#FFFFFFFF</color>
    <color name="payment_sdk_enabled_switch_track_color">#00000000</color>
    <color name="payment_sdk_enabled_switch_handle_color">#3db39e</color>
    <color name="payment_sdk_disabled_switch_track_color">#00000000</color>
    <color name="payment_sdk_disabled_switch_handle_color">#c7c7c7</color>
    <color name="payment_sdk_switch_stroke_color">#4c4c4c</color>
    <color name="payment_sdk_amount_font_color">#4c4c4c</color>
    <color name="payment_sdk_original_amount_font_color">#a5a5a5</color>
    <color name="payment_sdk_billing_header_background_color">#0073bc</color>
    <color name="payment_sdk_billing_text_color">#FFF</color>

    <!-- Override dimens -->
    <dimen name="payment_sdk_title_font_size">18sp</dimen>
    <dimen name="payment_sdk_title_margin">24dp</dimen>
    <dimen name="payment_sdk_primary_font_size">16sp</dimen>
    <dimen name="payment_sdk_secondary_font_size">16sp</dimen>
    <dimen name="payment_sdk_button_font_size">16sp</dimen>
    <dimen name="payment_sdk_separator_thickness">1dp</dimen>
    <dimen name="payment_sdk_stroke_thickness">.5dp</dimen>
    <dimen name="payment_sdk_input_corner_radius">8dp</dimen>
    <dimen name="payment_sdk_card_corner_radius">8dp</dimen>
    <dimen name="payment_sdk_card_margin">16dp</dimen>
    <dimen name="payment_sdk_billing_header_corner_radius">0dp</dimen>
    <dimen name="payment_sdk_billing_header_margin">0dp</dimen>
    <dimen name="payment_sdk_button_corner_radius">8dp</dimen>
    <dimen name="payment_sdk_error_font_size">12sp</dimen>
    <dimen name="payment_sdk_amount_font_size">16sp</dimen>

    <!-- Override styles -->
    <style name="PaymentSdkTheme" parent="Theme.MaterialComponents.NoActionBar">
        <!-- Hides the payment screen title background -->
        <item name="payment_sdk_hideScreenTitleBackground">true</item>
        <!-- Sets the alignment of the payment screen title [start-end-center] -->
        <item name="payment_sdk_screenTitleAlignment">start</item>
        <!-- Hides the card and button shadows -->
        <item name="payment_sdk_hideViewsShadow">true</item>
    </style>

</resources>

-- Override strings To override string you can find the keys with the default values here English, Arabic.

Enums

Those enums will help you in customizing your configuration.

  • Tokenise types

The default type is none

enum PaymentSdkTokeniseType {
  NONE,
  USER_OPTIONAL,
  USER_MANDATORY,
  MERCHANT_MANDATORY,
  USER_OPTIONAL_DEFAULT_ON
}

configuration.tokeniseType = PaymentSdkTokeniseType.USER_OPTIONAL;
  • Token formats

The default format is hex32

enum PaymentSdkTokenFormat {
  Hex32Format,
  NoneFormat,
  AlphaNum20Format,
  Digit22Format,
  Digit16Format,
  AlphaNum32Format
}

  • Transaction Type

The default type is PaymentSdkTransactionType.SALE

enum PaymentSdkTransactionType {
  SALE,
  AUTH
}
configuration.tokenFormat = PaymentSdkTokenFormat.Hex32Format
  • Alternative Payment Methods
enum PaymentSdkAPms {
  UNION_PAY,
  STC_PAY,
  VALU,
  MEEZA_QR,
  OMAN_NET,
  KNET_CREDIT,
  FAWRY,
  KNET_DEBIT,
  URPAY,
  AMAN,
  SAMSUNG_PAY,
  APPLE_PAY,
  SOUHOOLA,
  TABBY,
  HALAN,
  TRU,
  FORSA,
  TAMARA
}

Demo application

Check our complete example here https://github.com/paytabscom/flutter-sdk-bridge/tree/master/example.

License

See LICENSE.

Paytabs

Support | Terms of Use | Privacy Policy

所属分类

依赖

依赖清单 1 项

源码仓库

使用此插件的项目

暂无相关数据。