搜索插件、代码仓与 APP 分类

interactive_maps_marker 封面
插件详情v0.0.10

interactive_maps_marker

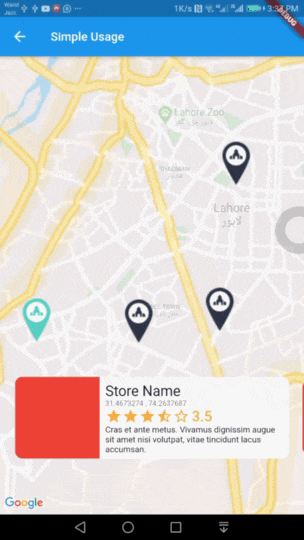
易于使用的动画地图标记,带有详细信息卡片。可用于商店或任何位置定位。

近 30 天下载
55
喜欢数
57
Pub 分数
60

安装插件

flutter pub add interactive_maps_marker

插件介绍

基于插件公开信息、社区数据与项目使用情况整理的选型参考。

Interactive Maps Marker 是一个 Flutter 包,提供带有交互式详细信息卡片的动画地图标记。设计简洁,使开发者能够轻松集成位置相关功能,如商店定位器或兴趣点显示。标记在点击时会动画显示,揭示一个可自定义的卡片以提供额外信息。非常适合需要直观地理定位可视化和用户参与的应用程序。支持流畅的过渡效果和响应式设计,无需复杂设置即可提升用户体验。

适合场景

  • 商店定位应用
  • 兴趣点突出显示
  • 活动场地寻找者
  • 旅游和旅行指南
  • 实时位置跟踪界面

主要特点

  • 动画标记过渡
  • 可自定义的详细信息卡片
  • 与 Google 地图的简单集成
  • 轻触显示交互
  • 响应式 UI 组件
  • 轻便且易于配置

适合对象

  • 开发基于位置的应用程序的开发者
  • 需要快速实现地图功能的初创企业
  • 专注于用户友好导航的应用程序
  • 项目需要最少的代码来实现地图交互
  • Flutter 初学者探索地理位置

使用建议

  • 需要 Google Maps API 密钥才能实现完整功能
  • 仅限 Android 和 iOS(未提及网页支持)
  • 自定义样式可能需要额外的 Dart 知识
  • 依赖外部地图渲染库
  • 未针对高密度标记聚类进行优化

原始 README

以下为关联源码仓库的 README 原文快照,最新内容请访问源码仓库。

interactive_maps_marker for Flutter

Easy to use Animated Maps Markers with detail card. Use it for store or any place locator.

Demo

Usage

Add this package to your pubspec.yaml in dependencies: section

dependencies: 
  interactive_maps_marker: ^0.0.2

This package depends upon google_maps_flutter so first setup this by following This Guide

Update dependencies

flutter pub get

You can now add a InteractiveMapsMarker widget to your widget tree.

Simple Usage

In your widget import the package and use InteractiveMapsMarker Widget

Example

import 'package:flutter/material.dart';
import 'package:google_maps_flutter/google_maps_flutter.dart';
import 'package:interactive_maps_marker/interactive_maps_marker.dart';

class ExplorePage extends StatelessWidget {
  @override
  Widget build(BuildContext context) {

    return InteractiveMapsMarker(
      items: <MarkerItem>[
        MarkerItem(id: 1, latitude: 31.4673274, longitude: 74.2637687),
        MarkerItem(id: 2, latitude: 31.4718461, longitude: 74.3531591),
      ],
      center: LatLng(31.4906504, 74.319872),
      itemContent: (context, index) {
        return Text("Current Item $index");
      },
    );

  }
}
Advanced Usage

Coming Soon

Markers data from a remote server?

Use this widget inside a stateful widget and update the markers list state with new data. An example can be found in stateful_example.dart file in example project.

Customise with parameters

You can customise it by passing various parameter values. Details about all parameters is as follows.

Parameter Type Default Value Description
items List<MarkerItem> none List of Markers with type of MarkerItem. This parameter is required and cannot be null.
itemContent IndexedWidgetBuilder none This is builder function which will receive context and index. You must return a Widget which will show on a pre designed container. This is exactly like you use ListView Builder. Not applicable when using itemBuilder
center LatLng LatLng(0.0, 0.0) Center point for initial map display.
zoom double 12.0 Default zoom value for initial map screen.
itemHeight double 116.0 Height of your detail item. Not applicable when using itemBuilder
itemPadding EdgeInsetsGeometry EdgeInsets.only(bottom: 80.0) Padding for item detail card. Mainly used for bottom padding.
itemPadding Alignment Alignment.bottomCenter Alignment for content slider.
itemBuilder IndexedWidgetBuilder null If you don't want default container and want to build the bottom widget yourself, you can use this builder instead of itemContent and have full control over UI. This is builder function which will receive context and index. You must return a Widget.
controller InteractiveMapsController null A controller if you want to add the markers later and then call rebuild() or change the index of marker to animate with your action via setCurrentIndex(int index).

Meta

Atiq Samtia– @AtiqSamtia – me@atiqsamtia.com

Distributed under the MIT license.

https://github.com/atiqsamtia/interactive_maps_marker_flutter

Credits

Inspired by amazing work from Mohamed Douzane

Github Repo

Medium Post

Contributing

  1. Fork it (https://github.com/atiqsamtia/interactive_maps_marker_flutter/fork)
  2. Create your feature branch (git checkout -b feature/fooBar)
  3. Commit your changes (git commit -am 'Add some fooBar')
  4. Push to the branch (git push origin feature/fooBar)
  5. Create a new Pull Request

所属分类

依赖

依赖清单 1 项

源码仓库

使用此插件的项目

暂无相关数据。