搜索插件、代码仓与 APP 分类

slide_drawer 封面
插件详情v1.0.3

slide_drawer

一种在 Flutter 中使用抽屉的简单方法,带有酷炫的滑动动画。

近 30 天下载
30
喜欢数
49
Pub 分数
70

安装插件

flutter pub add slide_drawer

插件介绍

基于插件公开信息、社区数据与项目使用情况整理的选型参考。

slide_drawer 是一个 Flutter 包,可简化带有平滑滑动动画的抽屉实现。它提供了一个易于使用的 API,用于将侧边导航菜单集成到 Flutter 应用中,通过流畅的过渡效果提升用户体验。专为寻求轻量级且可自定义抽屉解决方案的开发者设计,支持左右两侧抽屉,设置简单。该包注重性能和美观性,非常适合需要直观导航的应用程序。其简洁的代码库和积极的维护确保了在各类项目中的可靠性。

适合场景

  • 实现侧边导航菜单
  • 添加动画抽屉过渡
  • 使用可折叠面板创建响应式布局
  • 构建移动应用仪表板
  • 通过滑动效果增强UI交互性

主要特点

  • 平滑滑动动画
  • 支持左右抽屉
  • 最小配置要求
  • 轻量且高效
  • 可自定义的外观和行为

适合对象

  • 移动应用开发者
  • 寻求动画增强的UI/UX设计师
  • 需要简单抽屉功能的项目
  • Flutter 初学者探索导航模式
  • 动态侧边栏内容的应用

使用建议

  • 仅限基本抽屉功能
  • 不支持嵌套抽屉的内置支持
  • 可能需要额外的样式才能实现复杂布局
  • 未针对大规模导航结构进行优化
  • 依赖外部依赖项以实现高级自定义

原始 README

以下为关联源码仓库的 README 原文快照,最新内容请访问源码仓库。

SlideDrawer

An easy way to use drawer in Flutter with cool sliding animation.

Getting Started

Add dependency in your flutter project.

$ flutter pub add slide_drawer

or

dependencies:
  slide_drawer: ^1.0.3

Then run flutter pub get.

Example

You can see the example folder to learn many different ways of using SlideDrawer in your app.

Usage

As usual, we need to import the package.

import 'package:slide_drawer/slide_drawer.dart';

Then wrap the app home page with SlideDrawer.

To use the basic SlideDrawer, you only need to define items (List of MenuItem) to generate menu in your drawer. The drawer will use your default theme color as drawer background, and theme brightness as drawer brightness.

class App extends StatelessWidget {
  @override
  Widget build(BuildContext context) {
    return MaterialApp(
      title: title,
      // SlideDrawer will use style from this theme
      theme: ThemeData(
        brightness: Brightness.dark,
        primarySwatch: Colors.blue,
        visualDensity: VisualDensity.adaptivePlatformDensity,
      ),
      // wrap your HomePage with SlideDrawer
      home: SlideDrawer(
        items: [
          MenuItem('Home', onTap: (){}),
          MenuItem('Project', onTap: (){}),
          MenuItem('Favourite', onTap: (){}),
          MenuItem('Profile', onTap: (){}),
          MenuItem('Setting', onTap: (){}),
        ],
        child: HomePage(),
      ),
    );
  }
}

Then set onPressed in your AppBar menu button to toggle SlideDrawer.

appBar: AppBar(
  title: Text(title),
  leading: IconButton(
    icon: Icon(Icons.menu),
    // call toggle from SlideDrawer to alternate between open and close
    // when pressed menu button
    onPressed: () => SlideDrawer.of(context).toggle(),
  ),
),
Icons

We can also use icon for menu items.

home: SlideDrawer(
  items: [
    MenuItem('Home', icon: Icons.home, onTap: (){}),
    MenuItem('Project', icon:Icons.rss_feed, onTap: (){}),
    MenuItem('Favourite', icon: Icons.favorite_border, onTap: (){}),
    MenuItem('Profile', icon: Icons.person_outline, onTap: (){}),
    MenuItem('Setting', icon: Icons.settings, onTap: (){}),
  ],
  child: HomePage(),
),
Custom Background

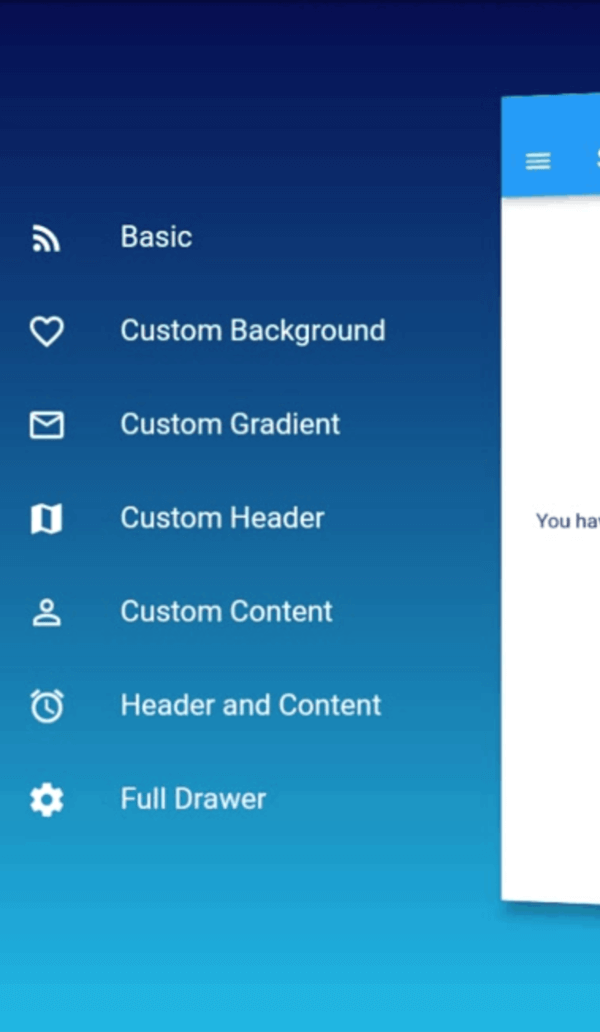
SlideDrawer also come with parameter backgroundColor and backgroundGradient.

If we specify backgroundGradient, the drawer will use it as background. If not, it will use backgroundColor. If we also not specify backgroundColor, it will use the default theme color as background.

It's good practice to specify brightness (dark or light) if we use backgroundGradient or backgroundColor. If we set dark color in your backgroundGradient or backgroundColor, use Brightness.dark. If we set light color, use Brightness.light.

// SlideDrawer with custom gradient as background.
home: SlideDrawer(
  items: [
    MenuItem('Home', icon: Icons.home, onTap: (){}),
    MenuItem('Project', icon:Icons.rss_feed, onTap: (){}),
    MenuItem('Favourite', icon: Icons.favorite_border, onTap: (){}),
    MenuItem('Profile', icon: Icons.person_outline, onTap: (){}),
    MenuItem('Setting', icon: Icons.settings, onTap: (){}),
  ],
  brightness: Brightness.dark,
  backgroundGradient: LinearGradient(
    begin: Alignment.topCenter,
    end: Alignment.bottomCenter,
    stops: [0.0, 1.0], 
    colors: [
      Color(0xFF000046),
      Color(0xFF1CB5E0),
    ],
  ),
  child: HomePage(),
),
// SlideDrawer with custom color as background.
home: SlideDrawer(
  items: [
    MenuItem('Home', icon: Icons.home, onTap: (){}),
    MenuItem('Project', icon:Icons.rss_feed, onTap: (){}),
    MenuItem('Favourite', icon: Icons.favorite_border, onTap: (){}),
    MenuItem('Profile', icon: Icons.person_outline, onTap: (){}),
    MenuItem('Setting', icon: Icons.settings, onTap: (){}),
  ],
  brightness: Brightness.dark,
  backgroundColor: Colors.blue[900],
  child: HomePage(),
),
Custom Head Drawer

It's advisable to set alignment to SlideDrawerAlignment.start when you use headDrawer.

home: SlideDrawer(
  alignment: SlideDrawerAlignment.start,
  headDrawer: Image.asset('boys.png'),
  items: [
    MenuItem('Home', icon: Icons.home, onTap: (){}),
    MenuItem('Project', icon:Icons.rss_feed, onTap: (){}),
    MenuItem('Favourite', icon: Icons.favorite_border, onTap: (){}),
    MenuItem('Profile', icon: Icons.person_outline, onTap: (){}),
    MenuItem('Setting', icon: Icons.settings, onTap: (){}),
  ],
  brightness: Brightness.dark,
  backgroundColor: Colors.blue[900],
  child: HomePage(),
),
Custom Content Drawer

In the previous example, we use items and let the SlideDrawer generate menu in the content drawer. But we can also set any custom widget as the content drawer.

home: SlideDrawer(
  brightness: Brightness.dark,
  contentDrawer: Container(
    padding: EdgeInsets.symmetric(horizontal: 5),
    child: Column(
      children: [
        ListTile(title: 'Home', icon: Icons.home, onTap: (){}),
        ListTile(title: 'Project', icon:Icons.rss_feed, onTap: (){}),
        ListTile(title: 'Favourite', icon: Icons.favorite_border, onTap: (){}),
        ListTile(title: 'Profile', icon: Icons.person_outline, onTap: (){}),
        ListTile(title: 'Setting', icon: Icons.settings, onTap: (){}),
      ],
    ),
  ),
  child: HomePage(),
),
Custom Full Drawer

If you have your own creative idea for the full widget inside the drawer, don't worry. We can use it in SlideDrawer by passing it to drawer. In this way, SlideDrawer will use style of custom drawer and ignore any value in backgroundColor, gradientColor, and brightness.

home: SlideDrawer(
  drawer: Container(
    color: Colors.teal,
    padding: EdgeInsets.symmetric(vertical: 36, horizontal: 15),
    child: Theme(
      data: ThemeData(brightness: Brightness.dark),
      child: Column(
        mainAxisAlignment: MainAxisAlignment.end,
        crossAxisAlignment: CrossAxisAlignment.stretch,
        children: [
          ListTile(title: 'Home', icon: Icons.home, onTap: (){}),
          ListTile(title: 'Project', icon:Icons.rss_feed, onTap: (){}),
          ListTile(title: 'Favourite', icon: Icons.favorite_border, onTap: (){}),
          ListTile(title: 'Profile', icon: Icons.person_outline, onTap: (){}),
          ListTile(title: 'Setting', icon: Icons.settings, onTap: (){}),
        ],
      ),
    ),
  ),
  child: HomePage(),
),
Others

The default SlideDrawer animate home page by move it to the right (offsetFromRight default to 60), scale it, and rotate it at y axis with some small angle (pi / 24 radian or 180 / 24 degree = 7.5 degree).

If don't want to rotate, we can disable the rotation by setting isRotate to false.

home: SlideDrawer(
  isRotate: false,
  items: [
    MenuItem('Home', icon: Icons.home, onTap: (){}),
    MenuItem('Project', icon:Icons.rss_feed, onTap: (){}),
    MenuItem('Favourite', icon: Icons.favorite_border, onTap: (){}),
    MenuItem('Profile', icon: Icons.person_outline, onTap: (){}),
    MenuItem('Setting', icon: Icons.settings, onTap: (){}),
  ],
  child: HomePage(),
),

Or use a custom rotateAngle if we want to rotate it at a spesific angle.

home: SlideDrawer(
  isRotate: true,
  rotateAngle: pi / 36,
  items: [
    MenuItem('Home', icon: Icons.home, onTap: (){}),
    MenuItem('Project', icon:Icons.rss_feed, onTap: (){}),
    MenuItem('Favourite', icon: Icons.favorite_border, onTap: (){}),
    MenuItem('Profile', icon: Icons.person_outline, onTap: (){}),
    MenuItem('Setting', icon: Icons.settings, onTap: (){}),
  ],
  child: HomePage(),
),

Or change offsetFromRight to make it move a little closer or farther.

home: SlideDrawer(
  offsetFromRight: 80.0,
  items: [
    MenuItem('Home', icon: Icons.home, onTap: (){}),
    MenuItem('Project', icon:Icons.rss_feed, onTap: (){}),
    MenuItem('Favourite', icon: Icons.favorite_border, onTap: (){}),
    MenuItem('Profile', icon: Icons.person_outline, onTap: (){}),
    MenuItem('Setting', icon: Icons.settings, onTap: (){}),
  ],
  child: HomePage(),
),

We can also use custom curve and duration. The default values are linear and 300ms. We can specify curveReverse and durationReverse to change curve and duration of animation in the reverse direction.

home: SlideDrawer(
  curve: Curves.easeInOut,
  duration: Duration(milliseconds: 200),
  items: [
    MenuItem('Home', icon: Icons.home, onTap: (){}),
    MenuItem('Project', icon:Icons.rss_feed, onTap: (){}),
    MenuItem('Favourite', icon: Icons.favorite_border, onTap: (){}),
    MenuItem('Profile', icon: Icons.person_outline, onTap: (){}),
    MenuItem('Setting', icon: Icons.settings, onTap: (){}),
  ],
  child: HomePage(),
),

There it is. Have fun!!!

所属分类

依赖

依赖清单 1 项

  • curved_animation_controller^1.1.0+1

源码仓库

使用此插件的项目

暂无相关数据。