Easy EventBus 是一个轻量级、直观的事件总线库,专为 Flutter 应用程序设计,通过事件实现组件间的简单高效通信。它提供优雅的 API 用于发布和订阅事件,避免了紧密耦合,非常适合状态管理和组件间消息传递。该库支持所有主要平台,包括 Android、iOS、Web、macOS、Windows 和 Linux,确保跨平台一致性。通过最少的配置和简洁的语法,它提升了复杂应用中的代码可维护性和可扩展性。
适合场景
实时通知
跨组件通信
UI 与业务逻辑解耦
事件驱动架构
跨屏幕的状态同步
插件或模块集成
主要特点
简单的发布/订阅模式
跨平台支持
最小化样板代码
类型安全的事件处理
轻量级依赖
简洁且可读的 API
适合对象
寻求轻量级状态管理的开发者
频繁组件间通信的应用
需要解耦架构的项目
注重代码简洁性的团队
Flutter 初学者探索事件驱动设计
使用建议
不适合大规模状态管理
有限的内置错误处理
无内置持久化
需要仔细命名事件以避免冲突
最好与其他状态管理解决方案配合使用
原始 README
以下为关联源码仓库的 README 原文快照,最新内容请访问源码仓库。
EasyEventBus
It's an easy-to-use and elegant library based on event bus. It was greatly inspired by EventBus and made much simpler.
About Event Bus
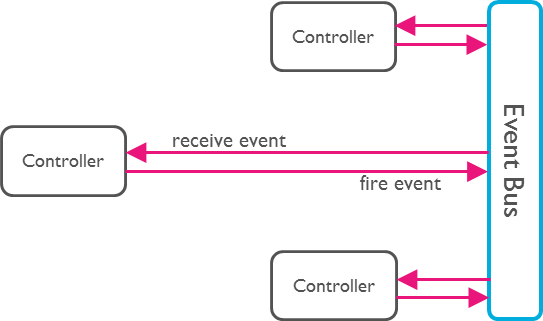
An Event Bus follows the publish/subscribe pattern. It allows listeners to
subscribe for events and publishers to fire events. This enables objects to
interact without requiring to explicitly define listeners and keeping track of
them.
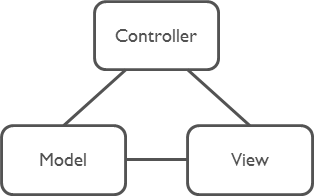
The Event Bus pattern is especially helpful for decoupling MVC
(or MVP) applications.
One group of MVC is not a problem.
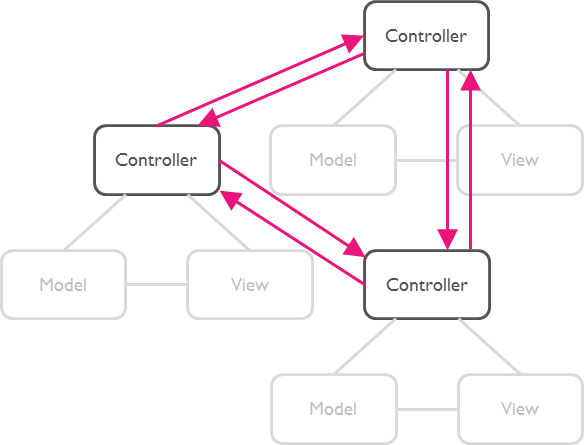
But as soon as there are multiple groups of MVCs, those groups will have to talk
to each other. This creates a tight coupling between the controllers.
By communication through an Event Bus, the coupling is reduced.
Usage
Step 1: Subscribe to an Event
First, set up a subscription for the desired event. This allows you to listen for and react to the event whenever it is triggered.
EasyEventBus.on('sayHello', (event) {
  print(event); // write your code here.
});
Step 2: Trigger the Event
Next, trigger the event at the appropriate time in your application. This will notify all subscribers of the event.
EasyEventBus.fire('sayHello', 'hello world'); // Triggers the event with a any data.
Note: The event data can be of any type, giving you flexibility in what information you pass to the subscribers.
That's All!
Advance
1. Cancel Subscription
To cancel a subscription, you call the cancel method. This example shows how to cancel all subscriptions for the 'sayHello' event, both anonymous and with identifiers.
// Cancel all subscriptions to the 'sayHello' event.EasyEventBus.cancel('sayHello');
2. Cancel Specific Subscription
Before canceling a specific subscription, you first need to create a subscription with an identifier (id). Here is how to subscribe to an event with an id and then cancel that specific subscription by calling the cancel method with the same id.
First, subscribe to an event with an id:
// Subscribe to the 'sayHello' event with an identifier.EasyEventBus.on('sayHello', (event) {
print('Received: $event');
}, id: 'uniqueId123');
Then, cancel the subscription using the same id:
// Cancel the subscription to the 'sayHello' event using the identifier 'uniqueId123'.EasyEventBus.cancel('sayHello', id: 'uniqueId123');
3. Cancel All Subscriptions
You can cancel all subscriptions by calling the cancelAll method. This method cancels all subscriptions for all events and closes all event controllers.
// Cancel all subscriptions and close all event controllers.EasyEventBus.cancelAll();